
大数据实验:Flume 电商日志采集实战(含可视化模拟器)
作者前言:在学习 Flume 时,很多同学往往停留在
conf配置文件上,缺乏对数据流动的直观感受。本文结合 Flume 核心理论 与 前端交互模拟器,带你用“上帝视角”理解大数据采集。
一、为什么需要 Flume?
在大数据生态中,数据通常分散在各个服务器上(Web 日志、App 日志)。我们需要一个工具把这些数据稳定、可靠地搬运到 HDFS 或 HBase 中。
Flume 就是那个“搬运工”。
1.1 传统方案的痛点
-
数据孤岛:数据散落在几百台机器上。
-
不可靠:用
scp或rsync脚本传输,容易丢数据。 -
耦合高:业务代码里混杂着数据上报逻辑。
1.2 Flume 的优势
-
解耦:Source、Channel、Sink 三大组件分离。
-
高可用:支持负载均衡和故障转移。
-
事务保障:Channel 机制保证数据不丢失。
二、Flume 核心架构(必考)
Flume 的运行单元叫 Agent。一个 Agent 就是一个 JVM 进程,内部包含三个核心组件:
|
组件 |
名称 |
作用 |
类比 |
|---|---|---|---|
|
Source |
数据源 |
接收或监听数据 |
快递员收货 |
|
Channel |
通道 |
临时存储数据(缓冲区) |
快递货车 |
|
Sink |
沉槽 |
将数据发送到目的地 |
快递入仓 |
数据流向:
Web Server / Logs → Source → Channel → Sink → HDFS/HBase三、实战模拟:电商用户行为采集
为了让你真正理解 Flume,我开发了一个 “Flume 电商日志采集沙盒”。
你不需要搭建复杂的 Hadoop 环境,直接在浏览器里完成实验。
3.1 实验背景
假设你是电商公司的工程师,需要实时采集用户对商品的点击日志(click.log),并存入 HDFS。
3.2 交互式模拟器
👉 请按照步骤操作下方的模拟器:
-
拖拽组件:从左侧组件库拖出
Source、Channel、Sink到中间区域。 -
选择场景:尝试切换“正常采集”和“Channel 满”两种模式。
-
启动 Agent:点击运行,观察数据流动和日志输出。
💡 实验现象:
正常模式:数据像水流一样顺畅流入 HDFS。
错误模式:Channel 满了之后,数据会丢失(这正是生产环境调优的重点!)。
<div style="border: 2px solid #eee; border-radius: 12px; padding: 20px; background: #f9fafc; margin: 20px 0; box-shadow: 0 4px 12px rgba(0,0,0,0.1);">
<style>
.sim-container { display: grid; grid-template-columns: 220px 1fr 280px; gap: 15px; font-family: 'Microsoft YaHei'; min-height: 550px; }
.sim-panel { background: #fff; border-radius: 8px; padding: 15px; box-shadow: 0 2px 8px rgba(0,0,0,0.05); }
.sim-title { font-weight: bold; border-bottom: 1px solid #eee; padding-bottom: 8px; margin-bottom: 10px; color: #333; }
.component { padding: 10px; margin: 8px 0; border-radius: 6px; cursor: grab; text-align: center; font-weight: bold; color: white; font-size: 14px; }
.source { background: #f39c12; } .channel { background: #27ae60; } .sink { background: #c0392b; }
#sim-canvas { position: relative; min-height: 450px; border: 2px dashed #ccc; border-radius: 8px; background: #fdfdfd; }
.node { position: absolute; padding: 10px; border-radius: 8px; color: white; font-weight: bold; text-align: center; width: 90px; cursor: pointer; font-size: 13px; transition: transform 0.2s; }
.node:hover { transform: scale(1.05); }
#sim-log { background: #2c3e50; color: #ecf0f1; padding: 10px; height: 180px; overflow-y: auto; font-size: 12px; border-radius: 6px; margin-top: 10px; font-family: Consolas; }
.log-info { color: #2ecc71; } .log-error { color: #e74c3c; } .log-warn { color: #f1c40f; }
.btn { width: 100%; padding: 10px; margin-top: 10px; border: none; border-radius: 6px; color: white; font-size: 14px; cursor: pointer; }
.btn-run { background: #27ae60; } .btn-reset { background: #e74c3c; }
.packet { position: absolute; width: 10px; height: 10px; background: gold; border-radius: 50%; box-shadow: 0 0 8px gold; z-index: 100; }
select { width: 100%; padding: 8px; border-radius: 4px; border: 1px solid #ddd; }
</style>

<div class="sim-container">
    <!-- 左:组件库 -->
    <div class="sim-panel">
        <div class="sim-title">🧩 组件库</div>
        <p style="font-size:12px; color:#666;">拖到中间画布</p>
        <div class="component source" draggable="true" ondragstart="event.dataTransfer.setData('type', 'source')">📥 Source</div>
        <div class="component channel" draggable="true" ondragstart="event.dataTransfer.setData('type', 'channel')">🗄️ Channel</div>
        <div class="component sink" draggable="true" ondragstart="event.dataTransfer.setData('type', 'sink')">📤 Sink</div>
    </div>

    <!-- 中:画布 -->
    <div class="sim-panel">
        <div class="sim-title">🏗️ Flume Agent 设计区</div>
        <div id="sim-canvas" ondragover="event.preventDefault()" ondrop="drop(event)">
            <p style="text-align:center; color:#aaa; margin-top: 40px;">将组件拖到这里</p>
        </div>
    </div>

    <!-- 右:控制面板 -->
    <div class="sim-panel">
        <div class="sim-title">⚙️ 实验控制台</div>
        <label>选择场景:</label>
        <select id="scenario">
            <option value="normal">✅ 正常采集 (Memory)</option>
            <option value="safe">✅ 高可靠 (File Channel)</option>
            <option value="error">❌ Channel 满 (数据丢失)</option>
        </select>
        <button class="btn btn-run" onclick="runFlume()">▶️ 启动 Agent</button>
        <button class="btn btn-reset" onclick="resetSim()">🔄 重置</button>
        <div class="sim-title" style="margin-top:15px;">📜 运行日志</div>
        <div id="sim-log"><div>> 等待实验开始...</div></div>
    </div>
</div>

<script>
let nodes = [];
const canvas = document.getElementById('sim-canvas');
const logDiv = document.getElementById('sim-log');

function drop(e) {
    e.preventDefault();
    const type = e.dataTransfer.getData('type');
    const colors = { source: '#f39c12', channel: '#27ae60', sink: '#c0392b' };
    const names = { source: 'Source', channel: 'Channel', sink: 'Sink' };

    const div = document.createElement('div');
    div.className = 'node';
    div.style.left = (e.offsetX - 45) + 'px';
    div.style.top = (e.offsetY - 30) + 'px';
    div.style.background = colors[type];
    div.innerText = names[type];
    canvas.appendChild(div);
    nodes.push(div);
}

function log(msg, cls = 'log-info') {
    const time = new Date().toLocaleTimeString();
    logDiv.innerHTML += `<div class="${cls}">[${time}] ${msg}</div>`;
    logDiv.scrollTop = logDiv.scrollHeight;
}

function runFlume() {
    if (nodes.length < 3) {
        log('❌ 错误:请放置 Source、Channel、Sink 各一个!', 'log-error');
        return;
    }
    log('🚀 Flume Agent 启动...', 'log-info');

    const scenario = document.getElementById('scenario').value;
    let packets = (scenario === 'error') ? 8 : 5;
    if(scenario === 'error') log('⚠️ 警告:Channel 容量仅 3,即将溢出!', 'log-warn');

    let sent = 0;
    const timer = setInterval(() => {
        if (sent >= packets) { clearInterval(timer); log('✅ 实验结束', 'log-info'); return; }

        // 动画
        const p = document.createElement('div');
        p.className = 'packet';
        p.style.left = (nodes[0].offsetLeft + 40) + 'px';
        p.style.top = (nodes[0].offsetTop + 40) + 'px';
        canvas.appendChild(p);
        setTimeout(() => { p.style.left = (nodes[1].offsetLeft + 40) + 'px'; p.style.top = (nodes[1].offsetTop + 40) + 'px'; }, 400);
        setTimeout(() => { p.style.left = (nodes[2].offsetLeft + 40) + 'px'; p.style.top = (nodes[2].offsetTop + 40) + 'px'; }, 800);
        setTimeout(() => p.remove(), 1200);

        sent++;
        log(`📦 日志 ${sent} 写入 HDFS`, 'log-info');

        if (scenario === 'error' && sent > 3) {
            log('❌ Channel Full! 数据丢失!', 'log-error');
            clearInterval(timer);
        }
    }, 700);
}

function resetSim() {
    canvas.innerHTML = '<p style="text-align:center; color:#aaa; margin-top: 40px;">将组件拖到这里</p>';
    nodes = [];
    logDiv.innerHTML = '<div>> 实验已重置...</div>';
}
</script>
</div>
<!-- 复制到这结束 -->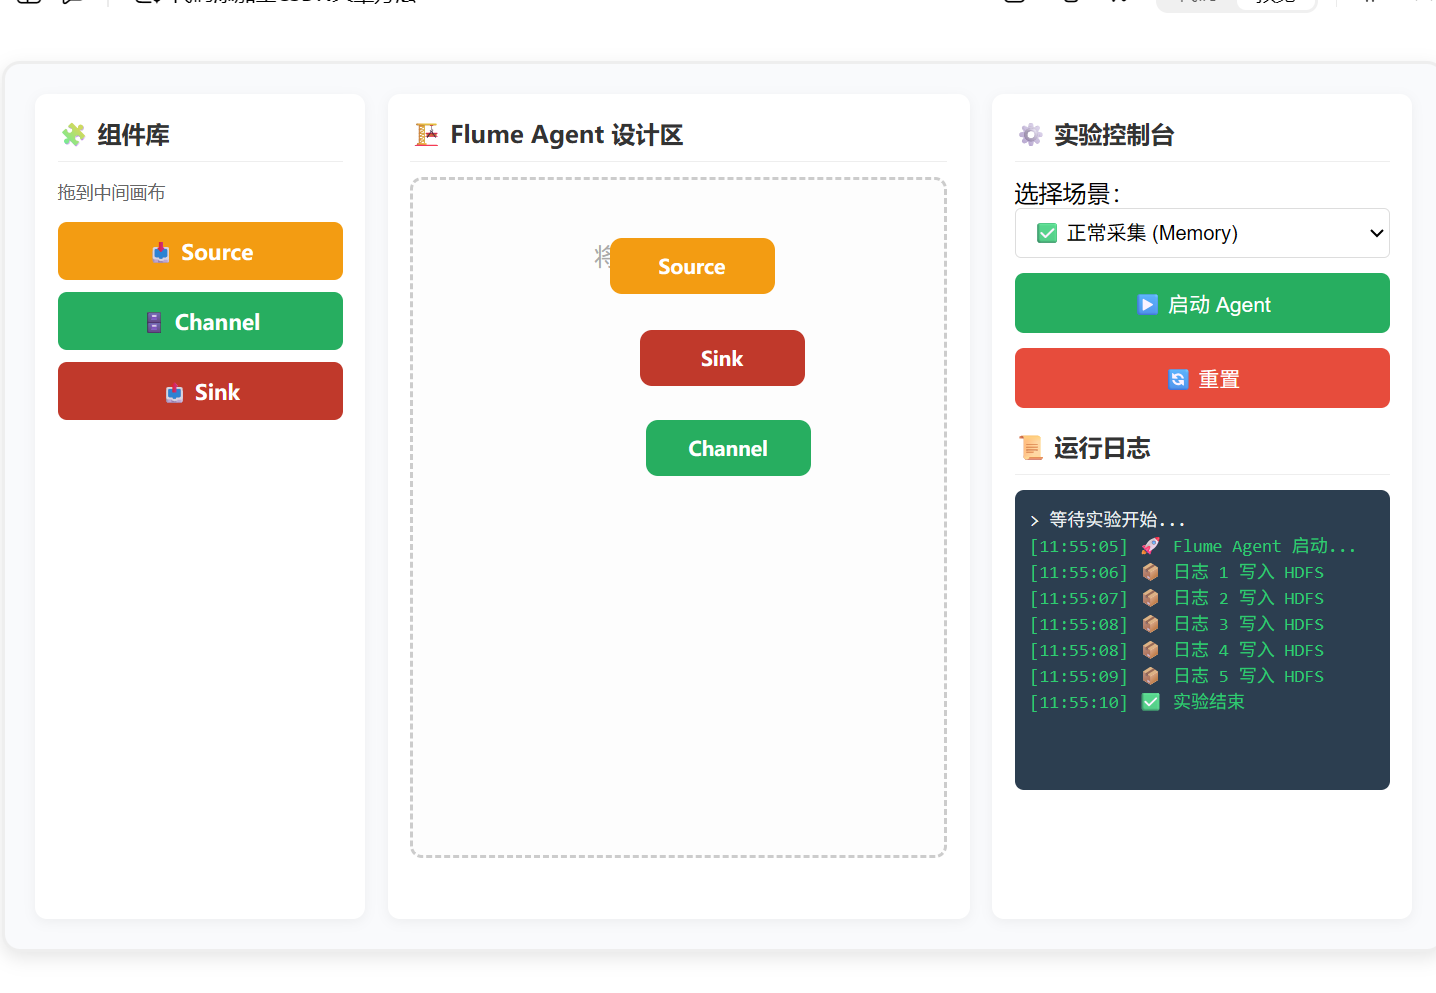
四、面试与考试高频考点
通过上面的实验,你应该能深刻理解以下概念:
-
Flume 会丢数据吗?
-
Memory Channel:Agent 挂掉,数据丢失(快但不稳)。
-
File Channel:数据落盘,Agent 重启数据不丢(慢但稳)。
-
-
Channel 的作用是什么?
-
解耦 Source 和 Sink。
-
起到削峰填谷的作用(防止 Sink 忙不过来导致数据丢失)。
-
-
Flume 和 Kafka 的区别?
-
Flume:侧重于数据的采集和搬运(管道)。
-
Kafka:侧重于高吞吐的消息存储和分发(缓冲池)。
-
实战组合:
Flume Source -> Kafka -> Flume Sink。
-
五、总结
Flume 是大数据生态的“血管”,负责将血液(数据)输送到各个器官(计算引擎)。
通过这个模拟器,希望你不再死记硬背 xxx.conf配置文件,而是真正理解 Agent 内部的运作机制。
如果觉得这个模拟器对你有帮助,欢迎 点赞 👍、收藏 ⭐、关注 🚀,后续我会推出更多大数据组件的可视化教程!

电商企业物流数字化转型必备!快递鸟 API 接口,72 小时快速完成物流系统集成。全流程实战1V1指导,营造开放的API技术生态圈。
更多推荐


 7
7 0
0- 0


 已为社区贡献1条内容

所有评论(0)