
小兔鲜电商项目(三):详情页
目录
整体业务
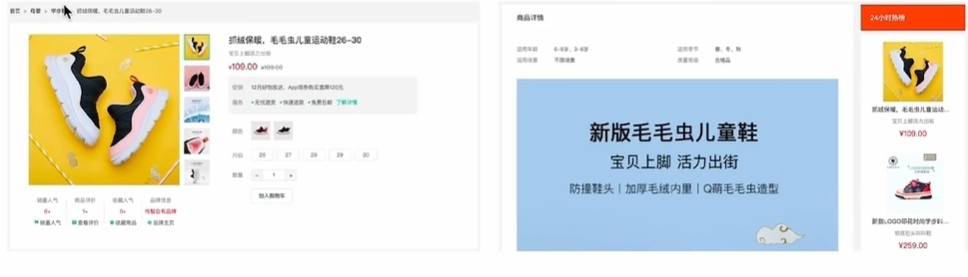
路由配置
步骤:创建详情组件---绑定路由关系---绑定模板测试跳转
在views中创建Detail文件夹,创建index.vue文件:
<script setup>
</script>
<template>
<div class="xtx-goods-page">
<div class="container">
<div class="bread-container">
<el-breadcrumb separator=">">
<el-breadcrumb-item :to="{ path: '/' }">首页</el-breadcrumb-item>
<el-breadcrumb-item :to="{ path: '/' }">母婴
</el-breadcrumb-item>
<el-breadcrumb-item :to="{ path: '/' }">跑步鞋
</el-breadcrumb-item>
<el-breadcrumb-item>抓绒保暖,毛毛虫子儿童运动鞋</el-breadcrumb-item>
</el-breadcrumb>
</div>
<!-- 商品信息 -->
<div class="info-container">
<div>
<div class="goods-info">
<div class="media">
<!-- 图片预览区 -->
<!-- 统计数量 -->
<ul class="goods-sales">
<li>
<p>销量人气</p>
<p> 100+ </p>
<p><i class="iconfont icon-task-filling"></i>销量人气</p>
</li>
<li>
<p>商品评价</p>
<p>200+</p>
<p><i class="iconfont icon-comment-filling"></i>查看评价</p>
</li>
<li>
<p>收藏人气</p>
<p>300+</p>
<p><i class="iconfont icon-favorite-filling"></i>收藏商品</p>
</li>
<li>
<p>品牌信息</p>
<p>400+</p>
<p><i class="iconfont icon-dynamic-filling"></i>品牌主页</p>
</li>
</ul>
</div>
<div class="spec">
<!-- 商品信息区 -->
<p class="g-name"> 抓绒保暖,毛毛虫儿童鞋 </p>
<p class="g-desc">好穿 </p>
<p class="g-price">
<span>200</span>
<span> 100</span>
</p>
<div class="g-service">
<dl>
<dt>促销</dt>
<dd>12月好物放送,App领券购买直降120元</dd>
</dl>
<dl>
<dt>服务</dt>
<dd>
<span>无忧退货</span>
<span>快速退款</span>
<span>免费包邮</span>
<a href="javascript:;">了解详情</a>
</dd>
</dl>
</div>
<!-- sku组件 -->
<!-- 数据组件 -->
<!-- 按钮组件 -->
<div>
<el-button size="large" class="btn">
加入购物车
</el-button>
</div>
</div>
</div>
<div class="goods-footer">
<div class="goods-article">
<!-- 商品详情 -->
<div class="goods-tabs">
<nav>
<a>商品详情</a>
</nav>
<div class="goods-detail">
<!-- 属性 -->
<ul class="attrs">
<li v-for="item in 3" :key="item.value">
<span class="dt">白色</span>
<span class="dd">纯棉</span>
</li>
</ul>
<!-- 图片 -->
</div>
</div>
</div>
<!-- 24热榜+专题推荐 -->
<div class="goods-aside">
</div>
</div>
</div>
</div>
</div>
</div>
</template>
<style scoped lang='scss'>
.xtx-goods-page {
.goods-info {
min-height: 600px;
background: #fff;
display: flex;
.media {
width: 580px;
height: 600px;
padding: 30px 50px;
}
.spec {
flex: 1;
padding: 30px 30px 30px 0;
}
}
.goods-footer {
display: flex;
margin-top: 20px;
.goods-article {
width: 940px;
margin-right: 20px;
}
.goods-aside {
width: 280px;
min-height: 1000px;
}
}
.goods-tabs {
min-height: 600px;
background: #fff;
}
.goods-warn {
min-height: 600px;
background: #fff;
margin-top: 20px;
}
.number-box {
display: flex;
align-items: center;
.label {
width: 60px;
color: #999;
padding-left: 10px;
}
}
.g-name {
font-size: 22px;
}
.g-desc {
color: #999;
margin-top: 10px;
}
.g-price {
margin-top: 10px;
span {
&::before {
content: "¥";
font-size: 14px;
}
&:first-child {
color: $priceColor;
margin-right: 10px;
font-size: 22px;
}
&:last-child {
color: #999;
text-decoration: line-through;
font-size: 16px;
}
}
}
.g-service {
background: #f5f5f5;
width: 500px;
padding: 20px 10px 0 10px;
margin-top: 10px;
dl {
padding-bottom: 20px;
display: flex;
align-items: center;
dt {
width: 50px;
color: #999;
}
dd {
color: #666;
&:last-child {
span {
margin-right: 10px;
&::before {
content: "•";
color: $xtxColor;
margin-right: 2px;
}
}
a {
color: $xtxColor;
}
}
}
}
}
.goods-sales {
display: flex;
width: 400px;
align-items: center;
text-align: center;
height: 140px;
li {
flex: 1;
position: relative;
~li::after {
position: absolute;
top: 10px;
left: 0;
height: 60px;
border-left: 1px solid #e4e4e4;
content: "";
}
p {
&:first-child {
color: #999;
}
&:nth-child(2) {
color: $priceColor;
margin-top: 10px;
}
&:last-child {
color: #666;
margin-top: 10px;
i {
color: $xtxColor;
font-size: 14px;
margin-right: 2px;
}
&:hover {
color: $xtxColor;
cursor: pointer;
}
}
}
}
}
}
.goods-tabs {
min-height: 600px;
background: #fff;
nav {
height: 70px;
line-height: 70px;
display: flex;
border-bottom: 1px solid #f5f5f5;
a {
padding: 0 40px;
font-size: 18px;
position: relative;
>span {
color: $priceColor;
font-size: 16px;
margin-left: 10px;
}
}
}
}
.goods-detail {
padding: 40px;
.attrs {
display: flex;
flex-wrap: wrap;
margin-bottom: 30px;
li {
display: flex;
margin-bottom: 10px;
width: 50%;
.dt {
width: 100px;
color: #999;
}
.dd {
flex: 1;
color: #666;
}
}
}
>img {
width: 100%;
}
}
.btn {
margin-top: 20px;
}
.bread-container {
padding: 25px 0;
}
</style>
在router/index.js中配置二级路由
{
          path: 'detail/:id',
          component: Detail
        }
在views/Home/components/HomeNew.vue中拼接
<RouterLink :to="`/detail/${item.id}`">
<img :src="item.picture" alt="" />
<p class="name">{{ item.name }}</p>
<p class="price">¥{{ item.price }}</p>
</RouterLink>基础数据渲染
步骤:封装函数---调用获取函数---渲染模板
在apis文件夹中创建details.js文件
import http from '@/utils/http'

export const getDetail = (id) => {
  return http({
    url: '/goods',
    params: {
      id
    }
  })
}
在views/Detail/index.vue中获取数据
<script setup>
import {getDetail} from '@/apis/detail'
import {onMounted,ref} from 'vue'
import {useRoute} from 'vue-router'

const goods=ref({})
const route=useRoute()
const getGoods=async()=>{
  const res=await getDetail(route.params.id)
  goods.value=res.result
}
onMounted(() => getGoods())
</script>
渲染数据:
        <div class="container" v-if="goods.details">
            <div class="bread-container">
                <el-breadcrumb separator=">">
                    <el-breadcrumb-item :to="{ path: '/' }">首页</el-breadcrumb-item>
                    <!--
                      易错点:goods初始为空对象 {}.categories -> undefined -> undefined[1]
                      解决办法:1.可选链语法?. 2.v-if手动控制渲染时机 保证只有数据存在才渲染
                     -->
                    <el-breadcrumb-item :to="{ path: `/category/${goods.categories[1].id}` }">{{goods.categories[1].name}}
                    </el-breadcrumb-item>
                    <el-breadcrumb-item :to="{ path: `/category/sub/${goods.categories[0].id}` }">{{goods.categories[0].name}}
                    </el-breadcrumb-item>
                    <el-breadcrumb-item>{{ goods.name }}</el-breadcrumb-item>
                </el-breadcrumb>
            </div>
            <!-- 商品信息 -->
            <div class="info-container">
                <div>
                    <div class="goods-info">
                        <div class="media">
                            <!-- 图片预览区 -->

                            <!-- 统计数量 -->
                            <ul class="goods-sales">
                                <li>
                                    <p>销量人气</p>
                                    <p> {{ goods.salesCount }}+ </p>
                                    <p><i class="iconfont icon-task-filling"></i>销量人气</p>
                                </li>
                                <li>
                                    <p>商品评价</p>
                                    <p>{{goods.commentCount}}+</p>
                                    <p><i class="iconfont icon-comment-filling"></i>查看评价</p>
                                </li>
                                <li>
                                    <p>收藏人气</p>
                                    <p>{{goods.collectCount}}+</p>
                                    <p><i class="iconfont icon-favorite-filling"></i>收藏商品</p>
                                </li>
                                <li>
                                    <p>品牌信息</p>
                                    <p>{{goods.brand.name}}+</p>
                                    <p><i class="iconfont icon-dynamic-filling"></i>品牌主页</p>
                                </li>
                            </ul>
                        </div>
                        <div class="spec">
                            <!-- 商品信息区 -->
                            <p class="g-name"> {{ goods.name }} </p>
                            <p class="g-desc">{{ goods.desc }} </p>
                            <p class="g-price">
                                <span>{{ goods.oldPrice }}</span>
                                <span> {{ goods.price }}</span>
                            </p>
                            <div class="g-service">
                                <dl>
                                    <dt>促销</dt>
                                    <dd>12月好物放送,App领券购买直降120元</dd>
                                </dl>
                                <dl>
                                    <dt>服务</dt>
                                    <dd>
                                        <span>无忧退货</span>
                                        <span>快速退款</span>
                                        <span>免费包邮</span>
                                        <a href="javascript:;">了解详情</a>
                                    </dd>
                                </dl>
                            </div>
                            <!-- sku组件 -->

                            <!-- 数据组件 -->

                            <!-- 按钮组件 -->
                            <div>
                                <el-button size="large" class="btn">
                                    加入购物车
                                </el-button>
                            </div>

                        </div>
                    </div>
                    <div class="goods-footer">
                        <div class="goods-article">
                            <!-- 商品详情 -->
                            <div class="goods-tabs">
                                <nav>
                                    <a>商品详情</a>
                                </nav>
                                <div class="goods-detail">
                                    <!-- 属性 -->
                                    <ul class="attrs">
                                        <li v-for="item in goods.details.properties" :key="item.value">
                                            <span class="dt">{{ item.name }}</span>
                                            <span class="dd">{{ item.value }}</span>
                                        </li>
                                    </ul>
                                    <!-- 图片 -->
                                    <img v-for="img in goods.details.pictures" :src="img" :key="img" alt="">
                                </div>
                            </div>
                        </div>
                        <!-- 24热榜+专题推荐 -->
                        <div class="goods-aside">

                        </div>
                    </div>
                </div>
            </div>
        </div>
?.可选链做法:
<div class="bread-container">
    <el-breadcrumb separator=">">
        <el-breadcrumb-item :to="{ path: '/' }">首页</el-breadcrumb-item>
        <!--
            易错点:goods一开始没有数据
            解决办法:1.可选链语法?. 2.v-if手动控制渲染时机 保证只有数据存在才渲染
        -->
        <el-breadcrumb-item :to="{ path: `/category/${goods.categories?.[1].id}` }">{{goods.categories?.[1].name}}
        </el-breadcrumb-item>
        <el-breadcrumb-item :to="{ path: `/category/sub/${goods.categories?.[0].id}` }">{{ goods.categories?.[0].name }}
        </el-breadcrumb-item>
        <el-breadcrumb-item>抓绒保暖,毛毛虫子儿童运动鞋</el-breadcrumb-item>
    </el-breadcrumb>
</div>
热榜区实现
整体分析
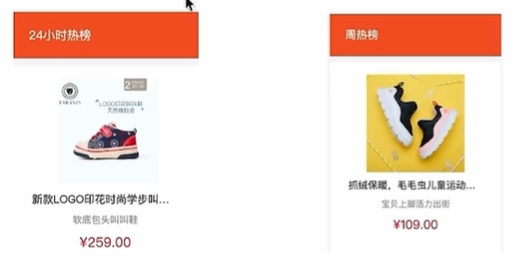
两块热榜相比:结构一致,标题和内容不用
步骤:封装Hot组件---获取渲染数据(以24小时热度为准)---适配不同标题---适配不同列表内容
基础组件封装
在views/Detail/components中创建DetailHot.vue文件:
<script setup>
</script>
<template>
<div class="goods-hot">
<h3>周日榜单</h3>
<!-- 商品区块 -->
<RouterLink to="/" class="goods-item" v-for="item in 3" :key="item.id">
<img :src="item.picture" alt="" />
<p class="name ellipsis">一双男鞋</p>
<p class="desc ellipsis">一双好穿的男鞋</p>
<p class="price">¥200.00</p>
</RouterLink>
</div>
</template>
<style scoped lang="scss">
.goods-hot {
h3 {
height: 70px;
background: $helpColor;
color: #fff;
font-size: 18px;
line-height: 70px;
padding-left: 25px;
margin-bottom: 10px;
font-weight: normal;
}
.goods-item {
display: block;
padding: 20px 30px;
text-align: center;
background: #fff;
width: 280px;
img {
width: 160px;
height: 160px;
}
p {
padding-top: 10px;
}
.name {
font-size: 16px;
}
.desc {
color: #999;
height: 29px;
}
.price {
color: $priceColor;
font-size: 20px;
}
}
}
</style>
在views/Detail/components/index.vue中导入
import DetailHot from './components/DetailHot.vue'<div class="goods-aside">
<!-- 24小时 -->
<DetailHot/>
<!-- 一周 -->
<DetailHot/>
</div>在src/apis/detail.js中
/**
 * 获取热榜商品
 * @param {Number} id - 商品id
 * @param {Number} type - 1代表24小时热销榜 2代表周热销榜
 * @param {Number} limit - 获取个数
 */
export const getHotGoodsAPI = ({ id, type, limit = 3 }) => {
  return http({
    url: '/goods/hot',
    params: {
      id,
      type,
      limit
    }
  })
}
在views/Detail/components/DetailHot.vue中获取数据
<script setup>
import {getHotGoodsAPI} from '@/apis/detail'
import { onMounted,ref } from 'vue'
import { useRoute } from 'vue-router'
// 24小时热榜
const hotList=ref([])
const route=useRoute()
const getHotList=async()=>{
  const res=await getHotGoodsAPI({
    id:route.params.id,
    type:1
  })
  hotList.value=res.result
}
onMounted(()=>getHotList())

</script>
此时在浏览器中检查-->network中,我们会发现有两个hot请求,这是因为我们用了两次组件

渲染数据
在views/Detail/components/DetailHot.vue中渲染数据
<template>
<div class="goods-hot">
<h3>周日榜单</h3>
<!-- 商品区块 -->
<RouterLink to="/" class="goods-item" v-for="item in 3" :key="item.id">
<img :src="item.picture" alt="" />
<p class="name ellipsis">{{ item.name }}</p>
<p class="desc ellipsis">{{ item.desc }}</p>
<p class="price">¥{{ item.price }}</p>
</RouterLink>
</div>
</template>适配不同title和数据列表
由于日热榜和周热播,结构一致,标题和列表内容不同,适配不同标题和数据列表,使用时传入参数,定义props,渲染数据
                        <!-- 24热榜+专题推荐 -->
                        <div class="goods-aside">
                            <!-- 24小时 -->
                            <DetailHot :hot-type="1"/>
                            <!-- 一周 -->
                            <DetailHot :hot-type="2"/>
                        </div>
//设计props参数 适配不同的title和数据
const props=defineProps({
hotType: {
type:Number
}
})
// 适配title 1-24小时热榜 2-周热榜
const TYPEMAP={
1:'24小时热榜',
2:'周热榜'
}
const title=ref(TYPEMAP[props.hotType])
......
const getHotList=async()=>{
const res=await getHotGoodsAPI({
id:route.params.id,
type:props.hotType
})
hotList.value=res.result
}图片预览组件
小图切换大图显示
思路:维护一个数组图片列表,鼠标划入小图记录当前小图下标值,通过下标值在数组中取对应图片,显示到大图位置。
创建src/components/ImageView/index.vue文件,并导入模板代码:
<script setup>
// 图片列表
const imageList = [
  "https://yanxuan-item.nosdn.127.net/d917c92e663c5ed0bb577c7ded73e4ec.png",
  "https://yanxuan-item.nosdn.127.net/e801b9572f0b0c02a52952b01adab967.jpg",
  "https://yanxuan-item.nosdn.127.net/b52c447ad472d51adbdde1a83f550ac2.jpg",
  "https://yanxuan-item.nosdn.127.net/f93243224dc37674dfca5874fe089c60.jpg",
  "https://yanxuan-item.nosdn.127.net/f881cfe7de9a576aaeea6ee0d1d24823.jpg"
]
</script>

<template>
  <div class="goods-image">
    <!-- 左侧大图-->
    <div class="middle" ref="target">
      <img :src="imageList[0]" alt="" />
      <!-- 蒙层小滑块 -->
      <div class="layer" :style="{ left: `0px`, top: `0px` }"></div>
    </div>
    <!-- 小图列表 -->
    <ul class="small">
      <li v-for="(img, i) in imageList" :key="i">
        <img :src="img" alt="" />
      </li>
    </ul>
    <!-- 放大镜大图 -->
    <div class="large" :style="[
      {
        backgroundImage: `url(${imageList[0]})`,
        backgroundPositionX: `0px`,
        backgroundPositionY: `0px`,
      },
    ]" v-show="false"></div>
  </div>
</template>

<style scoped lang="scss">
.goods-image {
  width: 480px;
  height: 400px;
  position: relative;
  display: flex;

  .middle {
    width: 400px;
    height: 400px;
    background: #f5f5f5;
  }

  .large {
    position: absolute;
    top: 0;
    left: 412px;
    width: 400px;
    height: 400px;
    z-index: 500;
    box-shadow: 0 0 10px rgba(0, 0, 0, 0.1);
    background-repeat: no-repeat;
    // 背景图:盒子的大小 = 2:1  将来控制背景图的移动来实现放大的效果查看 background-position
    background-size: 800px 800px;
    background-color: #f8f8f8;
  }

  .layer {
    width: 200px;
    height: 200px;
    background: rgba(0, 0, 0, 0.2);
    // 绝对定位 然后跟随咱们鼠标控制left和top属性就可以让滑块移动起来
    left: 0;
    top: 0;
    position: absolute;
  }

  .small {
    width: 80px;

    li {
      width: 68px;
      height: 68px;
      margin-left: 12px;
      margin-bottom: 15px;
      cursor: pointer;

      &:hover,
      &.active {
        border: 2px solid $xtxColor;
      }
    }
  }
}
</style>
在详情页引入组件
import ImageView from '@/components/ImageView/index.vue'在对应位置渲染
<!-- 图片预览区 -->
<ImageView/>
当我们鼠标移动到小图时,左侧大图显示对应的商品
    <!-- 左侧大图-->
    <div class="middle" ref="target">
      <img :src="imageList[activeIndex]" alt="" />
      <!-- 蒙层小滑块 -->
      <div class="layer" :style="{ left: `0px`, top: `0px` }"></div>
</div>此时,我们会发现当我们移动鼠标且不在小图区域时,左侧大图商品显示,但是小图没有处于激活状态,因此我们可以使用:class动态控制active类名,当下标值和当前激活的index相等激活小图
    <!-- 小图列表 -->
    <ul class="small">
      <li v-for="(img, i) in imageList" :key="i" @mouseenter="enterhandler(i)" :class="{active:activeIndex===i}">
        <img :src="img" alt="" />
      </li>
    </ul>
放大镜功能:左侧滑块会跟随鼠标移动;右侧大图放大左侧滑块中的图;鼠标移入控制滑块和大图显示隐藏
放大镜---滑块跟随移动
思路:获取到当前的鼠标在盒子内的相对位置(useMouseInElement),控制滑块跟随鼠标移动(left/top)
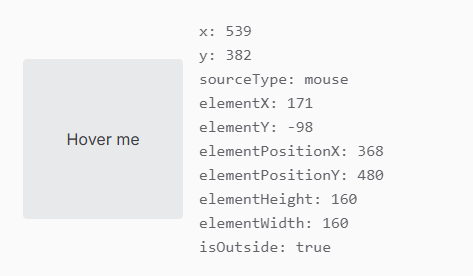
elementX:鼠标相对盒子左侧的位置 elementY:鼠标相对盒子顶部的位置
isOutside:鼠标是否在盒子内 true:在盒子外 false:在盒子内
有效移动范围内的计算逻辑:
横向:100<elementX<300,left=elementX - 小滑块宽度一半
纵向:100<elementY<300,top=elementY - 小滑块高度一半
边界距离控制
横向:elementX>300(left=200) elementX<100(left=0)
纵向:elementY>300(top=200) elementY<100(top=0)
参考vueuse导入useMouseInElement
// 获取鼠标相对位置
const target = ref(null)
const { elementX, elementY, isOutside } = useMouseInElement(target)

// 控制滑块跟随鼠标移动(监听elementX/Y变化,一旦变化 重新设置left/top)
const left=ref(0)
const top=ref(0)
watch([elementX,elementY],()=>{
  // 有效距离
  if(elementX.value>100 && elementX.value<300){
    left.value=elementX.value-100
  }
  if(elementY.value>100 && elementY.value<300){
    top.value=elementY.value-100
  }
  // 边界距离
  if(elementX.value>300){left.value=200}
  if(elementX.value<100){left.value=0}

  if(elementY.value>300){top.value=200}
  if(elementY.value<100){top.value=0}
})
<!-- 左侧大图-->
<div class="middle" ref="target">
<img :src="imageList[activeIndex]" alt="" />
<!-- 蒙层小滑块 -->
<div class="layer" :style="{ left: `${left}px`, top: `${top}px` }"></div>
</div>放大镜---大图效果实现
思路:大图的移动方向和滑块移动方向相反,且数值为2倍
const positionX = ref(0)
const positionY = ref(0)
watch([elementX,elementY],()=>{
  // 有效距离
  if(elementX.value>100 && elementX.value<300){
    left.value=elementX.value-100
  }
  if(elementY.value>100 && elementY.value<300){
    top.value=elementY.value-100
  }
  // 边界距离
  if(elementX.value>300){left.value=200}
  if(elementX.value<100){left.value=0}

  if(elementY.value>300){top.value=200}
  if(elementY.value<100){top.value=0}

  // 控制大图显示
  positionX.value = -left.value * 2
  positionY.value = -top.value * 2
})
<!-- 左侧大图-->
<div class="middle" ref="target">
<img :src="imageList[activeIndex]" alt="" />
<!-- 蒙层小滑块 -->
<div class="layer" v-show="!isOutside" :style="{ left: `${left}px`, top: `${top}px` }"></div>
</div>
<!-- 小图列表 -->
<ul class="small">
<li v-for="(img, i) in imageList" :key="i" @mouseenter="enterhandler(i)" :class="{active:activeIndex===i}">
<img :src="img" alt="" />
</li>
</ul>
<!-- 放大镜大图 -->
<div class="large" :style="[
{
backgroundImage: `url(${imageList[activeIndex]})`,
backgroundPositionX: `${positionX}px`,
backgroundPositionY: `${positionY}px`,
},
]" v-show="!isOutside"></div>优化:我们会发现不管鼠标有没有在盒子内,都会执行后面的逻辑
watch([elementX,elementY,isOutside],()=>{
  //如果鼠标没有移入盒子里,直接不执行后面的逻辑
  if(isOutside.value)return
  // 有效距离
  if(elementX.value>100 && elementX.value<300){
    left.value=elementX.value-100
  }
  if(elementY.value>100 && elementY.value<300){
    top.value=elementY.value-100
  }
  // 边界距离
  if(elementX.value>300){left.value=200}
  if(elementX.value<100){left.value=0}

  if(elementY.value>300){top.value=200}
  if(elementY.value<100){top.value=0}

  // 控制大图显示
  positionX.value = -left.value * 2
  positionY.value = -top.value * 2
})
组件props适配
组件中的图片列表是不能写死的,需要通过props参数把接口数据传入
//props适配图片列表
defineProps({
  imageList:{
    type:Array,
    dafault:()=>{}
  }
})
<!-- 图片预览区 -->
<ImageView :image-list="goods.mainPictures"/>SKU组件熟悉使用
SKU:存货单位(英语:stock keeping unit,SKU/,es,keju:/),也翻译为库存单元,是一个会计学名词,定义为库存管理中的最小可用单元,例如纺织品中一个SKU通常表示规格、颜色、款式,而在连锁零售门店中有时称单品为一个 SKU。
SKU组件的作用:产出当前用户选择的商品规格,为加入购物车操作提供数据信息。
熟悉一个三方组件,首先重点看props和emit,props决定了当前组件接收什么数据,emit决定了会产出什么数据。
验证组件是否成功使用:传入必要数据是否交互功能正常;点击选择规格,是否正常产出数据。
导入 src\components\XtxSku 组件:
import XtxSku from '@/components/XtxSku/index.vue'

// sku规格被操作时
const skuChange=(sku)=>{
    console.log(sku)

}
<!-- sku组件 -->
<XtxSku :goods="goods" @change="skuChange" />通用组件统一注册全局
components目录下有可能还会有很多其他通用型组件有可能在多个业务模块中共享,所有统一进行全局组件注册比较好
思路:把components目录下的所有组件进行全局注册;在main.js中注册插件
在src/components目录下创建index.js
// 把components目录下的所有组件进行全局注册
import ImageView from './ImageView/index.vue'
import Sku from './XtxSku/index.vue'
export const componentPlugin = {
  install(app) {
    // app.component('组件名字', 组件配置对象)
    app.component('XtxImageView', ImageView)
    app.component('XtxSku', Sku)

  }
}
在main.js中注册插件
import { componentPlugin } from '@/components/index'

app.use(componentPlugin)
电商企业物流数字化转型必备!快递鸟 API 接口,72 小时快速完成物流系统集成。全流程实战1V1指导,营造开放的API技术生态圈。
更多推荐


 17
17 0
0- 0


 已为社区贡献6条内容

所有评论(0)