
Spring Boot 4 + Thymeleaf 电商主题实战 阶段三:表单、布局与页面复用
Spring Boot 4 + Thymeleaf 电商主题实战 阶段三:表单、布局与页面复用
学习目标: 掌握 Thymeleaf 的核心语法和动态页面渲染能力。
第12章:表单与校验 th:field / @Valid / BindingResult —— 商品新增表单
章节目标
通过本章学习,你将能够:
- 掌握
th:field绑定表单字段到 Java 对象属性 - 理解
@Valid+BindingResult的表单校验流程 - 使用 Jakarta Validation 注解(
@NotBlank/@Positive/@Size)定义校验规则 - 在模板中显示校验错误并保留用户输入值
- 实现完整的"显示表单 → 提交 → 校验 → 成功/失败"流程
理论知识
Spring MVC + Thymeleaf 的表单处理流程:
-
th:object="${formObject}":绑定表单对象(Command Object)- 通常是 Controller 中的 POJO,字段对应表单字段
- 后续
th:field都基于这个对象
-
th:field="*{property}":绑定表单字段到对象属性*表示相对th:object的路径- 自动生成
name、id、value属性name:表单提交时作为参数名id:用于<label for="...">关联value:提交失败时回显用户输入的值
-
th:action="@{/url}":表单提交目标 URL@{}是 Thymeleaf 的 URL 表达式,自动处理上下文路径
-
th:errors="*{property}":显示字段的校验错误- 显示该字段的所有错误信息
- 配合
th:if="${#fields.hasErrors('property')}"条件判断是否显示
-
@Valid+BindingResult:校验流程@Valid触发 Jakarta Validation 对表单对象校验BindingResult收集所有校验错误,供模板显示- 若
bindingResult.hasErrors()为 true,返回表单视图(保留用户输入)
本章演示商品新增表单:用户填写名称、分类、价格、库存、描述,提交后系统校验,若通过显示成功页面,否则返回表单并显示错误。
项目结构
chapter12-form/
├── pom.xml
├── src/main/java/com/lihaozhe/ch12/
│   ├── Ch12Application.java
│   └── controller/
│       └── ProductFormController.java
└── src/main/resources/
    ├── application.yml
    └── templates/
        ├── form.html
        └── success.html
完整代码
pom.xml
<?xml version="1.0" encoding="UTF-8"?>
<!--
  第12章:表单与校验 th:field / @Valid / BindingResult —— 商品新增表单

  本章依赖:
  - spring-boot-starter-webmvc:Spring Boot 4.x 的 Web 启动器
  - spring-boot-starter-thymeleaf:模板引擎启动器(核心依赖)
  - spring-boot-starter-test:单元测试(备用)
  - jakarta.validation:jakarta.validation-api:Jakarta Validation 约束注解(@NotBlank / @Positive 等)
-->
<project xmlns="http://maven.apache.org/POM/4.0.0"
         xmlns:xsi="http://www.w3.org/2001/XMLSchema-instance"
         xsi:schemaLocation="http://maven.apache.org/POM/4.0.0 https://maven.apache.org/xsd/maven-4.0.0.xsd">
    <modelVersion>4.0.0</modelVersion>

    <!-- 继承教程根工程,共享版本管理 -->
    <parent>
        <groupId>com.lihaozhe</groupId>
        <artifactId>sb-thymeleaf</artifactId>
        <version>1.0.0</version>
    </parent>

    <artifactId>chapter12-form</artifactId>
    <!-- Web 应用打成可执行 jar,内嵌 Tomcat,java -jar 直接跑 -->
    <packaging>jar</packaging>

    <dependencies>
        <!-- Web 启动器(Boot 4 重命名后的名称) -->
        <dependency>
            <groupId>org.springframework.boot</groupId>
            <artifactId>spring-boot-starter-webmvc</artifactId>
        </dependency>
        <!-- Thymeleaf 模板引擎:服务端渲染 HTML -->
        <dependency>
            <groupId>org.springframework.boot</groupId>
            <artifactId>spring-boot-starter-thymeleaf</artifactId>
        </dependency>
        <!-- Jakarta Validation:提供 @NotBlank / @Positive 等约束注解 -->
        <dependency>
            <groupId>org.springframework.boot</groupId>
            <artifactId>spring-boot-starter-validation</artifactId>
        </dependency>
        <!-- 单元测试 -->
        <dependency>
            <groupId>org.springframework.boot</groupId>
            <artifactId>spring-boot-starter-test</artifactId>
            <scope>test</scope>
        </dependency>
    </dependencies>

    <build>
        <plugins>
            <!-- Spring Boot Maven 插件:支持 mvn spring-boot:run 和可执行 jar -->
            <plugin>
                <groupId>org.springframework.boot</groupId>
                <artifactId>spring-boot-maven-plugin</artifactId>
            </plugin>
        </plugins>
    </build>
</project>
Ch12Application.java
package com.lihaozhe.ch12;

import org.springframework.boot.SpringApplication;
import org.springframework.boot.autoconfigure.SpringBootApplication;

/**
 * 第12章 启动入口。
 *
 * <p>理论知识:{@code @SpringBootApplication} 是一个组合注解,等价于同时加了
 * {@code @SpringBootConfiguration}(标记这是一个配置类)、
 * {@code @EnableAutoConfiguration}(根据 classpath 自动装配 Bean)、
 * {@code @ComponentScan}(扫描当前包及其子包下的组件)。</p>
 *
 * <p>启动类必须放在最外层包 {@code com.lihaozhe.ch12},
 * 这样 {@code @ComponentScan} 才能扫描到 controller / service 等子包中的组件。</p>
 */
@SpringBootApplication
public class Ch12Application {

    /**
     * 程序入口:SpringApplication.run 会启动内嵌 Tomcat 并初始化 Spring 容器。
     *
     * @param args 命令行参数(本教程不接收参数)
     */
    public static void main(String[] args) {
        SpringApplication.run(Ch12Application.class, args);
    }
}
ProductFormController.java
package com.lihaozhe.ch12.controller;

import jakarta.validation.Valid;
import jakarta.validation.constraints.NotBlank;
import jakarta.validation.constraints.Positive;
import jakarta.validation.constraints.Size;
import org.springframework.stereotype.Controller;
import org.springframework.ui.Model;
import org.springframework.validation.BindingResult;
import org.springframework.web.bind.annotation.GetMapping;
import org.springframework.web.bind.annotation.ModelAttribute;
import org.springframework.web.bind.annotation.PostMapping;

/**
 * 商品表单控制器:演示 th:field / @Valid / BindingResult。
 *
 * <p>理论知识:
 * 1. {@code @Controller} 的方法返回值会被视图解析器当作"视图名",交给 Thymeleaf 渲染成 HTML。
 * 2. {@code @ModelAttribute} 用于绑定表单数据到 Java 对象(Command Object 模式)。
 * 3. {@code @Valid} 触发 Jakarta Validation 对表单对象进行校验。
 * 4. {@code BindingResult} 收集校验错误,供模板显示错误信息。</p>
 */
@Controller
public class ProductFormController {

    /**
     * 商品表单对象(Command Object):用于接收表单提交的数据。
     *
     * <p>Jakarta Validation 注解:
     * - @NotBlank:字符串不能为 null 或空白(trim 后)
     * - @Size:字符串长度限制
     * - @Positive:必须为正数(> 0)
     * - @NotNull:不能为 null</p>
     */
    public static class ProductForm {
        @NotBlank(message = "商品名称不能为空")
        @Size(min = 2, max = 50, message = "商品名称长度必须在 2-50 个字符之间")
        private String name;

        @NotBlank(message = "商品分类不能为空")
        private String category;

        @Positive(message = "商品价格必须大于 0")
        private Double price;

        @Positive(message = "商品库存必须大于 0")
        private Integer stock;

        @Size(max = 200, message = "商品描述最多 200 个字符")
        private String description;

        // Getter 和 Setter(Spring 通过反射调用)
        public String getName() { return name; }
        public void setName(String name) { this.name = name; }
        public String getCategory() { return category; }
        public void setCategory(String category) { this.category = category; }
        public Double getPrice() { return price; }
        public void setPrice(Double price) { this.price = price; }
        public Integer getStock() { return stock; }
        public void setStock(Integer stock) { this.stock = stock; }
        public String getDescription() { return description; }
        public void setDescription(String description) { this.description = description; }
    }

    /**
     * GET 方法:显示表单。
     *
     * <p>向模型添加一个空的 ProductForm 对象,模板用 th:field 绑定它的字段。
     * th:field 会自动生成 name/id/value 属性,与表单对象字段对应。</p>
     *
     * @param model 视图模型(Spring 自动注入)
     * @return 视图名 "form",对应 templates/form.html
     */
    @GetMapping("/")
    public String showForm(Model model) {
        // 向模型添加一个空的表单对象(必须有,否则 th:field 会报错)
        model.addAttribute("productForm", new ProductForm());
        return "form";
    }

    /**
     * POST 方法:处理表单提交。
     *
     * <p>@ModelAttribute 自动将表单字段绑定到 productForm 对象。
     * @Valid 触发校验,如果有错误,BindingResult 会包含错误。
     * 如果校验失败,返回表单视图,模板会显示错误信息;
     * 如果校验成功,重定向到成功页面(或返回成功视图)。</p>
     *
     * @param productForm 表单对象(@ModelAttribute 自动绑定)
     * @param bindingResult 校验结果(Spring 自动注入,紧跟在 @ModelAttribute 参数之后)
     * @param model 视图模型
     * @return 表单视图或成功视图
     */
    @PostMapping("/submit")
    public String submitForm(
            @Valid @ModelAttribute("productForm") ProductForm productForm,
            BindingResult bindingResult,
            Model model) {

        // 检查是否有校验错误
        if (bindingResult.hasErrors()) {
            // 有错误,返回表单视图,模板会显示错误信息
            // 注意:必须返回表单视图名,不能返回其他视图
            return "form";
        }

        // 校验通过,这里可以保存数据到数据库
        // 为演示,仅打印到控制台
        System.out.println("✓ 表单提交成功:");
        System.out.println("  商品名称:" + productForm.getName());
        System.out.println("  商品分类:" + productForm.getCategory());
        System.out.println("  商品价格:" + productForm.getPrice());
        System.out.println("  商品库存:" + productForm.getStock());
        System.out.println("  商品描述:" + productForm.getDescription());

        // 返回成功视图
        model.addAttribute("product", productForm);
        return "success";
    }
}
application.yml
# 第12章:表单与校验 th:field / @Valid / BindingResult —— 商品新增表单
# 端口规则:8080 + 章号 12 → 8112
server:
  port: 8112

spring:
  application:
    name: chapter12-form
  thymeleaf:
    # 开发期关闭缓存,修改模板后刷新浏览器即可看到效果(无需重启)
    cache: false
    # 模板/响应统一使用 UTF-8,保证中文不乱码
    encoding: UTF-8
    # 使用 HTML 模式解析(兼容标准 HTML5 标签)
    mode: HTML
    # 启动时校验模板是否存在、语法是否正确(开发期友好)
    check-template: true
    check-template-location: true
form.html
<!DOCTYPE html>
<!--
  xmlns:th 是 Thymeleaf 的命名空间声明:只有加上它,
  th:* 属性才会被 Thymeleaf 识别并解析。IDE(如 IDEA)也会因此获得 th: 的自动补全。
-->
<html lang="zh-CN" xmlns:th="http://www.thymeleaf.org">
<head>
    <meta charset="UTF-8">
    <!-- 响应式视口,移动端按设备宽度渲染 -->
    <meta name="viewport" content="width=device-width, initial-scale=1.0">
    <title>第12章 · 商品新增表单(th:field / @Valid)</title>

    <!-- ===== 前端框架(全部走 CDN,免构建)===== -->
    <!-- Tailwind Play CDN:教学用零配置方案;生产环境请用 Tailwind CLI / PostCSS 构建 -->
    <script src="https://cdn.tailwindcss.com"></script>
    <!-- Bootstrap 5.3.x:提供现成组件(按钮/卡片/表单等) -->
    <link href="https://cdn.jsdelivr.net/npm/bootstrap@5.3.3/dist/css/bootstrap.min.css" rel="stylesheet">
    <script src="https://cdn.jsdelivr.net/npm/bootstrap@5.3.3/dist/js/bootstrap.bundle.min.js"></script>
    <!-- jQuery 4.x:DOM 操作与事件(后续章节异步请求会用到) -->
    <script src="https://code.jquery.com/jquery-4.0.0.min.js"></script>
    <!-- axios:基于 Promise 的 HTTP 客户端(后续章节异步加载数据会用到) -->
    <script src="https://cdn.jsdelivr.net/npm/axios@1.7.9/dist/axios.min.js"></script>
</head>
<body class="bg-gray-50 min-h-screen">

<!-- 页头:使用 Bootstrap 的 navbar 组件 -->
<nav class="navbar navbar-dark bg-primary">
    <div class="container">
        <span class="navbar-brand mb-0 h1">🛒 优选商城 · 第12章</span>
    </div>
</nav>

<!-- 主容器 -->
<div class="container my-5">
    <!-- 页面标题 -->
    <div class="text-center mb-5">
        <h1 class="display-5 fw-bold text-primary">商品新增表单</h1>
        <p class="text-muted">演示 Thymeleaf 的 th:field 与 Jakarta Validation 校验</p>
    </div>

    <!--
        表单语法(Thymeleaf + Spring MVC):

        1. th:action —— 表单提交的目标 URL
           语法:th:action="@{/submit}"(使用 @{} 生成正确 URL,包括上下文路径)

        2. th:object —— 绑定表单对象
           语法:th:object="${productForm}"(绑定 Model 中的 productForm 对象)
           后续 th:field 都基于这个对象

        3. th:field —— 绑定表单字段到对象属性
           语法:th:field="*{name}"(* 表示相对 th:object 的路径)
           自动生成 name、id、value 属性,与对象字段对应
           - name 属性:表单提交时作为参数名
           - id 属性:用于 label 关联
           - value 属性:回显提交的值(提交失败时保留用户输入)

        4. th:errors —— 显示字段的校验错误
           语法:th:errors="*{name}"(显示该字段的所有错误)
           或使用 th:if="${#fields.hasErrors('name')}" 判断是否有错误

        验证流程:
        1. GET 请求 "/" 显示表单,Model 中有空的 productForm 对象
        2. 用户填写表单,点击提交
        3. POST 请求 "/submit" 接收表单数据,@Valid 触发校验
        4. 如果有错误,返回表单视图,th:errors 显示错误信息,th:field 回显输入值
        5. 如果无错误,保存数据,返回成功视图
    -->
    <div class="row justify-content-center">
        <div class="col-md-8">
            <div class="card shadow-sm">
                <div class="card-header bg-light">
                    <h5 class="card-title mb-0">📝 新增商品</h5>
                </div>
                <div class="card-body">
                    <!-- 表单:th:action 指定提交 URL,th:object 绑定表单对象 -->
                    <form th:action="@{/submit}" th:object="${productForm}" method="post" accept-charset="UTF-8">

                        <!-- 商品名称字段 -->
                        <div class="mb-3">
                            <label for="name" class="form-label">商品名称 *</label>
                            <!-- th:field 绑定对象的 name 属性 -->
                            <input type="text" class="form-control"
                                   id="name" th:field="*{name}"
                                   th:classappend="${#fields.hasErrors('name')} ? 'is-invalid' : ''"
                                   placeholder="请输入商品名称(2-50 个字符)">
                            <!-- 显示字段错误 -->
                            <div class="invalid-feedback" th:if="${#fields.hasErrors('name')}" th:errors="*{name}">
                                商品名称错误
                            </div>
                        </div>

                        <!-- 商品分类字段 -->
                        <div class="mb-3">
                            <label for="category" class="form-label">商品分类 *</label>
                            <select class="form-select"
                                    id="category" th:field="*{category}"
                                    th:classappend="${#fields.hasErrors('category')} ? 'is-invalid' : ''">
                                <option value="">请选择分类</option>
                                <option value="手机">手机</option>
                                <option value="电脑">电脑</option>
                                <option value="平板">平板</option>
                                <option value="配件">配件</option>
                            </select>
                            <div class="invalid-feedback" th:if="${#fields.hasErrors('category')}" th:errors="*{category}">
                                商品分类错误
                            </div>
                        </div>

                        <!-- 商品价格字段 -->
                        <div class="mb-3">
                            <label for="price" class="form-label">商品价格 *</label>
                            <div class="input-group">
                                <span class="input-group-text">¥</span>
                                <input type="number" step="0.01" class="form-control"
                                       id="price" th:field="*{price}"
                                       th:classappend="${#fields.hasErrors('price')} ? 'is-invalid' : ''"
                                       placeholder="0.00">
                            </div>
                            <div class="invalid-feedback" th:if="${#fields.hasErrors('price')}" th:errors="*{price}">
                                商品价格错误
                            </div>
                        </div>

                        <!-- 商品库存字段 -->
                        <div class="mb-3">
                            <label for="stock" class="form-label">商品库存 *</label>
                            <input type="number" class="form-control"
                                   id="stock" th:field="*{stock}"
                                   th:classappend="${#fields.hasErrors('stock')} ? 'is-invalid' : ''"
                                   placeholder="0">
                            <div class="invalid-feedback" th:if="${#fields.hasErrors('stock')}" th:errors="*{stock}">
                                商品库存错误
                            </div>
                        </div>

                        <!-- 商品描述字段 -->
                        <div class="mb-3">
                            <label for="description" class="form-label">商品描述</label>
                            <textarea class="form-control" rows="3"
                                      id="description" th:field="*{description}"
                                      th:classappend="${#fields.hasErrors('description')} ? 'is-invalid' : ''"
                                      placeholder="请输入商品描述(最多 200 个字符)"></textarea>
                            <div class="invalid-feedback" th:if="${#fields.hasErrors('description')}" th:errors="*{description}">
                                商品描述错误
                            </div>
                        </div>

                        <!-- 提交按钮 -->
                        <div class="d-grid gap-2">
                            <button type="submit" class="btn btn-primary btn-lg">提交商品</button>
                        </div>
                    </form>
                </div>
            </div>

            <!-- 说明:模板里写在标签之间的中文是"兜底文本",
                 一旦 Thymeleaf 成功渲染,会被 th:* 的结果替换掉。
                 如果浏览器里看到的是这行兜底文本,说明模板没被解析。 -->
            <div class="mt-4 p-3 bg-light rounded">
                <h6 class="fw-bold">💡 本章知识点:</h6>
                <ul class="list-unstyled mb-0">
                    <li><code>th:field="*{property}"</code> —— 绑定表单字段到对象属性</li>
                    <li><code>th:action="@{/url}"</code> —— 表单提交 URL(使用 @{} 生成)</li>
                    <li><code>th:object="${formObject}"</code> —— 绑定表单对象</li>
                    <li><code>th:errors="*{property}"</code> —— 显示字段校验错误</li>
                    <li><code>th:classappend="${condition} ? 'class' : ''"</code> —— 条件追加 CSS 类</li>
                </ul>
            </div>
        </div>
    </div>
</div>

</body>
</html>
success.html
<!DOCTYPE html>
<!--
  xmlns:th 是 Thymeleaf 的命名空间声明:只有加上它,
  th:* 属性才会被 Thymeleaf 识别并解析。IDE(如 IDEA)也会因此获得 th: 的自动补全。
-->
<html lang="zh-CN" xmlns:th="http://www.thymeleaf.org">
<head>
    <meta charset="UTF-8">
    <!-- 响应式视口,移动端按设备宽度渲染 -->
    <meta name="viewport" content="width=device-width, initial-scale=1.0">
    <title>第12章 · 提交成功</title>

    <!-- ===== 前端框架(全部走 CDN,免构建)===== -->
    <!-- Tailwind Play CDN:教学用零配置方案;生产环境请用 Tailwind CLI / PostCSS 构建 -->
    <script src="https://cdn.tailwindcss.com"></script>
    <!-- Bootstrap 5.3.x:提供现成组件(按钮/卡片/表单等) -->
    <link href="https://cdn.jsdelivr.net/npm/bootstrap@5.3.3/dist/css/bootstrap.min.css" rel="stylesheet">
    <script src="https://cdn.jsdelivr.net/npm/bootstrap@5.3.3/dist/js/bootstrap.bundle.min.js"></script>
    <!-- jQuery 4.x:DOM 操作与事件(后续章节异步请求会用到) -->
    <script src="https://code.jquery.com/jquery-4.0.0.min.js"></script>
    <!-- axios:基于 Promise 的 HTTP 客户端(后续章节异步加载数据会用到) -->
    <script src="https://cdn.jsdelivr.net/npm/axios@1.7.9/dist/axios.min.js"></script>
</head>
<body class="bg-gray-50 min-h-screen">

<!-- 页头:使用 Bootstrap 的 navbar 组件 -->
<nav class="navbar navbar-dark bg-primary">
    <div class="container">
        <span class="navbar-brand mb-0 h1">🛒 优选商城 · 第12章</span>
    </div>
</nav>

<!-- 主容器 -->
<div class="container my-5">
    <!-- 页面标题 -->
    <div class="text-center mb-5">
        <h1 class="display-5 fw-bold text-success">✓ 提交成功</h1>
        <p class="text-muted">商品已成功添加到系统</p>
    </div>

    <!-- 成功卡片 -->
    <div class="row justify-content-center">
        <div class="col-md-8">
            <div class="card shadow-sm border-success">
                <div class="card-header bg-success text-white">
                    <h5 class="card-title mb-0">📦 商品信息</h5>
                </div>
                <div class="card-body">
                    <!-- 显示提交的商品信息 -->
                    <table class="table table-borderless">
                        <tbody>
                            <tr>
                                <td class="text-muted" style="width: 30%">商品名称</td>
                                <td class="fw-bold" th:text="${product.name}">商品名称</td>
                            </tr>
                            <tr>
                                <td class="text-muted">商品分类</td>
                                <td th:text="${product.category}">商品分类</td>
                            </tr>
                            <tr>
                                <td class="text-muted">商品价格</td>
                                <td class="text-danger" th:text="${'¥' + #numbers.formatDecimal(product.price, 1, 2)}">¥0.00</td>
                            </tr>
                            <tr>
                                <td class="text-muted">商品库存</td>
                                <td th:text="${product.stock + ' 件'}">0 件</td>
                            </tr>
                            <tr>
                                <td class="text-muted">商品描述</td>
                                <td th:text="${product.description ?: '无'}">商品描述</td>
                            </tr>
                        </tbody>
                    </table>

                    <!-- 返回按钮 -->
                    <div class="d-grid gap-2 mt-4">
                        <a href="/" class="btn btn-primary btn-lg">返回表单</a>
                    </div>
                </div>
            </div>
        </div>
    </div>
</div>

</body>
</html>
运行验证
cd sb-thymeleaf/chapter12-form
mvn clean package -DskipTests
java -jar target/chapter12-form-1.0.0.jar
# 浏览器访问 http://localhost:8112/
测试流程:
- 访问
http://localhost:8112/,显示商品新增表单 - 测试失败校验:直接点击"提交商品"按钮(不填任何字段)→ 页面返回表单,显示校验错误(“商品名称不能为空”、"商品价格必须大于 0"等)
- 测试字段级校验:填写名称但价格填 0 或负数 → 显示"商品价格必须大于 0"错误
- 测试成功:填写完整有效信息(名称 2-50 字、分类选择、价格 > 0、库存 > 0)→ 提交后显示成功页面,列出商品信息
页面效果
以下截图均为本地启动后浏览器真实渲染结果。
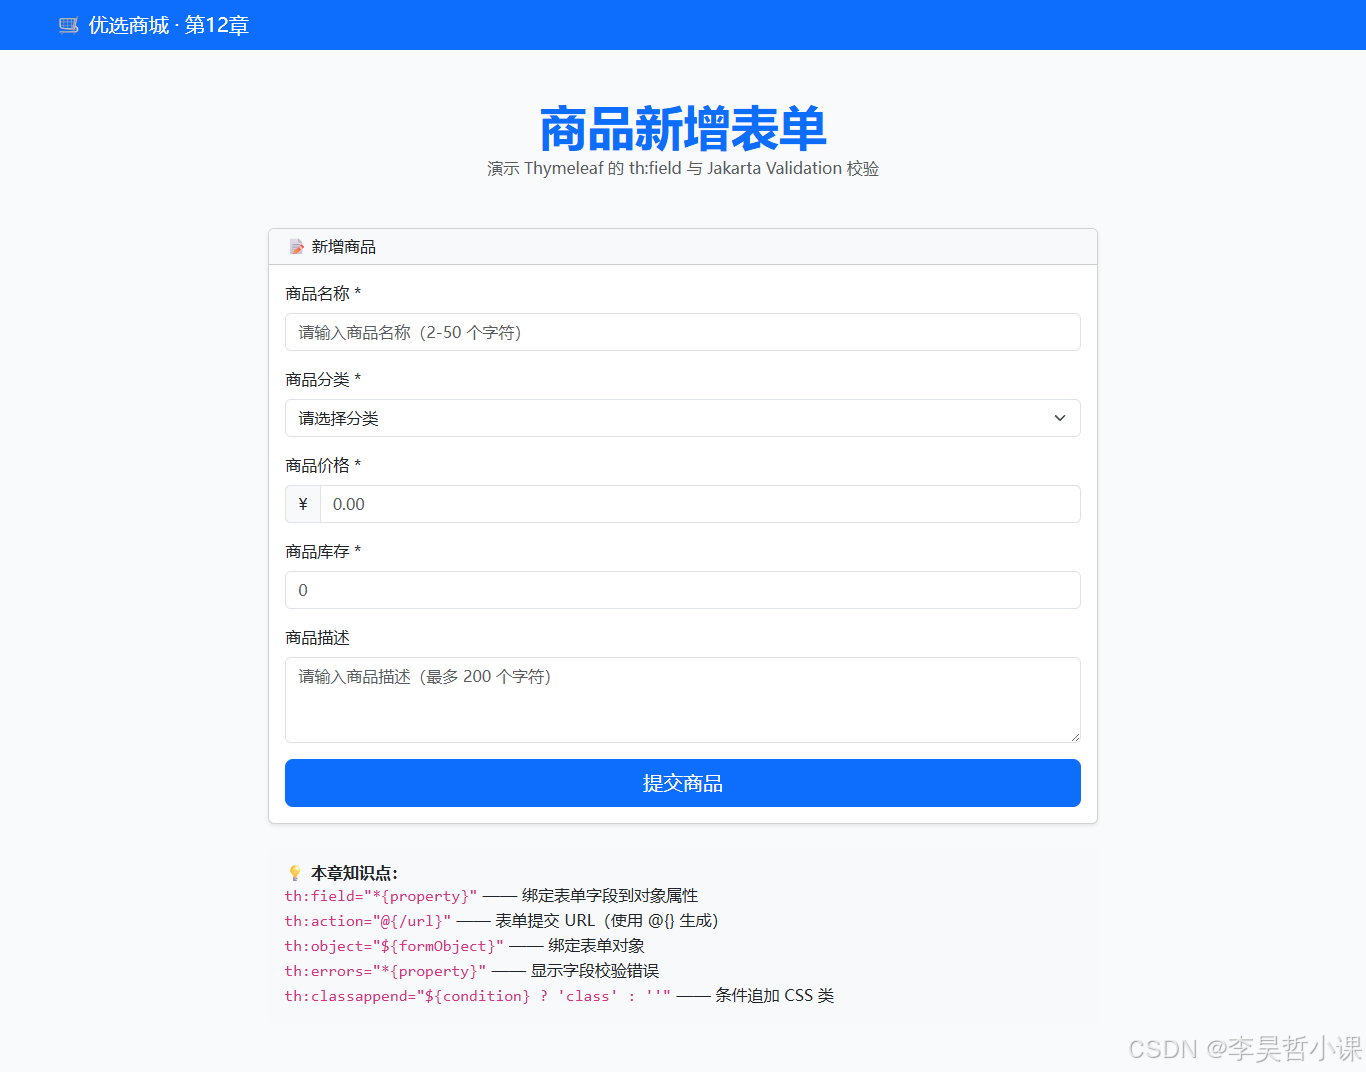
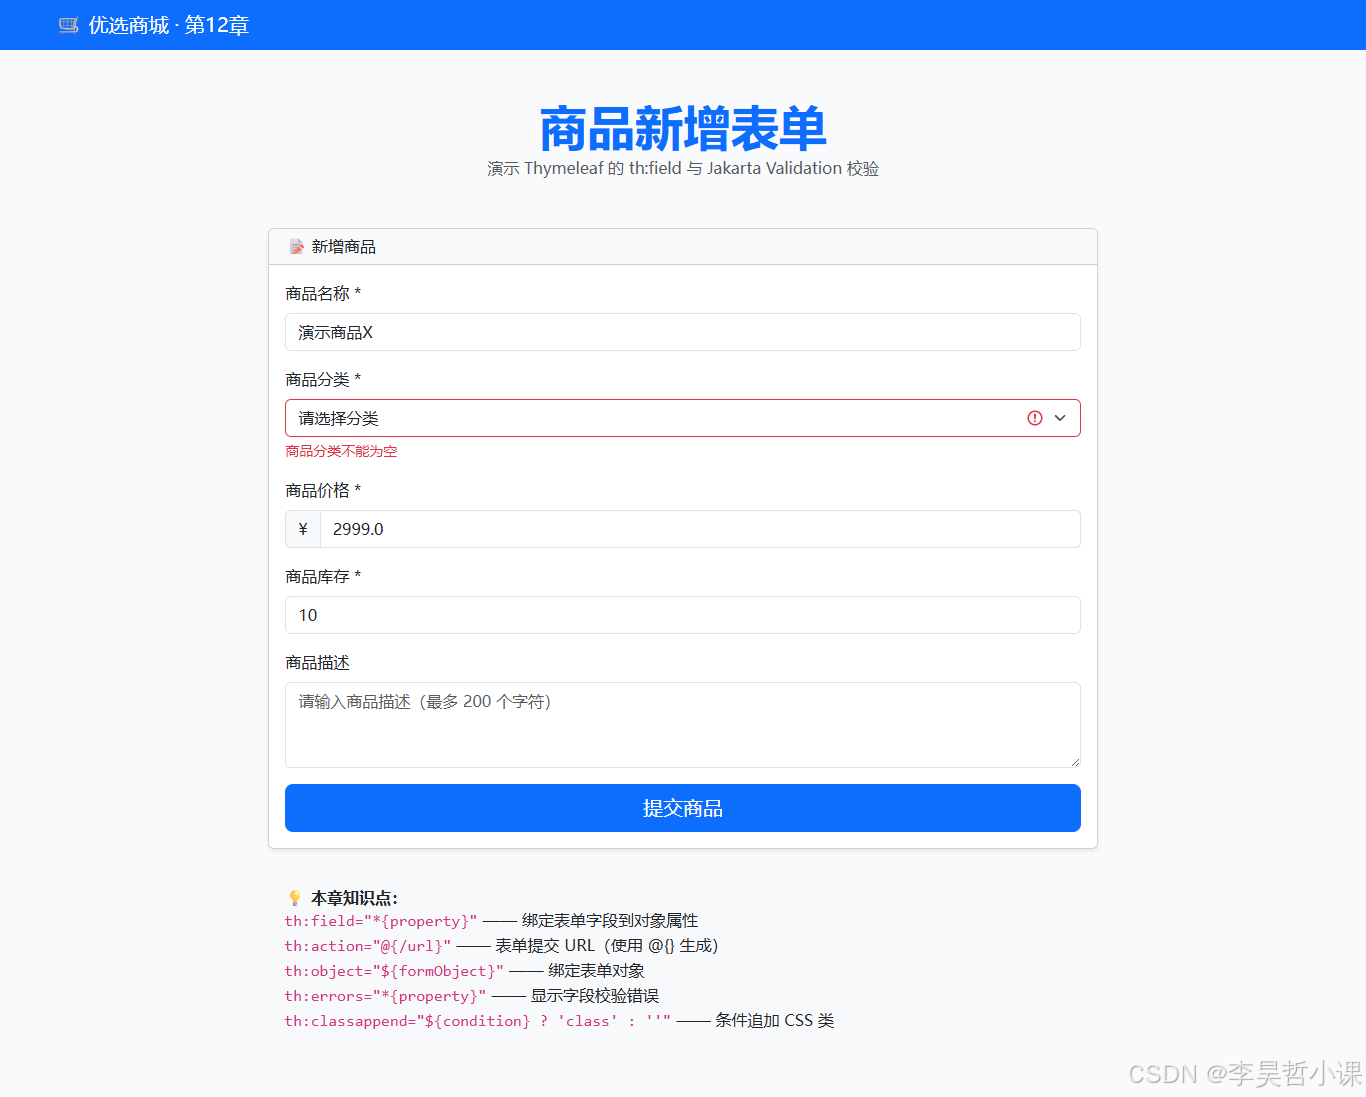
常见坑
-
th:object与th:field不匹配:th:field="*{property}"中的*表示相对th:object的路径。若 Controller 中th:object="${productForm}",则模板中必须是th:field="*{name}",不能是th:field="${productForm.name}"。 -
@Valid与BindingResult顺序:@Valid标记的表单参数后必须紧跟BindingResult参数,顺序不能反。若BindingResult在其他参数之后,会导致校验失败时无法捕获错误。 -
th:errors显示位置错误:th:errors必须放在<div>或<span>中(不是<input>),且用th:if条件判断是否显示。若放在<input>上,错误文本会被忽略。 -
提交后数据丢失:若 POST 方法返回表单视图但忘记把
productForm重新加入 Model,用户输入会全部清空。但 Spring MVC 会自动回显th:field绑定的值(因为BindingResult包含原始提交值),所以这通常不是问题。 -
@ModelAttribute名称不匹配:若@ModelAttribute("productForm")显式指定名称,则模板中th:object="${productForm}"必须使用相同名称。若省略@ModelAttribute("name"),则默认使用类名首字母小写(如productForm)。
第13章:布局与片段进阶 th:fragment / th:replace —— 页面骨架与插槽
章节目标
通过本章学习,你将能够:
- 掌握
th:fragment定义可复用的页面片段(页头/页脚/侧边栏等) - 理解
th:replace在子页面中引入公共片段并传参 - 实现模板层次的"布局继承"(类似 Thymeleaf Layout Dialect 但不用额外依赖)
- 在片段中定义参数,由引入方动态传入值
理论知识
Thymeleaf 的原生布局机制(无需第三方库):
-
th:fragment="fragmentName(parameters)":定义可复用片段- 在布局文件中标记某个元素为片段
- 参数类似函数参数,通过
th:replace时传入 - 示例:
<header th:fragment="header(title)">...</header>
-
th:replace="~{template :: fragmentName(args)}":替换当前元素为片段内容template:模板文件名(如layout.html)fragmentName:片段名(在th:fragment中定义)args:传给片段的参数(可选,对应th:fragment声明的参数)- 示例:
<header th:replace="~{layout :: header(${pageTitle})}"></header>
-
参数传递:片段定义时的参数可在引入时传入
- 定义:
<div th:fragment="sidebar(categories)"> - 引入:
<aside th:replace="~{layout :: sidebar(${categories})}"></aside> - 片段内部使用参数:
th:each="category : ${categories}"
- 定义:
-
与
th:include的区别(已废弃):th:replace:完全替换当前标签为片段内容th:include:保留当前标签,将片段内容作为子元素插入(不推荐)
本章演示将页头、侧边栏、页脚抽象成 layout.html 中的片段,子页面通过 th:replace 引入并传参,实现"一次定义、多处复用"的布局。
项目结构
chapter13-layout/
├── pom.xml
├── src/main/java/com/lihaozhe/ch13/
│   ├── Ch13Application.java
│   └── controller/
│       └── ProductController.java
└── src/main/resources/
    ├── application.yml
    └── templates/
        ├── layout.html
        └── products.html
完整代码
pom.xml
<?xml version="1.0" encoding="UTF-8"?>
<!--
  第13章:布局与片段进阶 th:fragment / th:replace —— 页面骨架与插槽

  本章依赖:
  - spring-boot-starter-webmvc:Spring Boot 4.x 的 Web 启动器
  - spring-boot-starter-thymeleaf:模板引擎启动器(核心依赖)
  - spring-boot-starter-test:单元测试(备用)

  重要说明:本章使用原生 th:fragment + th:replace 实现布局,
  不引入 thymeleaf-layout-dialect(避免版本兼容坑)。
-->
<project xmlns="http://maven.apache.org/POM/4.0.0"
         xmlns:xsi="http://www.w3.org/2001/XMLSchema-instance"
         xsi:schemaLocation="http://maven.apache.org/POM/4.0.0 https://maven.apache.org/xsd/maven-4.0.0.xsd">
    <modelVersion>4.0.0</modelVersion>

    <!-- 继承教程根工程,共享版本管理 -->
    <parent>
        <groupId>com.lihaozhe</groupId>
        <artifactId>sb-thymeleaf</artifactId>
        <version>1.0.0</version>
    </parent>

    <artifactId>chapter13-layout</artifactId>
    <!-- Web 应用打成可执行 jar,内嵌 Tomcat,java -jar 直接跑 -->
    <packaging>jar</packaging>

    <dependencies>
        <!-- Web 启动器(Boot 4 重命名后的名称) -->
        <dependency>
            <groupId>org.springframework.boot</groupId>
            <artifactId>spring-boot-starter-webmvc</artifactId>
        </dependency>
        <!-- Thymeleaf 模板引擎:服务端渲染 HTML -->
        <dependency>
            <groupId>org.springframework.boot</groupId>
            <artifactId>spring-boot-starter-thymeleaf</artifactId>
        </dependency>
        <!-- 单元测试 -->
        <dependency>
            <groupId>org.springframework.boot</groupId>
            <artifactId>spring-boot-starter-test</artifactId>
            <scope>test</scope>
        </dependency>
    </dependencies>

    <build>
        <plugins>
            <!-- Spring Boot Maven 插件:支持 mvn spring-boot:run 和可执行 jar -->
            <plugin>
                <groupId>org.springframework.boot</groupId>
                <artifactId>spring-boot-maven-plugin</artifactId>
            </plugin>
        </plugins>
    </build>
</project>
Ch13Application.java
package com.lihaozhe.ch13;

import org.springframework.boot.SpringApplication;
import org.springframework.boot.autoconfigure.SpringBootApplication;

/**
 * 第13章 启动入口。
 *
 * <p>理论知识:{@code @SpringBootApplication} 是一个组合注解,等价于同时加了
 * {@code @SpringBootConfiguration}(标记这是一个配置类)、
 * {@code @EnableAutoConfiguration}(根据 classpath 自动装配 Bean)、
 * {@code @ComponentScan}(扫描当前包及其子包下的组件)。</p>
 *
 * <p>启动类必须放在最外层包 {@code com.lihaozhe.ch13},
 * 这样 {@code @ComponentScan} 才能扫描到 controller / service 等子包中的组件。</p>
 */
@SpringBootApplication
public class Ch13Application {

    /**
     * 程序入口:SpringApplication.run 会启动内嵌 Tomcat 并初始化 Spring 容器。
     *
     * @param args 命令行参数(本教程不接收参数)
     */
    public static void main(String[] args) {
        SpringApplication.run(Ch13Application.class, args);
    }
}
ProductController.java
package com.lihaozhe.ch13.controller;

import org.springframework.stereotype.Controller;
import org.springframework.ui.Model;
import org.springframework.web.bind.annotation.GetMapping;

import java.util.ArrayList;
import java.util.List;

/**
 * 商品控制器:演示 th:fragment + th:replace 布局。
 *
 * <p>理论知识:{@code @Controller} 的方法返回值会被视图解析器当作"视图名",
 * 交给 Thymeleaf 渲染成 HTML。本章要展示带侧边栏的商品列表,所以用 {@code @Controller}。</p>
 */
@Controller
public class ProductController {

    /**
     * 商品数据模型(使用 record 简化 POJO 定义)。
     */
    public record Product(
            Long id,           // 商品ID
            String name,       // 商品名称
            String category,   // 商品分类
            double price,      // 商品价格
            int stock,         // 库存数量
            String description // 商品描述
    ) {}

    /**
     * 处理根路径 GET 请求 "/"。
     *
     * <p>Model 是 Spring 提供的数据容器。演示布局时,
     * 通常把页面需要的数据放进 Model,模板用 th:replace 引入公共片段。</p>
     *
     * @param model 视图模型(Spring 自动注入)
     * @return 视图名 "products",对应 templates/products.html
     */
    @GetMapping("/")
    public String index(Model model) {
        // 在内存中准备一组商品数据
        List<Product> products = new ArrayList<>();
        products.add(new Product(1L, "iPhone 15 Pro", "手机", 7999.00, 50, "最新旗舰手机"));
        products.add(new Product(2L, "MacBook Air M3", "电脑", 8999.00, 30, "轻薄便携"));
        products.add(new Product(3L, "AirPods Pro", "配件", 1999.00, 100, "主动降噪"));
        products.add(new Product(4L, "iPad Pro", "平板", 6499.00, 20, "大屏创作"));
        products.add(new Product(5L, "Apple Watch", "配件", 2999.00, 40, "健康监测"));
        products.add(new Product(6L, "Magic Mouse", "配件", 699.00, 60, "顺滑触控"));

        // 商品分类列表(用于侧边栏)
        List<String> categories = List.of("手机", "电脑", "平板", "配件");

        // 把数据放进模型
        model.addAttribute("products", products);
        model.addAttribute("categories", categories);
        model.addAttribute("pageTitle", "商品列表(带侧边栏)");
        // 返回视图名,Thymeleaf 会去 classpath:/templates/ 找 products.html
        return "products";
    }
}
application.yml
# 第13章:布局与片段进阶 th:fragment / th:replace —— 页面骨架与插槽
# 端口规则:8080 + 章号 13 → 8113
server:
  port: 8113

spring:
  application:
    name: chapter13-layout
  thymeleaf:
    # 开发期关闭缓存,修改模板后刷新浏览器即可看到效果(无需重启)
    cache: false
    # 模板/响应统一使用 UTF-8,保证中文不乱码
    encoding: UTF-8
    # 使用 HTML 模式解析(兼容标准 HTML5 标签)
    mode: HTML
    # 启动时校验模板是否存在、语法是否正确(开发期友好)
    check-template: true
    check-template-location: true
layout.html
<!DOCTYPE html>
<!--
  公共布局模板:定义页面骨架(页头/页脚),使用 th:fragment 标记可复用的片段。

  th:fragment 语法:
  <div th:fragment="fragmentName">...</div>
  其他模板使用 th:replace="~{layout :: fragmentName}" 引入这个片段。

  注意:本文件只是片段库,本身不会被直接访问。
-->
<html lang="zh-CN" xmlns:th="http://www.thymeleaf.org">
<head>
    <meta charset="UTF-8">
    <title>布局片段库</title>
</head>
<body>

<!-- ========== 页头片段 ========== -->
<!-- th:fragment="header" 标记这是一个可复用的页头片段 -->
<header th:fragment="header(title)">
    <!-- 参数 title 通过 th:replace 时传入 -->
    <nav class="navbar navbar-dark bg-primary">
        <div class="container">
            <span class="navbar-brand mb-0 h1">🛒 优选商城 · 第13章</span>
            <!-- 如果传入了 title 参数,显示它 -->
            <span class="text-light" th:if="${title}" th:text="${title}">页面标题</span>
        </div>
    </nav>
</header>

<!-- ========== 侧边栏片段 ========== -->
<!-- th:fragment="sidebar" 标记这是一个可复用的侧边栏片段 -->
<aside th:fragment="sidebar(categories)">
    <div class="card shadow-sm">
        <div class="card-header bg-light">
            <h6 class="card-title mb-0">📑 商品分类</h6>
        </div>
        <div class="card-body">
            <!-- 遍历分类列表,显示链接 -->
            <ul class="list-group list-group-flush">
                <li class="list-group-item" th:each="category : ${categories}">
                    <a href="#" class="text-decoration-none" th:text="${category}">分类</a>
                </li>
            </ul>
        </div>
    </div>
</aside>

<!-- ========== 页脚片段 ========== -->
<!-- th:fragment="footer" 标记这是一个可复用的页脚片段 -->
<footer th:fragment="footer">
    <div class="bg-dark text-light text-center py-3 mt-5">
        <p class="mb-0">© 2026 优选商城 · Thymeleaf 教程第13章</p>
    </div>
</footer>

</body>
</html>
products.html
<!DOCTYPE html>
<!--
  xmlns:th 是 Thymeleaf 的命名空间声明:只有加上它,
  th:* 属性才会被 Thymeleaf 识别并解析。IDE(如 IDEA)也会因此获得 th: 的自动补全。
-->
<html lang="zh-CN" xmlns:th="http://www.thymeleaf.org">
<head>
    <meta charset="UTF-8">
    <!-- 响应式视口,移动端按设备宽度渲染 -->
    <meta name="viewport" content="width=device-width, initial-scale=1.0">
    <title>第13章 · 商品列表(带侧边栏)</title>

    <!-- ===== 前端框架(全部走 CDN,免构建)===== -->
    <!-- Tailwind Play CDN:教学用零配置方案;生产环境请用 Tailwind CLI / PostCSS 构建 -->
    <script src="https://cdn.tailwindcss.com"></script>
    <!-- Bootstrap 5.3.x:提供现成组件(按钮/卡片/表单等) -->
    <link href="https://cdn.jsdelivr.net/npm/bootstrap@5.3.3/dist/css/bootstrap.min.css" rel="stylesheet">
    <script src="https://cdn.jsdelivr.net/npm/bootstrap@5.3.3/dist/js/bootstrap.bundle.min.js"></script>
    <!-- jQuery 4.x:DOM 操作与事件(后续章节异步请求会用到) -->
    <script src="https://code.jquery.com/jquery-4.0.0.min.js"></script>
    <!-- axios:基于 Promise 的 HTTP 客户端(后续章节异步加载数据会用到) -->
    <script src="https://cdn.jsdelivr.net/npm/axios@1.7.9/dist/axios.min.js"></script>
</head>
<body class="bg-gray-50 min-h-screen d-flex flex-column">

<!-- 使用 th:replace 引入页头片段,并传入 title 参数 -->
<!-- 语法:th:replace="~{layout :: fragmentName(parameters)}" -->
<header th:replace="~{layout :: header(${pageTitle})}"></header>

<!-- 主容器:使用 flexbox 实现侧边栏 + 内容布局 -->
<div class="container my-4 flex-grow-1">
    <div class="row">
        <!-- 左侧边栏:使用 th:replace 引入 sidebar 片段,传入 categories 参数 -->
        <div class="col-md-3">
            <aside th:replace="~{layout :: sidebar(${categories})}"></aside>
        </div>

        <!-- 右侧内容区:商品列表 -->
        <div class="col-md-9">
            <!-- 页面标题 -->
            <div class="mb-4">
                <h2 class="fw-bold text-primary" th:text="${pageTitle}">商品列表</h2>
                <p class="text-muted">演示 th:fragment + th:replace 布局与侧边栏</p>
            </div>

            <!--
                th:each 遍历商品列表,渲染网格卡片
            -->
            <div class="row g-4">
                <!-- 外层 div 使用 th:each 遍历 products 列表 -->
                <div class="col-md-6 col-lg-4" th:each="product : ${products}">
                    <!-- 卡片:Bootstrap 的 card 组件 -->
                    <div class="card h-100 shadow-sm">
                        <!-- 卡片头部:显示商品名称 -->
                        <div class="card-header bg-light">
                            <h5 class="card-title mb-0" th:text="${product.name}">商品名称</h5>
                        </div>

                        <!-- 卡片主体 -->
                        <div class="card-body">
                            <!-- 商品分类 -->
                            <span class="badge bg-secondary mb-2" th:text="${product.category}">分类</span>

                            <!-- 商品描述 -->
                            <p class="card-text text-muted" th:text="${product.description}">商品描述</p>

                            <!-- 商品价格 -->
                            <div class="mb-2">
                                <span class="text-muted">价格:</span>
                                <span class="h5 text-danger" th:text="${'¥' + #numbers.formatDecimal(product.price, 1, 2)}">¥0.00</span>
                            </div>

                            <!-- 商品库存 -->
                            <div class="mb-2">
                                <span class="text-muted">库存:</span>
                                <span class="badge bg-info" th:text="${product.stock + ' 件'}">0 件</span>
                            </div>
                        </div>

                        <!-- 卡片底部:操作按钮 -->
                        <div class="card-footer bg-white border-0">
                            <button class="btn btn-primary btn-sm w-100">查看详情</button>
                        </div>
                    </div>
                </div>
            </div>
        </div>
    </div>
</div>

<!-- 使用 th:replace 引入页脚片段 -->
<footer th:replace="~{layout :: footer}"></footer>

<!--
    知识点说明:

    1. th:fragment="fragmentName(parameters)" —— 定义可复用片段(在 layout.html 中)
       - 参数类似函数参数,通过 th:replace 时传入

    2. th:replace="~{template :: fragmentName(args)}" —— 替换当前元素为片段内容
       - template:模板文件名(如 layout.html)
       - fragmentName:片段名(在 th:fragment 中定义)
       - args:传给片段的参数(可选)

    3. 优点:
       - 避免代码重复(页头、页脚、侧边栏只需定义一次)
       - 易于维护(改一处,所有页面生效)
       - 清晰的页面结构(公共部分抽象成片段)

    4. 与 th:include 的区别:
       - th:replace:完全替换当前标签为片段内容
       - th:include:保留当前标签,将片段内容作为子元素插入(已废弃,推荐使用 th:replace)
-->
</body>
</html>
运行验证
cd sb-thymeleaf/chapter13-layout
mvn clean package -DskipTests
java -jar target/chapter13-layout-1.0.0.jar
# 浏览器访问 http://localhost:8113/
页面显示带侧边栏的商品列表:
- 顶部页头由
layout.html中的header片段生成,显示页面标题 - 左侧边栏由
layout.html中的sidebar片段生成,列出商品分类 - 底部页脚由
layout.html中的footer片段生成 - 右侧内容区由
products.html本页面定义,显示商品卡片网格
页面效果
以下截图均为本地启动后浏览器真实渲染结果。
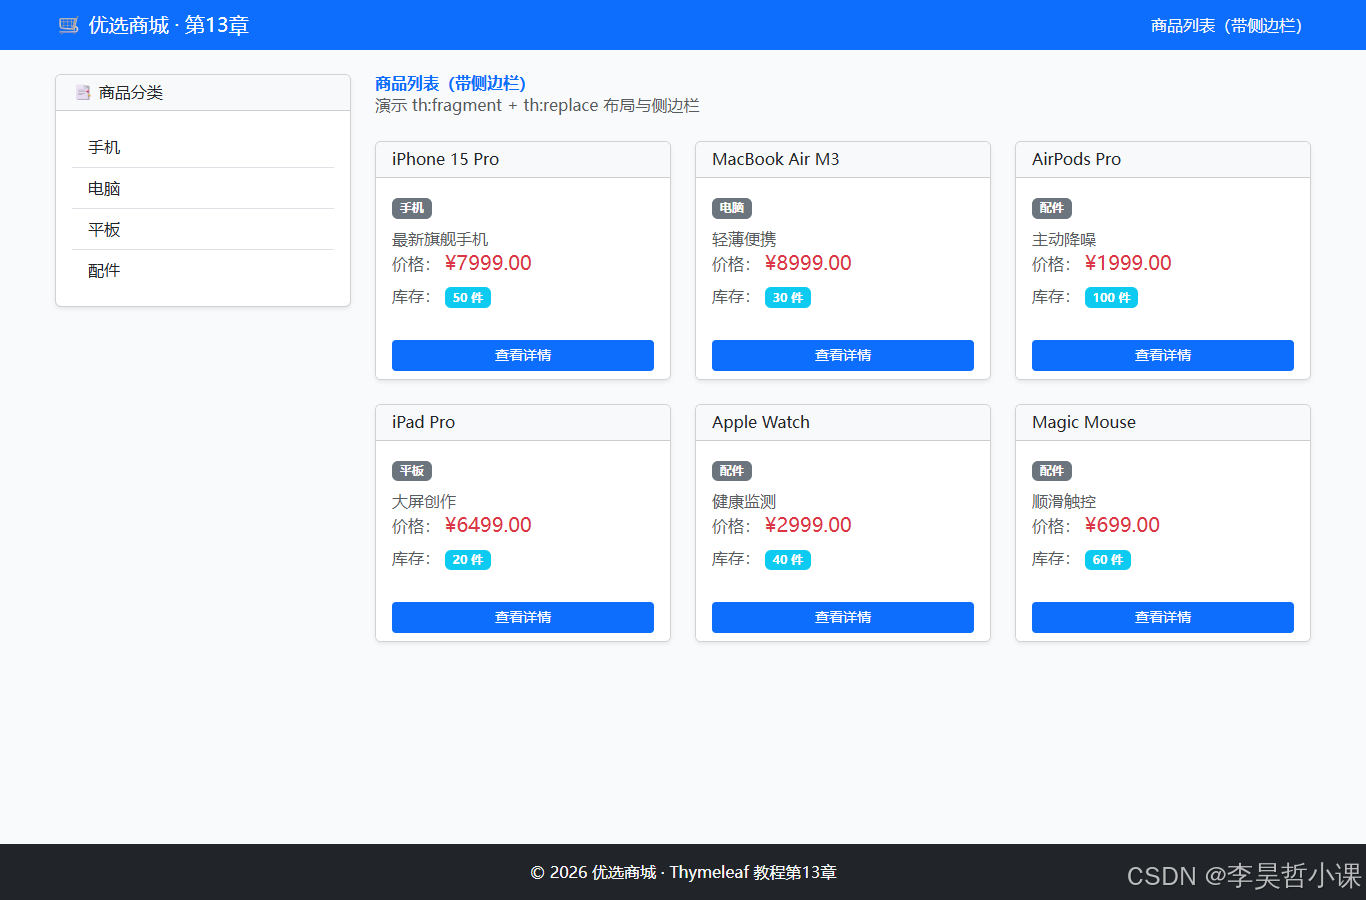
常见坑
-
片段参数类型不匹配:
th:fragment="header(title)"中声明参数title,但在th:replace时传入${pageTitle}必须是类型兼容的(如 String)。若传入 List,片段内th:if="${title}"仍可用,但th:text="${title}"会显示整个列表而非单个元素。 -
th:replace与th:include混淆:th:replace完全替换当前元素为片段内容,th:include保留当前元素并将片段作为子元素插入(已废弃)。若用th:include,当前元素的属性(如 class)会保留,但子元素会变成片段内容,可能导致嵌套错误。 -
片段文件路径错误:
th:replace="~{layout :: header}"中的layout是模板文件名(不含扩展名.html),Thymeleaf 会在classpath:/templates/下查找layout.html。若文件在子目录,需写成~{subdir/layout :: header}。 -
参数作用域:片段内通过
th:fragment声明的参数(如title),仅在片段内可见,不能在片段外的其他元素中使用。若需在多个片段间共享数据,考虑将其放在 Model 中而非参数。
第14章:工具对象 #temporals / #numbers / #strings / #lists —— 格式化与工具方法
章节目标
通过本章学习,你将能够:
- 掌握 Thymeleaf 内置工具对象:
#temporals、#numbers、#strings、#lists、#arrays - 使用
#temporals.format()格式化日期时间 - 使用
#numbers.formatDecimal()和formatInteger()格式化数值 - 使用
#strings进行字符串判空、截取、缩写等操作 - 使用
#lists操作列表(判空、大小、包含等) - 在服务端模板中直接格式化数据,无需在 Java 中预处理
理论知识
Thymeleaf 提供多个内建工具对象(由 Thymeleaf 自动注入,可直接在模板中使用,无需任何配置):
-
#temporals——日期时间工具(java.time 原生支持,推荐)format(temporal, pattern):按指定格式输出日期formatISO(temporal):按 ISO 格式输出day(temporal)/month(temporal)/year(temporal):提取日期组件createNow():创建当前时间- 注意:这是现代写法,替代过时的
#dates(仅支持 java.util.Date)
-
#numbers——数值工具formatDecimal(num, minIntDigits, decimalDigits):格式化小数(补零、保留位数)- 示例:
#numbers.formatDecimal(price, 1, 2)→ 保证至少 1 位整数、2 位小数
- 示例:
formatInteger(num, minIntDigits):格式化整数(千分位、补零)percent(num, decimalDigits):格式化为百分比
-
#strings——字符串工具isEmpty(str):判断是否为 null 或空length(str):获取长度substring(str, start, end):截取子串abbreviate(str, maxSize):缩写(超长显示...)upperCase(str)/lowerCase(str):大小写转换replace(str, old, new):替换
-
#lists——列表工具isEmpty(list):判断是否为空size(list):获取大小contains(list, element):判断是否包含
-
#arrays——数组工具(类似#lists)isEmpty(array)/size(array)/contains(array, element)
本章演示日期格式化、数值格式化、字符串判空与缩写、列表大小统计等常用操作。
项目结构
chapter14-utils/
├── pom.xml
├── src/main/java/com/lihaozhe/ch14/
│   ├── Ch14Application.java
│   └── controller/
│       └── ProductController.java
└── src/main/resources/
    ├── application.yml
    └── templates/
        └── products.html
完整代码
pom.xml
<?xml version="1.0" encoding="UTF-8"?>
<!--
  第14章:工具对象 #temporals / #numbers / #strings / #lists —— 格式化与工具方法

  本章依赖:
  - spring-boot-starter-webmvc:Spring Boot 4.x 的 Web 启动器
  - spring-boot-starter-thymeleaf:模板引擎启动器(核心依赖)
  - spring-boot-starter-test:单元测试(备用)

  重要说明:本章演示 Thymeleaf 内置的工具对象,这些对象由 Thymeleaf 自动提供,
  无需额外依赖,直接在模板中使用 #temporals / #numbers / #strings / #lists 等。
-->
<project xmlns="http://maven.apache.org/POM/4.0.0"
         xmlns:xsi="http://www.w3.org/2001/XMLSchema-instance"
         xsi:schemaLocation="http://maven.apache.org/POM/4.0.0 https://maven.apache.org/xsd/maven-4.0.0.xsd">
    <modelVersion>4.0.0</modelVersion>

    <!-- 继承教程根工程,共享版本管理 -->
    <parent>
        <groupId>com.lihaozhe</groupId>
        <artifactId>sb-thymeleaf</artifactId>
        <version>1.0.0</version>
    </parent>

    <artifactId>chapter14-utils</artifactId>
    <!-- Web 应用打成可执行 jar,内嵌 Tomcat,java -jar 直接跑 -->
    <packaging>jar</packaging>

    <dependencies>
        <!-- Web 启动器(Boot 4 重命名后的名称) -->
        <dependency>
            <groupId>org.springframework.boot</groupId>
            <artifactId>spring-boot-starter-webmvc</artifactId>
        </dependency>
        <!-- Thymeleaf 模板引擎:服务端渲染 HTML -->
        <dependency>
            <groupId>org.springframework.boot</groupId>
            <artifactId>spring-boot-starter-thymeleaf</artifactId>
        </dependency>
        <!-- 单元测试 -->
        <dependency>
            <groupId>org.springframework.boot</groupId>
            <artifactId>spring-boot-starter-test</artifactId>
            <scope>test</scope>
        </dependency>
    </dependencies>

    <build>
        <plugins>
            <!-- Spring Boot Maven 插件:支持 mvn spring-boot:run 和可执行 jar -->
            <plugin>
                <groupId>org.springframework.boot</groupId>
                <artifactId>spring-boot-maven-plugin</artifactId>
            </plugin>
        </plugins>
    </build>
</project>
Ch14Application.java
package com.lihaozhe.ch14;

import org.springframework.boot.SpringApplication;
import org.springframework.boot.autoconfigure.SpringBootApplication;

/**
 * 第14章 启动入口。
 *
 * <p>理论知识:{@code @SpringBootApplication} 是一个组合注解,等价于同时加了
 * {@code @SpringBootConfiguration}(标记这是一个配置类)、
 * {@code @EnableAutoConfiguration}(根据 classpath 自动装配 Bean)、
 * {@code @ComponentScan}(扫描当前包及其子包下的组件)。</p>
 *
 * <p>启动类必须放在最外层包 {@code com.lihaozhe.ch14},
 * 这样 {@code @ComponentScan} 才能扫描到 controller / service 等子包中的组件。</p>
 */
@SpringBootApplication
public class Ch14Application {

    /**
     * 程序入口:SpringApplication.run 会启动内嵌 Tomcat 并初始化 Spring 容器。
     *
     * @param args 命令行参数(本教程不接收参数)
     */
    public static void main(String[] args) {
        SpringApplication.run(Ch14Application.class, args);
    }
}
ProductController.java
package com.lihaozhe.ch14.controller;

import org.springframework.stereotype.Controller;
import org.springframework.ui.Model;
import org.springframework.web.bind.annotation.GetMapping;

import java.math.BigDecimal;
import java.time.LocalDateTime;
import java.util.ArrayList;
import java.util.List;

/**
 * 商品控制器:演示 Thymeleaf 工具对象 #temporals / #numbers / #strings / #lists。
 *
 * <p>理论知识:{@code @Controller} 的方法返回值会被视图解析器当作"视图名",
 * 交给 Thymeleaf 渲染成 HTML。本章要演示工具对象,所以用 {@code @Controller}。</p>
 */
@Controller
public class ProductController {

    /**
     * 商品数据模型(使用 record 简化 POJO 定义,Java 16+ 语法)。
     */
    public record Product(
            Long id,                // 商品ID
            String name,            // 商品名称
            String category,        // 商品分类
            BigDecimal price,       // 商品价格(使用 BigDecimal 精确计算)
            int stock,              // 库存数量
            String description,     // 商品描述(可能为 null 或空)
            LocalDateTime createdAt // 创建时间(Java 8+ 的 java.time API,替代过时的 java.util.Date)
    ) {}

    /**
     * 处理根路径 GET 请求 "/"。
     *
     * <p>Model 是 Spring 提供的数据容器。演示工具对象时,
     * 通常把一组对象放进 Model,模板通过 #工具对象 进行格式化处理。</p>
     *
     * @param model 视图模型(Spring 自动注入)
     * @return 视图名 "products",对应 templates/products.html
     */
    @GetMapping("/")
    public String index(Model model) {
        // 在内存中准备一组商品数据,包括不同格式的数值和日期
        List<Product> products = new ArrayList<>();
        // 直接构造 LocalDateTime(Java 8+ java.time API,无需 Date 互转)
        products.add(new Product(
                1L, "iPhone 15 Pro", "手机",
                new BigDecimal("7999.00"), 50,
                "最新旗舰手机,钛金属边框",
                LocalDateTime.now().minusDays(10)
        ));
        products.add(new Product(
                2L, "MacBook Air M3", "电脑",
                new BigDecimal("8999.50"), 30,
                "轻薄便携,续航出色",
                LocalDateTime.now().minusDays(5)
        ));
        products.add(new Product(
                3L, "AirPods Pro", "配件",
                new BigDecimal("1999.99"), 100,
                null,  // 描述为空(演示 #strings 判空)
                LocalDateTime.now().minusHours(3)
        ));
        products.add(new Product(
                4L, "iPad Pro", "平板",
                new BigDecimal("6499.00"), 20,
                "大屏创作利器,支持Apple Pencil",
                LocalDateTime.now().minusWeeks(2)
        ));
        products.add(new Product(
                5L, "Apple Watch", "配件",
                new BigDecimal("2999.00"), 40,
                "",  // 描述为空字符串(演示 #strings 判空)
                LocalDateTime.now().minusMonths(1)
        ));

        // 把商品列表放进模型,键名为 "products"
        model.addAttribute("products", products);
        // 当前时间(演示 #temporals 格式化,java.time 原生支持)
        model.addAttribute("now", LocalDateTime.now());
        // 返回视图名,Thymeleaf 会去 classpath:/templates/ 找 products.html
        return "products";
    }
}
application.yml
# 第14章:工具对象 #temporals / #numbers / #strings / #lists —— 格式化与工具方法
# 端口规则:8080 + 章号 14 → 8114
server:
  port: 8114

spring:
  application:
    name: chapter14-utils
  thymeleaf:
    # 开发期关闭缓存,修改模板后刷新浏览器即可看到效果(无需重启)
    cache: false
    # 模板/响应统一使用 UTF-8,保证中文不乱码
    encoding: UTF-8
    # 使用 HTML 模式解析(兼容标准 HTML5 标签)
    mode: HTML
    # 启动时校验模板是否存在、语法是否正确(开发期友好)
    check-template: true
    check-template-location: true
products.html
<!DOCTYPE html>
<!--
  xmlns:th 是 Thymeleaf 的命名空间声明:只有加上它,
  th:* 属性才会被 Thymeleaf 识别并解析。IDE(如 IDEA)也会因此获得 th: 的自动补全。
-->
<html lang="zh-CN" xmlns:th="http://www.thymeleaf.org">
<head>
    <meta charset="UTF-8">
    <!-- 响应式视口,移动端按设备宽度渲染 -->
    <meta name="viewport" content="width=device-width, initial-scale=1.0">
    <title>第14章 · 商品列表(工具对象)</title>

    <!-- ===== 前端框架(全部走 CDN,免构建)===== -->
    <!-- Tailwind Play CDN:教学用零配置方案;生产环境请用 Tailwind CLI / PostCSS 构建 -->
    <script src="https://cdn.tailwindcss.com"></script>
    <!-- Bootstrap 5.3.x:提供现成组件(按钮/卡片/表单等) -->
    <link href="https://cdn.jsdelivr.net/npm/bootstrap@5.3.3/dist/css/bootstrap.min.css" rel="stylesheet">
    <script src="https://cdn.jsdelivr.net/npm/bootstrap@5.3.3/dist/js/bootstrap.bundle.min.js"></script>
    <!-- jQuery 4.x:DOM 操作与事件(后续章节异步请求会用到) -->
    <script src="https://code.jquery.com/jquery-4.0.0.min.js"></script>
    <!-- axios:基于 Promise 的 HTTP 客户端(后续章节异步加载数据会用到) -->
    <script src="https://cdn.jsdelivr.net/npm/axios@1.7.9/dist/axios.min.js"></script>
</head>
<body class="bg-gray-50 min-h-screen">

<!-- 页头:使用 Bootstrap 的 navbar 组件 -->
<nav class="navbar navbar-dark bg-primary">
    <div class="container">
        <span class="navbar-brand mb-0 h1">🛒 优选商城 · 第14章</span>
    </div>
</nav>

<!-- 主容器 -->
<div class="container my-5">
    <!-- 页面标题 -->
    <div class="text-center mb-5">
        <h1 class="display-5 fw-bold text-primary">商品列表(Thymeleaf 工具对象)</h1>
        <p class="text-muted">演示 #temporals / #numbers / #strings / #lists 格式化与工具方法</p>
    </div>

    <!-- 演示:当前时间格式化(#temporals,原生支持 java.time 的 LocalDateTime) -->
    <div class="alert alert-info mb-4">
        <strong>当前时间:</strong>
        <span th:text="${#temporals.format(now, 'yyyy年MM月dd日 HH:mm:ss')}">2026年01月01日 00:00:00</span>
    </div>

    <!--
        工具对象语法(均由 Thymeleaf 自动提供,可直接使用):

        1. #temporals —— 日期时间工具(java.time 原生支持,替代过时的 #dates)
           - format(temporal, pattern):按指定格式输出日期
           - formatISO(date):按 ISO 格式输出
           - day(date) / month(date) / year(date):提取日期组件
           - createNow():创建当前时间

        2. #numbers —— 数值工具
           - formatDecimal(num, minIntDigits, decimalDigits):格式化小数(补零、保留位数)
           - formatInteger(num, minIntDigits):格式化整数(千分位、补零)
           - percent(num, decimalDigits):格式化为百分比

        3. #strings —— 字符串工具
           - isEmpty(str):判断是否为 null 或空
           - length(str):获取长度
           - substring(str, start, end):截取子串
           - abbreviate(str, maxSize):缩写(超长显示 ...)
           - upperCase(str) / lowerCase(str):大小写转换
           - replace(str, old, new):替换

        4. #lists —— 列表工具
           - isEmpty(list):判断是否为空
           - size(list):获取大小
           - contains(list, element):判断是否包含

        5. #arrays —— 数组工具(类似 #lists)
           - isEmpty(array) / size(array) / contains(array, element)
    -->
    <div class="row g-4">
        <!-- 遍历商品列表 -->
        <div class="col-md-6 col-lg-4" th:each="product : ${products}">
            <!-- 卡片:Bootstrap 的 card 组件 -->
            <div class="card h-100 shadow-sm">
                <!-- 卡片头部:显示商品名称 -->
                <div class="card-header bg-light">
                    <h5 class="card-title mb-0" th:text="${product.name}">商品名称</h5>
                </div>

                <!-- 卡片主体 -->
                <div class="card-body">
                    <!-- 商品分类 -->
                    <span class="badge bg-secondary mb-2" th:text="${product.category}">分类</span>

                    <!-- 商品描述(演示 #strings 判空与缩写) -->
                    <p class="card-text text-muted">
                        <!--
                            th:if 判断描述非空时显示
                            #strings.isEmpty(product.description) 返回 true 表示为空
                        -->
                        <span th:if="${not #strings.isEmpty(product.description)}"
                              th:text="${#strings.abbreviate(product.description, 30)}">
                            商品描述
                        </span>
                        <!--
                            th:if 判断描述为空时显示"暂无描述"
                        -->
                        <span th:if="${#strings.isEmpty(product.description)}"
                              class="text-muted fst-italic">暂无描述</span>
                    </p>

                    <!-- 商品价格(演示 #numbers 格式化) -->
                    <div class="mb-2">
                        <span class="text-muted">价格:</span>
                        <!--
                            #numbers.formatDecimal(price, 1, 2):
                            - 参数 1:最小整数位数(不够补零)
                            - 参数 2:小数位数(保留 2 位)
                        -->
                        <span class="h5 text-danger"
                              th:text="${'¥' + #numbers.formatDecimal(product.price, 1, 2)}">¥0.00</span>
                    </div>

                    <!-- 商品库存(演示 #numbers 格式化整数) -->
                    <div class="mb-2">
                        <span class="text-muted">库存:</span>
                        <span class="badge bg-info"
                              th:text="${#numbers.formatInteger(product.stock, 1) + ' 件'}">0 件</span>
                    </div>

                    <!-- 创建时间(演示 #temporals 格式化,java.time 原生支持) -->
                    <div class="small text-muted">
                        <span>上架时间:</span>
                        <span th:text="${#temporals.format(product.createdAt, 'MM月dd日')}">01月01日</span>
                    </div>
                </div>

                <!-- 卡片底部:操作按钮 -->
                <div class="card-footer bg-white border-0">
                    <button class="btn btn-primary btn-sm w-100">查看详情</button>
                </div>
            </div>
        </div>
    </div>

    <!-- 演示:列表工具(#lists) -->
    <div class="mt-5 p-3 bg-light rounded">
        <h6 class="fw-bold">💡 工具对象知识点:</h6>
        <ul class="list-unstyled mb-0">
            <li><code>#temporals.format(date, 'pattern')</code> —— 日期格式化(java.time)</li>
            <li><code>#numbers.formatDecimal(num, 1, 2)</code> —— 小数格式化(保留2位)</li>
            <li><code>#strings.isEmpty(str)</code> —— 判断字符串是否为空</li>
            <li><code>#strings.abbreviate(str, maxSize)</code> —— 字符串缩写</li>
            <li><code>#lists.size(list)</code> / <code>#lists.isEmpty(list)</code> —— 列表操作</li>
            <li class="mt-2">
                <strong>当前商品总数:</strong>
                <span class="badge bg-primary" th:text="${#lists.size(products)}">0</span> 件
            </li>
        </ul>
    </div>
</div>

</body>
</html>
运行验证
cd sb-thymeleaf/chapter14-utils
mvn clean package -DskipTests
java -jar target/chapter14-utils-1.0.0.jar
# 浏览器访问 http://localhost:8114/
页面显示 5 个商品卡片,演示:
- 顶部提示显示当前时间,使用
#temporals.format(now, .*)格式化 - 每个卡片的价格使用
#numbers.formatDecimal(price, 1, 2)保留两位小数 - 库存数量使用
#numbers.formatInteger(stock, 1)格式化 - 描述使用
#strings.isEmpty()判断是否为空,若空显示"暂无描述",否则用#strings.abbreviate()缩写 - 上架时间使用
#temporals.format(createdAt, .*)格式化 - 底部显示总商品数:
#lists.size(products)
页面效果
以下截图均为本地启动后浏览器真实渲染结果。
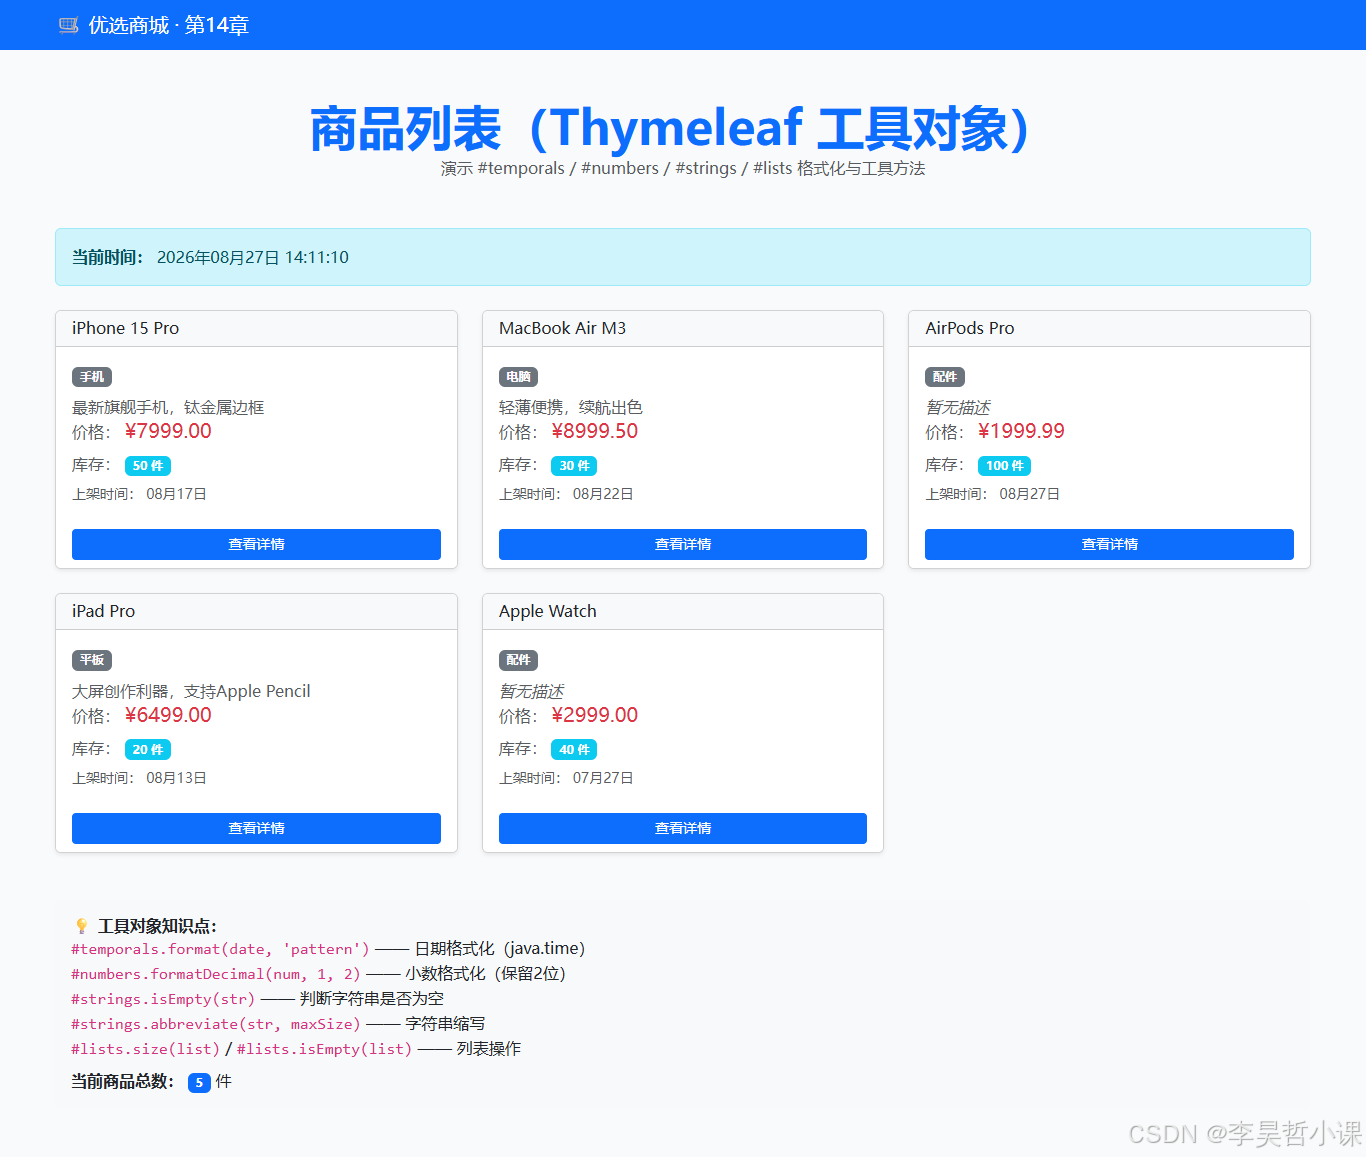
常见坑
-
#temporals需要 java.time 类型:若传入java.util.Date,#temporals.format()会报类型转换错误。Controller 中应使用LocalDateTime(Java 8+ 引入),而非过时的Date。现代 Spring Boot 项目推荐使用 java.time API。 -
#strings.isEmpty()对 null 和空字符串都返回 true:若需区分 null 与空字符串(如显示不同的提示),应用#strings.isEmpty()判断是否显示,再视情况显示"暂无描述"或具体内容。 -
#numbers.formatDecimal()参数顺序:签名是formatDecimal(num, minIntegerDigits, decimalDigits)。若写反(如formatDecimal(price, 2, 1)),会导致位数不对(整数部分至少 2 位、小数部分只有 1 位)。 -
工具对象作用域:
#temporals、#numbers等工具对象由 Thymeleaf 自动提供,无需在 Model 中添加。但若在自定义工具类中也定义了同名变量,可能会发生冲突,导致原有工具无法访问。 -
性能考虑:在循环中频繁调用
#strings.abbreviate()或#temporals.format()等工具方法,虽然方便,但会增加渲染开销。若性能敏感,考虑在 Controller 中预处理数据。

电商企业物流数字化转型必备!快递鸟 API 接口,72 小时快速完成物流系统集成。全流程实战1V1指导,营造开放的API技术生态圈。
更多推荐

 22
22 0
0- 0


 已为社区贡献5条内容

所有评论(0)