
Spring Boot 4 + Thymeleaf 电商主题实战 阶段二:模板语法与页面渲染
Spring Boot 4 + Thymeleaf 电商主题实战 阶段二:模板语法与页面渲染
学习目标: 掌握 Thymeleaf 的核心语法和动态页面渲染能力。
第05章 · 消息表达式与国际化
章节目标
通过本章学习,您将能够:
- 理解国际化(i18n)的概念及其在 Web 应用中的重要性
- 使用消息表达式
#{}从资源文件中读取多语言文本 - 配置 Spring Boot 的 i18n 支持(LocaleResolver + LocaleChangeInterceptor)
- 实现中英双语切换功能
理论知识
什么是国际化(i18n)?
国际化(Internationalization,简称 i18n)是指设计和开发能够适应不同语言和地区的软件的过程。
在 Web 应用中,这意味着用户可以根据自己的偏好查看不同语言的界面。
Spring Boot 的国际化支持
Spring Boot 自动配置了 MessageSource,用于加载和解析消息文件。关键组件包括:
1. MessageSource
自动从 classpath 加载消息文件:
messages.properties(默认/后备)messages_zh.properties(中文)messages_en.properties(英文)
2. LocaleResolver
决定当前请求使用哪种语言:
SessionLocaleResolver:从 Session 中读取语言设置CookieLocaleResolver:从 Cookie 中读取AcceptHeaderLocaleResolver:从 HTTP Accept-Language 头读取
3. LocaleChangeInterceptor
拦截请求参数,动态切换语言:
- 访问
?lang=en切换到英文 - 访问
?lang=zh切换到中文
消息表达式 #{…} 的用法
1. 简单消息读取
#{home.title} <!-- 读取键为 home.title 的消息 -->
2. 带参数的消息
#{welcome(name=${username})} <!-- 参数通过 (name=${username}) 传入 -->
消息文件中定义:
welcome=欢迎您,{0}!
消息文件的结构
messages.properties(默认)
home.title=优选商城 - 您的智能购物助手
welcome=欢迎您,{0}!
messages_en.properties(英文)
home.title=Premium Mall - Your Smart Shopping Assistant
welcome=Welcome, {0}!
项目结构
chapter05-i18n/
├── pom.xml                                    # Maven 依赖配置
├── src/
│   ├── main/
│   │   ├── java/
│   │   │   └── com/lihaozhe/ch05/
│   │   │       ├── Ch05Application.java        # 启动类
│   │   │       ├── config/
│   │   │       │   └── I18nConfig.java        # i18n 配置类
│   │   │       └── controller/
│   │   │           └── HomeController.java     # 首页控制器
│   │   └── resources/
│   │       ├── application.yml                 # 应用配置
│   │       ├── i18n/
│   │       │   ├── messages.properties         # 中文消息
│   │       │   └── messages_en.properties      # 英文消息
│   │       └── templates/
│   │           └── index.html                  # 首页模板
│   └── test/                                   # 单元测试(可选)
完整代码
pom.xml
<?xml version="1.0" encoding="UTF-8"?>
<!--
  第05章:消息表达式 #{} + 国际化(i18n)

  本章聚焦:
  - messages.properties + messages_en.properties:多语言消息文件
  - #{home.title}:从消息文件读取键为 home.title 的文本
  - #{welcome(name=${x})}:带参数的消息读取
  演示中英切换(用请求参数 ?lang=en 切换 LocaleResolver/LocaleChangeInterceptor)
-->
<project xmlns="http://maven.apache.org/POM/4.0.0"
         xmlns:xsi="http://www.w3.org/2001/XMLSchema-instance"
         xsi:schemaLocation="http://maven.apache.org/POM/4.0.0 https://maven.apache.org/xsd/maven-4.0.0.xsd">
    <modelVersion>4.0.0</modelVersion>

    <!-- 继承教程根工程,共享版本管理 -->
    <parent>
        <groupId>com.lihaozhe</groupId>
        <artifactId>sb-thymeleaf</artifactId>
        <version>1.0.0</version>
    </parent>

    <artifactId>chapter05-i18n</artifactId>
    <!-- Web 应用打成可执行 jar,内嵌 Tomcat,java -jar 直接跑 -->
    <packaging>jar</packaging>

    <dependencies>
        <!-- Web 启动器(Boot 4 重命名后的名称) -->
        <dependency>
            <groupId>org.springframework.boot</groupId>
            <artifactId>spring-boot-starter-webmvc</artifactId>
        </dependency>
        <!-- Thymeleaf 模板引擎:服务端渲染 HTML -->
        <dependency>
            <groupId>org.springframework.boot</groupId>
            <artifactId>spring-boot-starter-thymeleaf</artifactId>
        </dependency>
        <!-- 国际化支持(Spring 的 MessageSource 自动配置) -->
        <dependency>
            <groupId>org.springframework.boot</groupId>
            <artifactId>spring-boot-starter</artifactId>
        </dependency>
        <!-- 单元测试 -->
        <dependency>
            <groupId>org.springframework.boot</groupId>
            <artifactId>spring-boot-starter-test</artifactId>
            <scope>test</scope>
        </dependency>
    </dependencies>

    <build>
        <plugins>
            <!-- Spring Boot Maven 插件:支持 mvn spring-boot:run 和可执行 jar -->
            <plugin>
                <groupId>org.springframework.boot</groupId>
                <artifactId>spring-boot-maven-plugin</artifactId>
            </plugin>
        </plugins>
    </build>
</project>
src/main/java/com/lihaozhe/ch05/Ch05Application.java
package com.lihaozhe.ch05;

import org.springframework.boot.SpringApplication;
import org.springframework.boot.autoconfigure.SpringBootApplication;

/**
 * 第05章 启动入口。
 *
 * <p>理论知识:{@code @SpringBootApplication} 是一个组合注解,等价于同时加了
 * {@code @SpringBootConfiguration}(标记这是一个配置类)、
 * {@code @EnableAutoConfiguration}(根据 classpath 自动装配 Bean)、
 * {@code @ComponentScan}(扫描当前包及其子包下的组件)。</p>
 *
 * <p>启动类必须放在最外层包 {@code com.lihaozhe.ch05},
 * 这样 {@code @ComponentScan} 才能扫描到 controller / service 等子包中的组件。</p>
 */
@SpringBootApplication
public class Ch05Application {

    /**
     * 程序入口:SpringApplication.run 会启动内嵌 Tomcat 并初始化 Spring 容器。
     *
     * @param args 命令行参数(本教程不接收参数)
     */
    public static void main(String[] args) {
        SpringApplication.run(Ch05Application.class, args);
    }
}
src/main/java/com/lihaozhe/ch05/config/I18nConfig.java
package com.lihaozhe.ch05.config;

import org.springframework.context.annotation.Bean;
import org.springframework.context.annotation.Configuration;
import org.springframework.web.servlet.LocaleResolver;
import org.springframework.web.servlet.config.annotation.InterceptorRegistry;
import org.springframework.web.servlet.config.annotation.WebMvcConfigurer;
import org.springframework.web.servlet.i18n.LocaleChangeInterceptor;
import org.springframework.web.servlet.i18n.SessionLocaleResolver;

import java.util.Locale;

/**
 * 国际化配置类。
 *
 * <p>理论知识:Spring 的 i18n 支持需要配置两个关键 Bean——
 * 1. LocaleResolver:决定当前请求使用哪种语言(Locale)
 *    - SessionLocaleResolver:从会话中读取语言设置
 * 2. LocaleChangeInterceptor:拦截请求参数,切换语言
 *    - 如访问 /?lang=en 时,自动将语言切换为英文</p>
 */
@Configuration
public class I18nConfig implements WebMvcConfigurer {

    /**
     * 配置 LocaleResolver。
     *
     * <p>SessionLocaleResolver 将语言设置保存在 HttpSession 中,
     * 保证同一个用户在后续请求中保持相同的语言设置。</p>
     *
     * @return LocaleResolver 实例
     */
    @Bean
    public LocaleResolver localeResolver() {
        SessionLocaleResolver resolver = new SessionLocaleResolver();
        // 默认语言设为简体中文
        resolver.setDefaultLocale(Locale.SIMPLIFIED_CHINESE);
        return resolver;
    }

    /**
     * 配置 LocaleChangeInterceptor。
     *
     * <p>拦截所有请求,检测是否存在 lang 参数。
     * 若访问 ?lang=en 则切换到英文,访问 ?lang=zh 则切换到中文。</p>
     *
     * @return LocaleChangeInterceptor 实例
     */
    @Bean
    public LocaleChangeInterceptor localeChangeInterceptor() {
        LocaleChangeInterceptor interceptor = new LocaleChangeInterceptor();
        // 指定请求参数名,默认为 "locale",这里改为 "lang" 更直观
        interceptor.setParamName("lang");
        return interceptor;
    }

    /**
     * 注册拦截器。
     *
     * <p>将 localeChangeInterceptor 添加到拦截器链,
     * 使其在每次请求时都能检测 lang 参数并切换语言。</p>
     *
     * @param registry 拦截器注册表
     */
    @Override
    public void addInterceptors(InterceptorRegistry registry) {
        registry.addInterceptor(localeChangeInterceptor());
    }
}
src/main/java/com/lihaozhe/ch05/controller/HomeController.java
package com.lihaozhe.ch05.controller;

import org.springframework.stereotype.Controller;
import org.springframework.ui.Model;
import org.springframework.web.bind.annotation.GetMapping;

/**
 * 首页控制器。
 *
 * <p>理论知识:消息表达式 {@code #{...}} 用于从国际化消息文件中读取文本。
 * Spring Boot 会自动加载 classpath 下的 messages.properties 和 messages_xx.properties,
 * 根据当前 Locale 自动选择对应语言的消息。
 *
 * 语法示例:
 * 1. {@code #{home.title}}:读取键为 home.title 的消息
 * 2. {@code #{welcome(name=${username})}}:读取带参数的消息,
 *    参数通过 (name=${username}) 传入</p>
 */
@Controller
public class HomeController {

    /**
     * 国际化首页。
     *
     * <p>本方法演示如何使用消息表达式读取多语言消息,
     * 并根据 lang 参数切换中英文显示。语言切换通过 LocaleChangeInterceptor 自动处理。</p>
     *
     * @param model 视图模型(Spring 自动注入)
     * @return 视图名 "index",对应 templates/index.html
     */
    @GetMapping("/")
    public String index(Model model) {
        // 传递一个用户名,用于演示带参数的消息
        model.addAttribute("username", "张三");

        // 返回视图名,Thymeleaf 会去 classpath:/templates/ 找 index.html
        return "index";
    }
}
src/main/resources/application.yml
# 第05章 国际化消息文件(中文)
# 默认消息文件(当找不到对应语言时使用)

# 首页标题
home.title=优选商城 - 您的智能购物助手

# 欢迎消息(带参数 {0} 会被 username 替换)
welcome=欢迎您,{0}!

# 导航栏
nav.home=首页
nav.products=商品
nav.cart=购物车
nav.profile=个人中心

# 按钮
btn.login=登录
btn.register=注册
btn.view=查看详情

# 页脚
footer.copyright=© 2026 优选商城. 保留所有权利.

# 提示消息
msg.language=当前语言:中文
src/main/resources/i18n/messages.properties
# 第05章 国际化消息文件(中文)
# 默认消息文件(当找不到对应语言时使用)

# 首页标题
home.title=优选商城 - 您的智能购物助手

# 欢迎消息(带参数 {0} 会被 username 替换)
welcome=欢迎您,{0}!

# 导航栏
nav.home=首页
nav.products=商品
nav.cart=购物车
nav.profile=个人中心

# 按钮
btn.login=登录
btn.register=注册
btn.view=查看详情

# 页脚
footer.copyright=© 2026 优选商城. 保留所有权利.

# 提示消息
msg.language=当前语言:中文
src/main/resources/i18n/messages_en.properties
# 第05章 国际化消息文件(英文)
# English messages file

# Home page title
home.title=Premium Mall - Your Smart Shopping Assistant

# Welcome message (parameter {0} will be replaced by username)
welcome=Welcome, {0}!

# Navigation
nav.home=Home
nav.products=Products
nav.cart=Cart
nav.profile=Profile

# Buttons
btn.login=Login
btn.register=Register
btn.view=View Details

# Footer
footer.copyright=© 2026 Premium Mall. All rights reserved.

# Language indicator
msg.language=Current Language: English
src/main/resources/templates/index.html
<!DOCTYPE html>
<!--
  xmlns:th 是 Thymeleaf 的命名空间声明:只有加上它,
  th:* 属性才会被 Thymeleaf 识别并解析。IDE(如 IDEA)也会因此获得 th: 的自动补全。
-->
<html lang="zh-CN" xmlns:th="http://www.thymeleaf.org">
<head>
    <meta charset="UTF-8">
    <!-- 响应式视口,移动端按设备宽度渲染 -->
    <meta name="viewport" content="width=device-width, initial-scale=1.0">
    <!--
        第05章重点:使用消息表达式 #{home.title} 动态读取页面标题
        标题会从 messages.properties 或 messages_en.properties 中读取,
        取决于当前语言设置(由 lang 请求参数控制)
    -->
    <title th:text="#{home.title}">优选商城</title>

    <!-- ===== 前端框架(全部走 CDN,免构建)===== -->
    <!-- Tailwind Play CDN:教学用零配置方案;生产环境请用 Tailwind CLI / PostCSS 构建 -->
    <script src="https://cdn.tailwindcss.com"></script>
    <!-- Bootstrap 5.3.x:提供现成组件(按钮/卡片/表单等) -->
    <link href="https://cdn.jsdelivr.net/npm/bootstrap@5.3.3/dist/css/bootstrap.min.css" rel="stylesheet">
    <script src="https://cdn.jsdelivr.net/npm/bootstrap@5.3.3/dist/js/bootstrap.bundle.min.js"></script>
    <!-- jQuery 4.x:DOM 操作与事件(后续章节异步请求会用到) -->
    <script src="https://code.jquery.com/jquery-4.0.0.min.js"></script>
    <!-- axios:基于 Promise 的 HTTP 客户端(后续章节异步加载数据会用到) -->
    <script src="https://cdn.jsdelivr.net/npm/axios@1.7.9/dist/axios.min.js"></script>
</head>
<body class="bg-gray-50 min-h-screen">

<!-- 语言切换栏 -->
<div class="bg-indigo-600 text-white py-2">
    <div class="container mx-auto px-4 flex justify-end space-x-4">
        <!-- 中文链接:访问 ?lang=zh 切换到中文 -->
        <a href="?lang=zh" class="text-white hover:text-gray-200">中文</a>
        <!-- 英文链接:访问 ?lang=en 切换到英文 -->
        <a href="?lang=en" class="text-white hover:text-gray-200">English</a>
    </div>
</div>

<!-- 主容器 -->
<div class="container mx-auto py-12 px-4">

    <!-- 页头 -->
    <div class="text-center mb-12">
        <!-- #{home.title} 从消息文件读取标题 -->
        <h1 class="text-4xl font-bold text-indigo-600" th:text="#{home.title}">优选商城</h1>

        <!-- #{welcome(name=${username})} 带参数的消息读取 -->
        <p class="mt-4 text-xl text-gray-600" th:text="#{welcome(${username})}">欢迎您,用户!</p>
    </div>

    <!-- 导航菜单 -->
    <nav class="flex justify-center space-x-8 mb-12">
        <a href="#" class="text-indigo-600 hover:text-indigo-800 font-semibold" th:text="#{nav.home}">首页</a>
        <a href="#" class="text-indigo-600 hover:text-indigo-800 font-semibold" th:text="#{nav.products}">商品</a>
        <a href="#" class="text-indigo-600 hover:text-indigo-800 font-semibold" th:text="#{nav.cart}">购物车</a>
        <a href="#" class="text-indigo-600 hover:text-indigo-800 font-semibold" th:text="#{nav.profile}">个人中心</a>
    </nav>

    <!-- 按钮示例 -->
    <div class="text-center space-x-4 mb-12">
        <button class="btn btn-primary px-6 py-2" th:text="#{btn.login}">登录</button>
        <button class="btn btn-secondary px-6 py-2" th:text="#{btn.register}">注册</button>
    </div>

    <!-- 当前语言提示 -->
    <div class="text-center text-sm text-gray-500 mb-8" th:text="#{msg.language}">当前语言:中文</div>

    <!-- 页脚 -->
    <footer class="text-center text-sm text-gray-400 mt-12" th:text="#{footer.copyright}">
        © 2026 优选商城. 保留所有权利.
    </footer>

    <!-- 说明:模板里写在标签之间的中文是"兜底文本",
         一旦 Thymeleaf 成功渲染,会被 th:text 的结果替换掉。 -->
    <div class="mt-8 text-center text-xs text-gray-400">
        第05章 · 知识点:<code>#{...}</code> 消息表达式 + 国际化配置
    </div>
</div>

</body>
</html>
运行验证
步骤 1:编译打包
cd sb-thymeleaf/chapter05-i18n
mvn clean package -DskipTests
步骤 2:运行应用
java -jar target/chapter05-i18n-1.0.0.jar
步骤 3:浏览器访问
中文界面(默认)
http://localhost:8105/
您应该看到:
- 标题:优选商城 - 您的智能购物助手
- 欢迎语:欢迎您,张三!
- 导航:首页 | 商品 | 购物车 | 个人中心
- 按钮:登录 | 注册
- 页脚:© 2026 优选商城. 保留所有权利.
- 语言提示:当前语言:中文
英文界面
http://localhost:8105/?lang=en
您应该看到所有文本变为英文:
- 标题:Premium Mall - Your Smart Shopping Assistant
- 欢迎语:Welcome, 张三!
- 导航:Home | Products | Cart | Profile
- 按钮:Login | Register
- 页脚:© 2026 Premium Mall. All rights reserved.
- 语言提示:Current Language: English
验证点
✅ 访问 ?lang=en 后,Session 中保存了英文设置,后续请求(不带参数)也会显示英文
✅ 访问 ?lang=zh 可以切换回中文
✅ 如果消息文件缺失某个键,会显示键名本身(如 home.title)
页面效果
以下截图均为本地启动后浏览器真实渲染结果。
中文界面(默认)
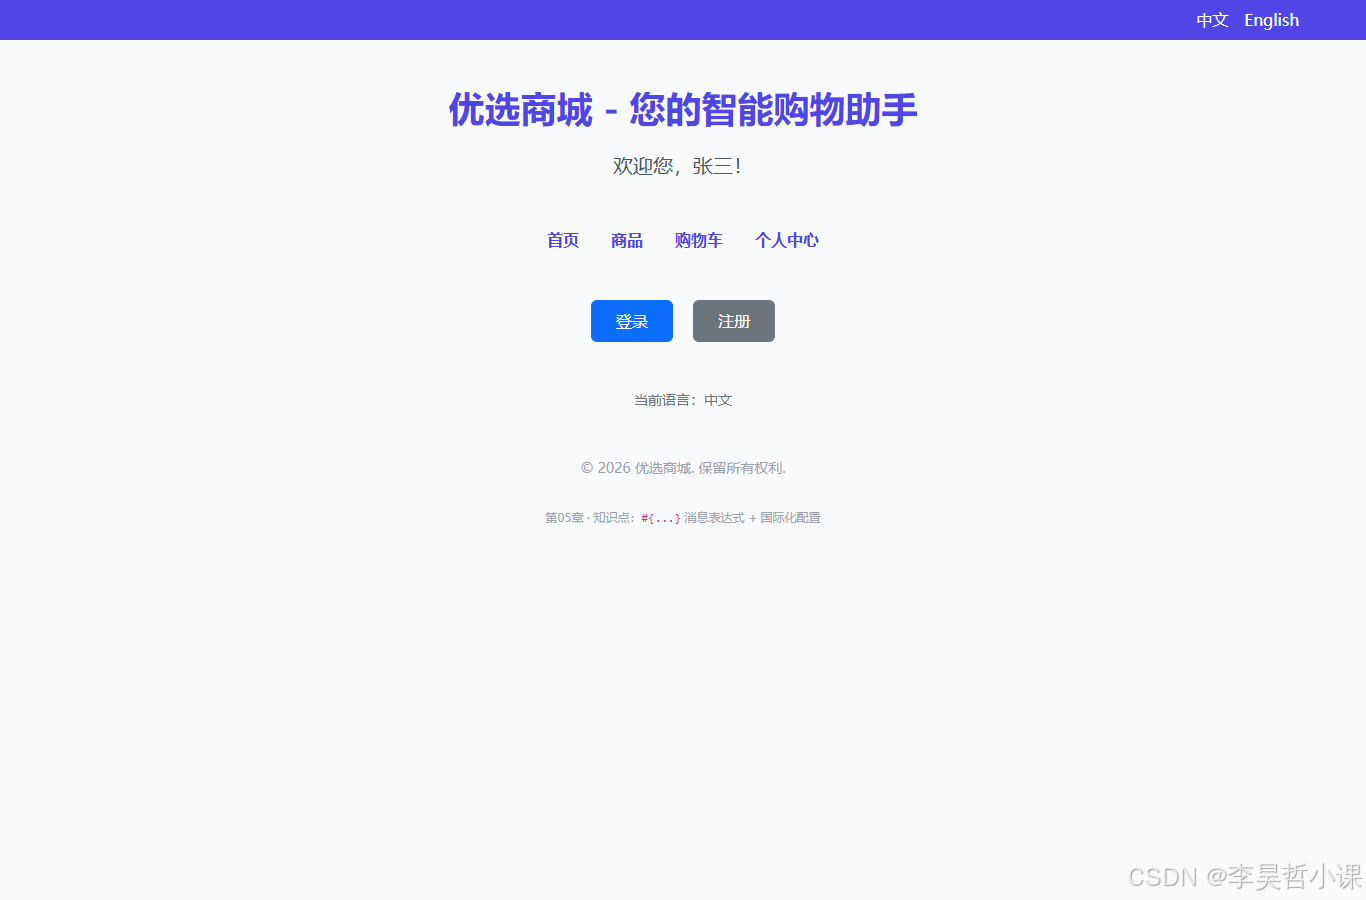
中文界面展示了消息表达式 #{...} 的用法:所有文本(标题、欢迎语、导航、按钮、页脚)都从 messages.properties 中读取中文消息,并使用 ?lang=zh 参数切换到中文。
英文界面
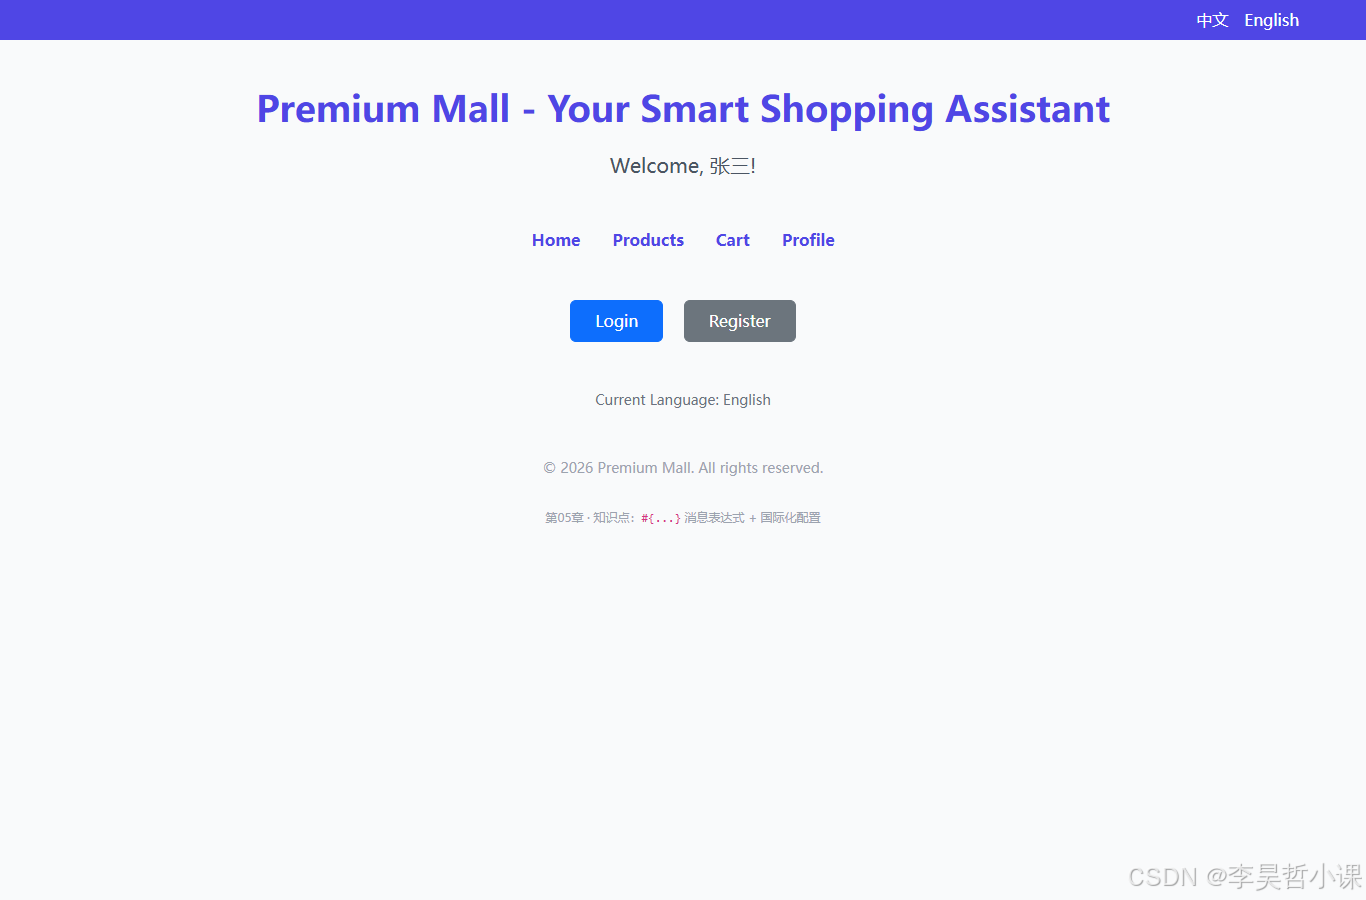
英文界面通过访问 ?lang=en 参数触发语言切换:所有文本自动从 messages_en.properties 中读取英文消息,演示了 Spring Boot 国际化配置的完整流程。
常见坑
坑 1:消息文件位置或命名错误
问题:#{home.title} 显示键名而不是消息内容。
原因:消息文件未放在正确位置或命名不符合规范。
解决:确保文件位置:
src/main/resources/
├── messages.properties           # 默认/后备
├── messages_en.properties        # 英文
└── messages_zh.properties        # 中文(可选,默认会用 messages.properties)
并在 application.yml 中配置:
spring:
  messages:
    basename: messages  # 基础名,不含扩展名和语言后缀
    encoding: UTF-8
坑 2:参数占位符错误
问题:#{welcome(name=${username})} 中参数未被替换。
原因:参数名或顺序错误,或消息文件中未定义占位符。
解决:
- 消息文件:使用
{0},{1}等索引占位符welcome=欢迎您,{0}! - 模板:参数名可以是任意的,但顺序必须与消息文件一致
#{welcome(name=${username})} <!-- name 对应第一个 {0} -->
坑 3:LocaleResolver 配置未生效
问题:?lang=en 不起作用,语言不切换。
原因:未配置 LocaleChangeInterceptor 或未注册拦截器。
解决:确保 I18nConfig 类中:
- 定义
localeChangeInterceptor()Bean - 在
addInterceptors()中注册拦截器 - 指定参数名:
interceptor.setParamName("lang")
坑 4:默认语言设置
问题:系统默认语言不是中文,导致英文优先显示。
原因:SessionLocaleResolver 的默认 Locale 设置不正确。
解决:在 localeResolver() 中明确设置:
SessionLocaleResolver resolver = new SessionLocaleResolver();
resolver.setDefaultLocale(Locale.SIMPLIFIED_CHINESE);  // 明确设为简体中文
return resolver;
第06章 · 片段表达式
章节目标
通过本章学习,您将能够:
- 理解片段表达式
~{}的概念及其作用 - 使用
th:fragment定义可复用的页面片段(如页头、页脚) - 通过
th:replace或th:insert复用片段 - 在多个页面间共享通用组件,减少代码重复
理论知识
什么是片段(Fragment)?
片段是模板中可独立复用的一部分 HTML 代码。
通过片段,可以将页面中重复的部分(如页头、页脚、导航栏)抽取成独立的模板,然后在其他页面中引入。
片段表达式的两种用法
1. th:fragment 定义片段
在片段文件中用 th:fragment="name" 标记一个片段:
<header th:fragment="header">
    <!-- 页头内容 -->
</header>
2. th:replace 或 th:insert 复用片段
在需要使用片段的页面中:
<!-- 替换当前标签为片段内容 -->
<header th:replace="~{fragments :: header}"></header>

<!-- 在标签内插入片段内容 -->
<div th:insert="~{fragments :: footer}"></div>
区别
| 特性 | th:replace | th:insert |
|---|---|---|
| 行为 | 用片段完全替换当前标签 | 在当前标签内插入片段 |
| 当前标签 | 消失 | 保留 |
| 常用场景 | 页头、页脚整体替换 | 在某个容器内插入内容 |
片段文件的命名约定
- 片段定义文件通常以
fragments.html命名,放在templates/目录下 - 片段在文件内用
th:fragment="name"标记 - 引用时使用格式:
~{fragments :: name}
实际应用场景
- 页头/页脚:所有页面共享相同的页头页脚
- 导航栏:统一的菜单和导航
- 表单组件:可复用的输入字段组合
- 卡片模板:电商中的商品卡片、用户卡片等
项目结构
chapter06-fragment/
├── pom.xml                                    # Maven 依赖配置
├── src/
│   ├── main/
│   │   ├── java/
│   │   │   └── com/lihaozhe/ch06/
│   │   │       ├── Ch06Application.java        # 启动类
│   │   │       └── controller/
│   │   │           └── PageController.java     # 页面控制器
│   │   └── resources/
│   │       ├── application.yml                 # 应用配置
│   │       └── templates/
│   │           ├── fragments.html             # 片段定义文件
│   │           ├── home.html                   # 首页模板
│   │           └── products.html               # 商品页模板
│   └── test/                                   # 单元测试(可选)
完整代码
pom.xml
<?xml version="1.0" encoding="UTF-8"?>
<!--
  第06章:片段表达式 ~{}

  本章聚焦:
  - th:fragment 定义可复用的页面片段(如页头、页脚)
  - th:replace / th:insert 复用片段,避免重复代码
  - 演示页头页脚只在片段文件定义一次
-->
<project xmlns="http://maven.apache.org/POM/4.0.0"
         xmlns:xsi="http://www.w3.org/2001/XMLSchema-instance"
         xsi:schemaLocation="http://maven.apache.org/POM/4.0.0 https://maven.apache.org/xsd/maven-4.0.0.xsd">
    <modelVersion>4.0.0</modelVersion>

    <!-- 继承教程根工程,共享版本管理 -->
    <parent>
        <groupId>com.lihaozhe</groupId>
        <artifactId>sb-thymeleaf</artifactId>
        <version>1.0.0</version>
    </parent>

    <artifactId>chapter06-fragment</artifactId>
    <!-- Web 应用打成可执行 jar,内嵌 Tomcat,java -jar 直接跑 -->
    <packaging>jar</packaging>

    <dependencies>
        <!-- Web 启动器(Boot 4 重命名后的名称) -->
        <dependency>
            <groupId>org.springframework.boot</groupId>
            <artifactId>spring-boot-starter-webmvc</artifactId>
        </dependency>
        <!-- Thymeleaf 模板引擎:服务端渲染 HTML -->
        <dependency>
            <groupId>org.springframework.boot</groupId>
            <artifactId>spring-boot-starter-thymeleaf</artifactId>
        </dependency>
        <!-- 单元测试 -->
        <dependency>
            <groupId>org.springframework.boot</groupId>
            <artifactId>spring-boot-starter-test</artifactId>
            <scope>test</scope>
        </dependency>
    </dependencies>

    <build>
        <plugins>
            <!-- Spring Boot Maven 插件:支持 mvn spring-boot:run 和可执行 jar -->
            <plugin>
                <groupId>org.springframework.boot</groupId>
                <artifactId>spring-boot-maven-plugin</artifactId>
            </plugin>
        </plugins>
    </build>
</project>
src/main/java/com/lihaozhe/ch06/Ch06Application.java
package com.lihaozhe.ch06;

import org.springframework.boot.SpringApplication;
import org.springframework.boot.autoconfigure.SpringBootApplication;

/**
 * 第06章 启动入口。
 *
 * <p>理论知识:{@code @SpringBootApplication} 是一个组合注解,等价于同时加了
 * {@code @SpringBootConfiguration}(标记这是一个配置类)、
 * {@code @EnableAutoConfiguration}(根据 classpath 自动装配 Bean)、
 * {@code @ComponentScan}(扫描当前包及其子包下的组件)。</p>
 *
 * <p>启动类必须放在最外层包 {@code com.lihaozhe.ch06},
 * 这样 {@code @ComponentScan} 才能扫描到 controller / service 等子包中的组件。</p>
 */
@SpringBootApplication
public class Ch06Application {

    /**
     * 程序入口:SpringApplication.run 会启动内嵌 Tomcat 并初始化 Spring 容器。
     *
     * @param args 命令行参数(本教程不接收参数)
     */
    public static void main(String[] args) {
        SpringApplication.run(Ch06Application.class, args);
    }
}
src/main/java/com/lihaozhe/ch06/controller/PageController.java
package com.lihaozhe.ch06.controller;

import org.springframework.stereotype.Controller;
import org.springframework.ui.Model;
import org.springframework.web.bind.annotation.GetMapping;

/**
 * 首页与商品页控制器。
 *
 * <p>理论知识:片段表达式 {@code ~{...}} 用于定义和复用页面片段。
 * 通过 th:fragment 定义可复用的模板片段(如页头、页脚、菜单),
 * 然后在其他页面用 th:replace 或 th:insert 引入,避免代码重复,提高维护性。</p>
 */
@Controller
public class PageController {

    /**
     * 首页。
     *
     * <p>本方法演示如何在首页中复用共同的页头、页脚片段。</p>
     *
     * @param model 视图模型(Spring 自动注入)
     * @return 视图名 "home",对应 templates/home.html
     */
    @GetMapping("/")
    public String home(Model model) {
        model.addAttribute("pageTitle", "首页");
        model.addAttribute("content", "欢迎来到优选商城!这里汇集了各类高品质商品。");
        return "home";
    }

    /**
     * 商品页面。
     *
     * <p>本方法演示如何在另一个页面中复用相同的页头、页脚片段。</p>
     *
     * @param model 视图模型(Spring 自动注入)
     * @return 视图名 "products",对应 templates/products.html
     */
    @GetMapping("/products")
    public String products(Model model) {
        model.addAttribute("pageTitle", "商品列表");
        model.addAttribute("content", "精选优质商品,满足您的各种需求。");
        return "products";
    }
}
src/main/resources/application.yml
# 第06章:片段表达式
# 端口规则:8080 + 章号 6 → 8106
server:
  port: 8106

spring:
  application:
    name: chapter06-fragment
  thymeleaf:
    # 开发期关闭缓存,修改模板后刷新浏览器即可看到效果(无需重启)
    cache: false
    # 模板/响应统一使用 UTF-8,保证中文不乱码
    encoding: UTF-8
    # 使用 HTML 模式解析(兼容标准 HTML5 标签)
    mode: HTML
    # 启动时校验模板是否存在、语法是否正确(开发期友好)
    check-template: true
    check-template-location: true
src/main/resources/templates/fragments.html
<!DOCTYPE html>
<!--
  片段定义文件:包含页头、页脚等可复用片段
  使用 th:fragment 定义片段,供其他模板复用
-->
<html lang="zh-CN" xmlns:th="http://www.thymeleaf.org">
<head>
    <meta charset="UTF-8">
    <title>片段定义</title>
</head>
<body>

<!--
    页头片段
    th:fragment="header" 定义了名为 "header" 的片段
    其他页面可以通过 th:replace="~{fragments :: header}" 复用这个片段
-->
<header th:fragment="header" class="bg-indigo-600 text-white py-4">
    <div class="container mx-auto px-4 flex justify-between items-center">
        <!-- 使用 #{...} 或变量表达式 ${pageTitle} 动态显示页面标题 -->
        <h1 class="text-2xl font-bold" th:text="${pageTitle}">页面标题占位符</h1>
        <nav class="space-x-4">
            <a href="/" class="text-white hover:text-gray-200">首页</a>
            <a href="/products" class="text-white hover:text-gray-200">商品</a>
        </nav>
    </div>
</header>

<!--
    页脚片段
    th:fragment="footer" 定义了名为 "footer" 的片段
-->
<footer th:fragment="footer" class="bg-gray-800 text-white py-6 mt-12">
    <div class="container mx-auto px-4 text-center">
        <p>© 2026 优选商城 · 您的智能购物助手</p>
        <p class="text-sm text-gray-400 mt-2">本教程演示 Thymeleaf 片段表达式</p>
    </div>
</footer>

</body>
</html>
src/main/resources/templates/home.html
<!DOCTYPE html>
<!--
  xmlns:th 是 Thymeleaf 的命名空间声明:只有加上它,
  th:* 属性才会被 Thymeleaf 识别并解析。IDE(如 IDEA)也会因此获得 th: 的自动补全。
-->
<html lang="zh-CN" xmlns:th="http://www.thymeleaf.org">
<head>
    <meta charset="UTF-8">
    <!-- 响应式视口,移动端按设备宽度渲染 -->
    <meta name="viewport" content="width=device-width, initial-scale=1.0">
    <title th:text="${pageTitle}">首页</title>

    <!-- ===== 前端框架(全部走 CDN,免构建)===== -->
    <!-- Tailwind Play CDN:教学用零配置方案;生产环境请用 Tailwind CLI / PostCSS 构建 -->
    <script src="https://cdn.tailwindcss.com"></script>
    <!-- Bootstrap 5.3.x:提供现成组件(按钮/卡片/表单等) -->
    <link href="https://cdn.jsdelivr.net/npm/bootstrap@5.3.3/dist/css/bootstrap.min.css" rel="stylesheet">
    <script src="https://cdn.jsdelivr.net/npm/bootstrap@5.3.3/dist/js/bootstrap.bundle.min.js"></script>
    <!-- jQuery 4.x:DOM 操作与事件(后续章节异步请求会用到) -->
    <script src="https://code.jquery.com/jquery-4.0.0.min.js"></script>
    <!-- axios:基于 Promise 的 HTTP 客户端(后续章节异步加载数据会用到) -->
    <script src="https://cdn.jsdelivr.net/npm/axios@1.7.9/dist/axios.min.js"></script>
</head>
<body class="bg-gray-50 min-h-screen flex flex-col">

    <!--
        复用页头片段:th:replace="~{fragments :: header}"
        - fragments 是片段定义的文件名(classpath:/templates/fragments.html)
        - header 是片段名(在 fragments.html 中用 th:fragment="header" 定义)
        - 这行会把当前 <header> 标签替换为 fragments.html 中的 header 片段
    -->
    <header th:replace="~{fragments :: header}">
        <!-- 兜底内容:如果片段加载失败,显示默认内容 -->
        <h1>首页</h1>
    </header>

    <!-- 主内容区 -->
    <main class="flex-grow container mx-auto py-12 px-4">
        <div class="text-center">
            <h2 class="text-3xl font-bold text-indigo-600 mb-4">首页</h2>
            <p class="text-lg text-gray-600" th:text="${content}">欢迎内容占位符</p>
        </div>

        <!-- 演示卡片 -->
        <div class="grid grid-cols-1 md:grid-cols-3 gap-6 mt-12">
            <div class="bg-white rounded-2xl shadow-lg p-6">
                <h3 class="text-xl font-bold text-gray-800 mb-2">商品丰富</h3>
                <p class="text-gray-600">各类商品应有尽有,满足您的购物需求</p>
            </div>
            <div class="bg-white rounded-2xl shadow-lg p-6">
                <h3 class="text-xl font-bold text-gray-800 mb-2">品质保证</h3>
                <p class="text-gray-600">严格筛选优质商家,确保商品质量</p>
            </div>
            <div class="bg-white rounded-2xl shadow-lg p-6">
                <h3 class="text-xl font-bold text-gray-800 mb-2">价格优惠</h3>
                <p class="text-gray-600">定期促销活动,享受超值价格</p>
            </div>
        </div>
    </main>

    <!--
        复用页脚片段:th:replace="~{fragments :: footer}"
    -->
    <footer th:replace="~{fragments :: footer}">
        <!-- 兜底内容 -->
        <p>页脚占位符</p>
    </footer>

    <!-- 说明:模板里写在标签之间的中文是"兜底文本",
         一旦 Thymeleaf 成功渲染,会被片段替换掉。 -->
    <div class="text-center text-xs text-gray-400 mb-4">
        第06章 · 知识点:<code>th:fragment</code> + <code>th:replace="~{...}"</code>
    </div>

</body>
</html>
src/main/resources/templates/products.html
<!DOCTYPE html>
<!--
  xmlns:th 是 Thymeleaf 的命名空间声明:只有加上它,
  th:* 属性才会被 Thymeleaf 识别并解析。IDE(如 IDEA)也会因此获得 th: 的自动补全。
-->
<html lang="zh-CN" xmlns:th="http://www.thymeleaf.org">
<head>
    <meta charset="UTF-8">
    <!-- 响应式视口,移动端按设备宽度渲染 -->
    <meta name="viewport" content="width=device-width, initial-scale=1.0">
    <title th:text="${pageTitle}">商品列表</title>

    <!-- ===== 前端框架(全部走 CDN,免构建)===== -->
    <!-- Tailwind Play CDN:教学用零配置方案;生产环境请用 Tailwind CLI / PostCSS 构建 -->
    <script src="https://cdn.tailwindcss.com"></script>
    <!-- Bootstrap 5.3.x:提供现成组件(按钮/卡片/表单等) -->
    <link href="https://cdn.jsdelivr.net/npm/bootstrap@5.3.3/dist/css/bootstrap.min.css" rel="stylesheet">
    <script src="https://cdn.jsdelivr.net/npm/bootstrap@5.3.3/dist/js/bootstrap.bundle.min.js"></script>
    <!-- jQuery 4.x:DOM 操作与事件(后续章节异步请求会用到) -->
    <script src="https://code.jquery.com/jquery-4.0.0.min.js"></script>
    <!-- axios:基于 Promise 的 HTTP 客户端(后续章节异步加载数据会用到) -->
    <script src="https://cdn.jsdelivr.net/npm/axios@1.7.9/dist/axios.min.js"></script>
</head>
<body class="bg-gray-50 min-h-screen flex flex-col">

    <!--
        复用页头片段:th:replace="~{fragments :: header}"
        同一片段在多个页面复用,避免代码重复
    -->
    <header th:replace="~{fragments :: header}">
        <h1>商品列表</h1>
    </header>

    <!-- 主内容区 -->
    <main class="flex-grow container mx-auto py-12 px-4">
        <div class="text-center mb-8">
            <h2 class="text-3xl font-bold text-indigo-600 mb-4">商品列表</h2>
            <p class="text-lg text-gray-600" th:text="${content}">商品内容占位符</p>
        </div>

        <!-- 演示商品列表 -->
        <div class="grid grid-cols-1 md:grid-cols-2 lg:grid-cols-4 gap-6">
            <div class="bg-white rounded-2xl shadow-lg p-6">
                <h3 class="text-lg font-bold text-gray-800 mb-2">iPhone 15 Pro</h3>
                <p class="text-gray-600 text-sm mb-4">专业级摄影手机</p>
                <div class="text-red-600 font-bold">¥7999</div>
            </div>
            <div class="bg-white rounded-2xl shadow-lg p-6">
                <h3 class="text-lg font-bold text-gray-800 mb-2">MacBook Air M3</h3>
                <p class="text-gray-600 text-sm mb-4">超轻薄笔记本</p>
                <div class="text-red-600 font-bold">¥8999</div>
            </div>
            <div class="bg-white rounded-2xl shadow-lg p-6">
                <h3 class="text-lg font-bold text-gray-800 mb-2">iPad Pro</h3>
                <p class="text-gray-600 text-sm mb-4">专业级平板</p>
                <div class="text-red-600 font-bold">¥7999</div>
            </div>
            <div class="bg-white rounded-2xl shadow-lg p-6">
                <h3 class="text-lg font-bold text-gray-800 mb-2">AirPods Pro</h3>
                <p class="text-gray-600 text-sm mb-4">主动降噪耳机</p>
                <div class="text-red-600 font-bold">¥1899</div>
            </div>
        </div>
    </main>

    <!--
        复用页脚片段:th:replace="~{fragments :: footer}"
    -->
    <footer th:replace="~{fragments :: footer}">
        <p>页脚占位符</p>
    </footer>

    <!-- 说明:模板里写在标签之间的中文是"兜底文本",
         一旦 Thymeleaf 成功渲染,会被片段替换掉。 -->
    <div class="text-center text-xs text-gray-400 mb-4">
        第06章 · 知识点:<code>th:fragment</code> + <code>th:replace="~{...}"</code>
    </div>

</body>
</html>
运行验证
步骤 1:编译打包
cd sb-thymeleaf/chapter06-fragment
mvn clean package -DskipTests
步骤 2:运行应用
java -jar target/chapter06-fragment-1.0.0.jar
步骤 3:浏览器访问
首页
http://localhost:8106/
您应该看到:
- 页头显示"首页"和导航菜单(来自 fragments.html 的 header 片段)
- 主内容区显示"欢迎来到优选商城!这里汇集了各类高品质商品。"
- 页脚显示"© 2026 优选商城 · 您的智能购物助手"
- 所有页头页脚内容与商品页面相同
商品页面
http://localhost:8106/products
您应该看到:
- 页头显示"商品列表"和导航菜单(同一个 header 片段)
- 主内容区显示商品列表(4 个商品卡片)
- 页脚显示相同内容(同一个 footer 片段)
验证点
✅ 修改 fragments.html 中的 header 片段,两个页面都会同时更新
✅ 如果片段引用失败(如文件名错误),显示兜底内容
页面效果
以下截图均为本地启动后浏览器真实渲染结果。
首页
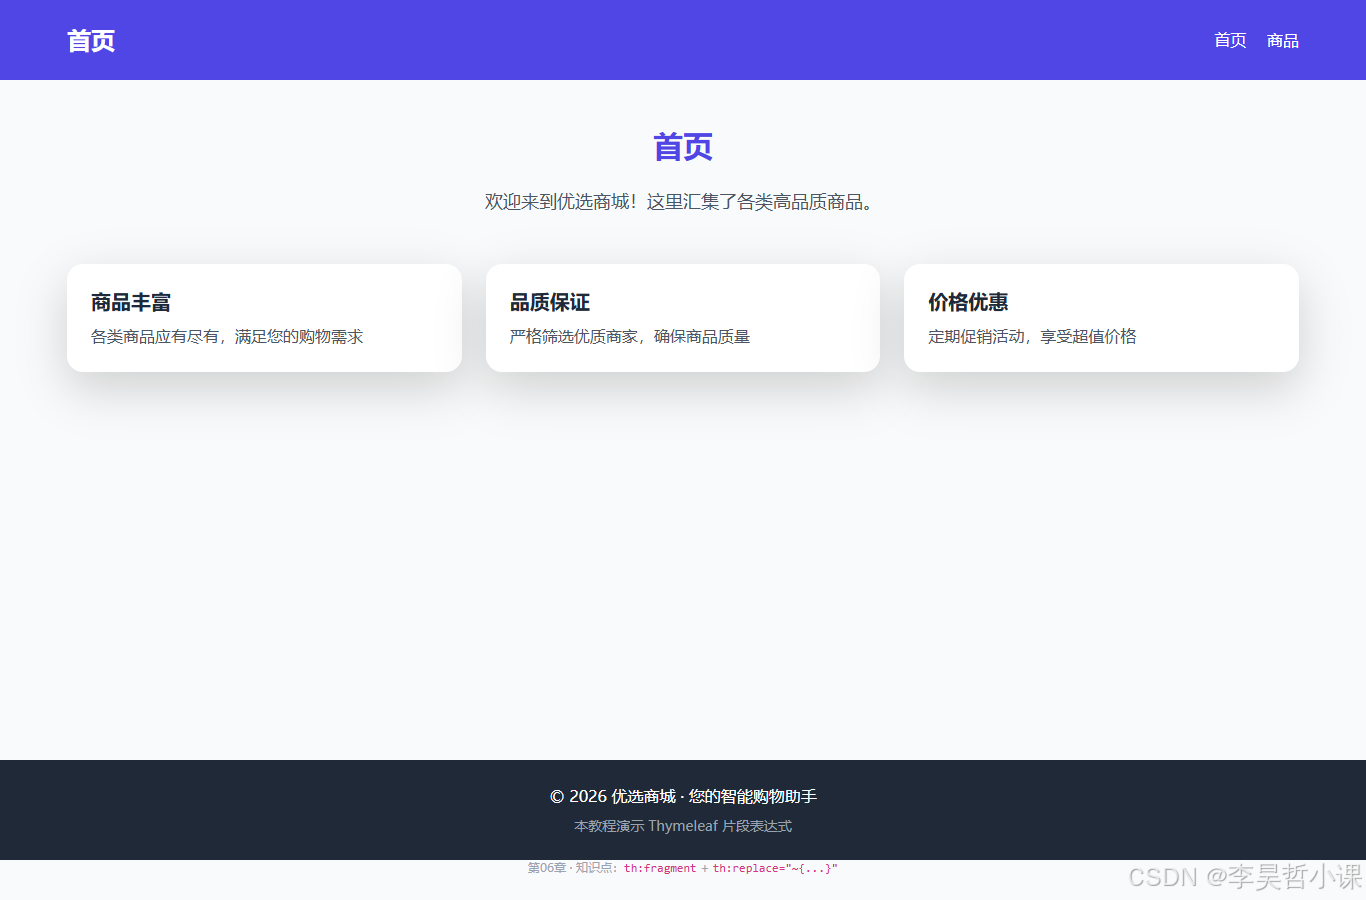
首页展示了片段表达式的复用:通过 th:replace="~{fragments :: header}" 和 th:replace="~{fragments :: footer}" 引入页头和页脚片段,两个片段定义在 fragments.html 中统一管理。
商品页面
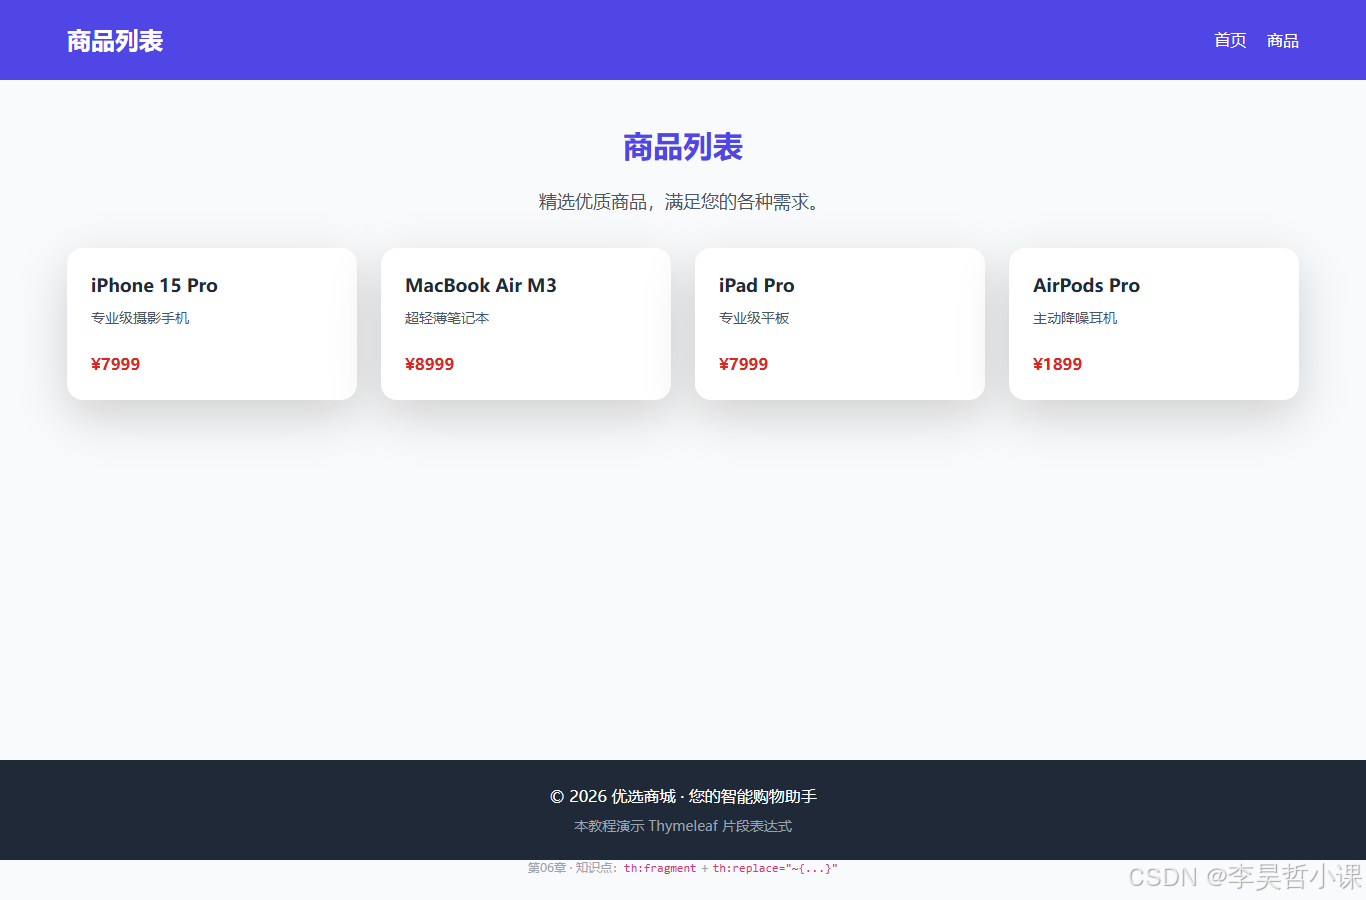
商品页面同样复用了 fragments.html 中的相同片段,演示了片段在多个页面间共享,避免了代码重复,提高了维护性。
坑 4:片段文件位置错误
问题:片段文件未在 templates/ 目录下,导致找不到。
原因:Thymeleaf 默认从 classpath:/templates/ 加载模板。
解决:确保片段文件位置:
src/main/resources/templates/
├── fragments.html # ✓ 正确位置
├── home.html
└── products.html
```](https://i-blog.csdnimg.cn/direct/51ddc2f5f6c84b9191ab34128c88d544.png#pic_center)
首页展示了片段表达式的复用:通过 `th:replace="~{fragments :: header}"` 和 `th:replace="~{fragments :: footer}"` 引入页头和页脚片段,两个片段定义在 `fragments.html` 中统一管理。
### 商品页面
商品页面同样复用了 `fragments.html` 中的相同片段,演示了片段在多个页面间共享,避免了代码重复,提高了维护性。
---
## 常见坑
### 坑 1:片段引用语法错误
**问题**:`th:replace="~{fragments :: header}"` 不生效。
**原因**:片段引用语法不正确或文件名/片段名拼写错误。
**解决**:确保语法格式正确:
```html
th:replace="~{文件名 :: 片段名}"
- 文件名不含扩展名(如
fragments不是fragments.html) - 片段名与
th:fragment="name"中的名称完全一致
坑 2:th:replace vs th:insert 混淆
问题:使用 th:insert 但期望用片段完全替换当前标签。
原因:两者行为不同:
th:replace:完全替换当前标签th:insert:在当前标签内插入片段
解决:根据需求选择:
<!-- 页头/页脚整体替换:用 th:replace -->
<header th:replace="~{fragments :: header}"></header>

<!-- 在某个容器内插入片段:用 th:insert -->
<div th:insert="~{fragments :: footer}"></div>
坑 3:片段内变量作用域问题
问题:片段中读取 ${pageTitle} 但显示为空。
原因:片段复用时,Model 中的变量作用域未正确传递。
解决:确保 Controller 在返回视图前将所需变量加入 Model:
model.addAttribute("pageTitle", "首页");
片段中就可以正常读取 ${pageTitle}。
坑 4:片段文件位置错误
问题:片段文件未在 templates/ 目录下,导致找不到。
原因:Thymeleaf 默认从 classpath:/templates/ 加载模板。
解决:确保片段文件位置:
src/main/resources/templates/
├── fragments.html    # ✓ 正确位置
├── home.html
└── products.html
第07章 · 文本与转义
章节目标
通过本章学习,您将能够:
- 理解 HTML 转义在 Web 安全中的重要性
- 掌握
th:text和th:utext的区别 - 使用
th:text自动转义防止 XSS 攻击 - 在需要时使用
th:utext插入可信的 HTML 内容
理论知识
什么是 HTML 转义?
HTML 转义(HTML Escaping)是将特殊字符转换成对应的 HTML 实体,使其在浏览器中显示为文本而非 HTML 标签的过程。常见的转义包括:
| 原字符 | 转义后 | 说明 |
|---|---|---|
< | < | 小于号 |
> | > | 大于号 |
& | & | 和号 |
" | " | 双引号 |
' | ' | 单引号 |
为什么需要转义?
XSS 攻击风险
跨站脚本攻击(Cross-Site Scripting,XSS)是指攻击者向网页注入恶意脚本,当其他用户浏览该网页时执行这些脚本。例如:
<!-- 用户输入 -->
<script>alert('XSS')</script>
<!-- 如果不转义直接显示 -->
<div>${userInput}</div>
<!-- 浏览器会执行 alert('XSS'),可能窃取用户 Cookie 等 -->
<!-- 如果转义后显示 -->
<div><script>alert('XSS')</script></div>
<!-- 浏览器显示为纯文本,不会执行 -->
th:text vs th:utext
th:text(自动转义,推荐)
-
默认行为:自动对内容进行 HTML 转义
-
安全性:✓ 防止 XSS
-
使用场景:所有来自用户输入或不可信来源的数据
-
示例:
<div th:text="${product.description}"></div>
<!-- 若 description = "<b>粗体</b>",显示:<b>粗体</b>(纯文本) -->
th:utext(不转义,慎用)
-
默认行为:不进行转义,直接插入 HTML
-
安全性:⚠️ 存在 XSS 风险
-
使用场景:内容完全可信(如管理员编辑的富文本、系统静态内容)
-
示例:
<div th:utext="${product.description}"></div>
<!-- 若 description = "<b>粗体</b>",显示:<b>粗体</b>(浏览器渲染为粗体) -->
何时使用 th:utext?
仅在以下情况使用 th:utext:
- 内容来自完全可信的来源(如数据库中的静态内容)
- 内容由管理员编辑,已通过安全审查
- 已经过 HTML 清理(如使用 Jsoup、OWASP Java HTML Sanitizer)
安全最佳实践
- 永远优先使用 th:text:除非有充分理由,否则始终使用
th:text - 用户输入必须转义:任何用户输入的数据都应通过
th:text自动转义 - 限制 utext 使用:仅在内容完全可信时使用
th:utext - HTML 清理:如需显示用户提交的 HTML,先通过白名单过滤或清理库处理
项目结构
chapter07-escaping/
├── pom.xml                                    # Maven 依赖配置
├── src/
│   ├── main/
│   │   ├── java/
│   │   │   └── com/lihaozhe/ch07/
│   │   │       ├── Ch07Application.java        # 启动类
│   │   │       ├── controller/
│   │   │       │   └── ProductController.java # 商品控制器
│   │   │       └── model/
│   │   │           └── Product.java           # 商品实体类
│   │   └── resources/
│   │       ├── application.yml                 # 应用配置
│   │       └── templates/
│   │           └── detail.html                 # 商品详情模板
│   └── test/                                   # 单元测试(可选)
完整代码
pom.xml
<?xml version="1.0" encoding="UTF-8"?>
<!--
  第07章:文本与转义

  本章聚焦:
  - th:text:自动 HTML 转义(防 XSS)
  - th:utext:不转义,直接插入 HTML(慎用,有 XSS 风险)
  演示商品描述里含 <b> 标签时两种写法的差异
-->
<project xmlns="http://maven.apache.org/POM/4.0.0"
         xmlns:xsi="http://www.w3.org/2001/XMLSchema-instance"
         xsi:schemaLocation="http://maven.apache.org/POM/4.0.0 https://maven.apache.org/xsd/maven-4.0.0.xsd">
    <modelVersion>4.0.0</modelVersion>

    <!-- 继承教程根工程,共享版本管理 -->
    <parent>
        <groupId>com.lihaozhe</groupId>
        <artifactId>sb-thymeleaf</artifactId>
        <version>1.0.0</version>
    </parent>

    <artifactId>chapter07-escaping</artifactId>
    <!-- Web 应用打成可执行 jar,内嵌 Tomcat,java -jar 直接跑 -->
    <packaging>jar</packaging>

    <dependencies>
        <!-- Web 启动器(Boot 4 重命名后的名称) -->
        <dependency>
            <groupId>org.springframework.boot</groupId>
            <artifactId>spring-boot-starter-webmvc</artifactId>
        </dependency>
        <!-- Thymeleaf 模板引擎:服务端渲染 HTML -->
        <dependency>
            <groupId>org.springframework.boot</groupId>
            <artifactId>spring-boot-starter-thymeleaf</artifactId>
        </dependency>
        <!-- 单元测试 -->
        <dependency>
            <groupId>org.springframework.boot</groupId>
            <artifactId>spring-boot-starter-test</artifactId>
            <scope>test</scope>
        </dependency>
    </dependencies>

    <build>
        <plugins>
            <!-- Spring Boot Maven 插件:支持 mvn spring-boot:run 和可执行 jar -->
            <plugin>
                <groupId>org.springframework.boot</groupId>
                <artifactId>spring-boot-maven-plugin</artifactId>
            </plugin>
        </plugins>
    </build>
</project>
src/main/java/com/lihaozhe/ch07/Ch07Application.java
package com.lihaozhe.ch07;

import org.springframework.boot.SpringApplication;
import org.springframework.boot.autoconfigure.SpringBootApplication;

/**
 * 第07章 启动入口。
 *
 * <p>理论知识:{@code @SpringBootApplication} 是一个组合注解,等价于同时加了
 * {@code @SpringBootConfiguration}(标记这是一个配置类)、
 * {@code @EnableAutoConfiguration}(根据 classpath 自动装配 Bean)、
 * {@code @ComponentScan}(扫描当前包及其子包下的组件)。</p>
 *
 * <p>启动类必须放在最外层包 {@code com.lihaozhe.ch07},
 * 这样 {@code @ComponentScan} 才能扫描到 controller / service 等子包中的组件。</p>
 */
@SpringBootApplication
public class Ch07Application {

    /**
     * 程序入口:SpringApplication.run 会启动内嵌 Tomcat 并初始化 Spring 容器。
     *
     * @param args 命令行参数(本教程不接收参数)
     */
    public static void main(String[] args) {
        SpringApplication.run(Ch07Application.class, args);
    }
}
src/main/java/com/lihaozhe/ch07/controller/ProductController.java
package com.lihaozhe.ch07.controller;
import com.lihaozhe.ch07.model.Product;
import org.springframework.stereotype.Controller;
import org.springframework.ui.Model;
import org.springframework.web.bind.annotation.GetMapping;
import java.math.BigDecimal;
/**
* 商品详情控制器。
*
* <p>理论知识:文本转义是 Web 安全的重要概念——
* 1. {@code th:text}:默认开启 HTML 转义(Escape),把 < > & 等字符转成实体
* - 防止用户输入的恶意 HTML/JS 被执行(XSS 攻击防护)
* - 例如:<b>粗体</b> → <b>粗体</b>(显示为纯文本)
* 2. {@code th:utext}:不转义(Unescaped),直接插入 HTML
* - 仅应在内容完全可信、且需要渲染 HTML 时使用
* - ⚠️ 慎用!若内容来自用户输入,则存在 XSS 漏洞
*
* 实际场景:商品描述可能由管理员编辑,包含格式化标签;
* 若描述来自用户评论,则必须用 th:text 转义。</p>
*/
@Controller
public class ProductController {
/**
* 商品详情页面。
*
* <p>本方法演示如何使用 th:text 和 th:utext 分别显示同一个包含 HTML 标签的描述,
* 观察两种写法在浏览器中的不同表现。</p>
*
* @param model 视图模型(Spring 自动注入)
* @return 视图名 "detail",对应 templates/detail.html
*/
@GetMapping("/product")
public String detail(Model model) {
// 创建一个商品,描述中包含 HTML 标签 <b> 和 <i>
Product product = new Product(
7001L,
"MacBook Pro 16",
"搭载 <b>M3 Max 芯片</b>,<i>超强性能</i>,专业创作首选",
new BigDecimal("19999.00"),
"Apple"
);
// 将商品对象放入 Model,键名为 "product"
model.addAttribute("product", product);
// 返回视图名,Thymeleaf 会去 classpath:/templates/ 找 detail.html
return "detail";
}
}
src/main/java/com/lihaozhe/ch07/model/Product.java
package com.lihaozhe.ch07.model;

import java.math.BigDecimal;

/**
 * 商品实体类。
 *
 * <p>模型类用于封装数据,在 Controller 中创建并放入 Model,
 * 模板中通过 th:text 或 th:utext 读取其属性进行显示。</p>
 */
public class Product {

    /** 商品ID */
    private Long id;

    /** 商品名称 */
    private String name;

    /** 商品描述(可能包含 HTML 标签,如 <b>) */
    private String description;

    /** 商品价格 */
    private BigDecimal price;

    /** 商品品牌 */
    private String brand;

    /** 构造方法 */
    public Product(Long id, String name, String description, BigDecimal price, String brand) {
        this.id = id;
        this.name = name;
        this.description = description;
        this.price = price;
        this.brand = brand;
    }

    /** 获取商品ID */
    public Long getId() {
        return id;
    }

    /** 设置商品ID */
    public void setId(Long id) {
        this.id = id;
    }

    /** 获取商品名称 */
    public String getName() {
        return name;
    }

    /** 设置商品名称 */
    public void setName(String name) {
        this.name = name;
    }

    /** 获取商品描述 */
    public String getDescription() {
        return description;
    }

    /** 设置商品描述 */
    public void setDescription(String description) {
        this.description = description;
    }

    /** 获取商品价格 */
    public BigDecimal getPrice() {
        return price;
    }

    /** 设置商品价格 */
    public void setPrice(BigDecimal price) {
        this.price = price;
    }

    /** 获取商品品牌 */
    public String getBrand() {
        return brand;
    }

    /** 设置商品品牌 */
    public void setBrand(String brand) {
        this.brand = brand;
    }
}
src/main/resources/application.yml
# 第07章:文本与转义
# 端口规则:8080 + 章号 7 → 8107
server:
  port: 8107

spring:
  application:
    name: chapter07-escaping
  thymeleaf:
    # 开发期关闭缓存,修改模板后刷新浏览器即可看到效果(无需重启)
    cache: false
    # 模板/响应统一使用 UTF-8,保证中文不乱码
    encoding: UTF-8
    # 使用 HTML 模式解析(兼容标准 HTML5 标签)
    mode: HTML
    # 启动时校验模板是否存在、语法是否正确(开发期友好)
    check-template: true
    check-template-location: true
src/main/resources/templates/detail.html
<!DOCTYPE html>
<!--
xmlns:th 是 Thymeleaf 的命名空间声明:只有加上它,
th:* 属性才会被 Thymeleaf 识别并解析。IDE(如 IDEA)也会因此获得 th: 的自动补全。
-->
<html lang="zh-CN" xmlns:th="http://www.thymeleaf.org">
<head>
<meta charset="UTF-8">
<!-- 响应式视口,移动端按设备宽度渲染 -->
<meta name="viewport" content="width=device-width, initial-scale=1.0">
<title>第07章 · 文本与转义</title>
<!-- ===== 前端框架(全部走 CDN,免构建)===== -->
<!-- Tailwind Play CDN:教学用零配置方案;生产环境请用 Tailwind CLI / PostCSS 构建 -->
<script src="https://cdn.tailwindcss.com"></script>
<!-- Bootstrap 5.3.x:提供现成组件(按钮/卡片/表单等) -->
<link href="https://cdn.jsdelivr.net/npm/bootstrap@5.3.3/dist/css/bootstrap.min.css" rel="stylesheet">
<script src="https://cdn.jsdelivr.net/npm/bootstrap@5.3.3/dist/js/bootstrap.bundle.min.js"></script>
<!-- jQuery 4.x:DOM 操作与事件(后续章节异步请求会用到) -->
<script src="https://code.jquery.com/jquery-4.0.0.min.js"></script>
<!-- axios:基于 Promise 的 HTTP 客户端(后续章节异步加载数据会用到) -->
<script src="https://cdn.jsdelivr.net/npm/axios@1.7.9/dist/axios.min.js"></script>
</head>
<body class="bg-gray-50 min-h-screen">
<!-- 主容器:使用 Bootstrap 的 container 和 row/col 实现响应式栅格 -->
<div class="container mx-auto py-8 px-4 max-w-4xl">
<!-- 页头 -->
<div class="text-center mb-8">
<h1 class="text-3xl font-bold text-indigo-600">第07章 · 文本与转义</h1>
<p class="mt-2 text-gray-600">th:text vs th:utext 的区别</p>
</div>
<!-- 商品详情卡片 -->
<div class="bg-white rounded-2xl shadow-lg p-8 mb-8">
<!-- 商品名称 -->
<h2 class="text-2xl font-bold text-gray-800 mb-4" th:text="${product.name}">商品名称占位符</h2>
<!--
关键对比:th:text vs th:utext
下面的描述内容包含 HTML 标签 <b> 和 <i>
-->
<!-- th:text 版本:自动转义,<b> 会被显示为纯文本 -->
<div class="mb-6">
<h3 class="text-lg font-semibold text-gray-700 mb-2">
使用 th:text(自动转义)↓
</h3>
<div class="bg-gray-100 rounded p-4 text-gray-800" th:text="${product.description}">
描述占位符
</div>
<p class="text-sm text-gray-500 mt-2">
⚠️ 说明:<code><b></code> 和 <code><i></code> 标签被转义成了实体,
显示为纯文本,不会被浏览器解析。这是<strong>安全的</strong>做法,防止 XSS 攻击。
</p>
</div>
<!-- th:utext 版本:不转义,HTML 标签会被浏览器渲染 -->
<div class="mb-6">
<h3 class="text-lg font-semibold text-gray-700 mb-2">
使用 th:utext(不转义)↓
</h3>
<div class="bg-gray-100 rounded p-4 text-gray-800" th:utext="${product.description}">
描述占位符
</div>
<p class="text-sm text-orange-600 mt-2">
⚠️ 警告:<code><b></code> 和 <code><i></code> 标签被直接插入 HTML,
<b>浏览器会渲染它们</b>。若内容来自<strong>不可信的用户输入</strong>,
则存在<strong>XSS 漏洞</strong>,攻击者可以注入恶意脚本!
仅应在内容完全可信(如管理员编辑的富文本)时使用。
</p>
</div>
<!-- 商品价格 -->
<div class="text-red-600 font-bold text-2xl" th:text="${'¥' + product.price}">¥0.00</div>
</div>
<!-- 安全建议 -->
<div class="bg-yellow-50 border-l-4 border-yellow-400 p-4 rounded mb-8">
<h3 class="text-lg font-bold text-yellow-800 mb-2">🛡️ 安全提示</h3>
<ul class="list-disc list-inside text-yellow-700 space-y-1">
<li><strong>永远优先使用 th:text</strong>:自动转义,防止 XSS</li>
<li>th:utext 只在内容<strong>完全可信</strong>时使用(如管理员编辑的静态内容)</li>
<li>若必须显示用户提交的 HTML,先通过白名单过滤或 HTML 清理库处理</li>
<li>教学演示用,实际项目中慎用 utext,推荐用 Markdown 或富文本编辑器</li>
</ul>
</div>
<!-- 说明:模板里写在标签之间的中文是"兜底文本",
一旦 Thymeleaf 成功渲染,会被 th:text 或 th:utext 的结果替换掉。 -->
<div class="mt-8 text-center text-sm text-gray-400">
第07章 · 知识点:<code>th:text</code>(安全)vs <code>th:utext</code>(慎用)
</div>
</div>
</body>
</html>
运行验证
步骤 1:编译打包
cd sb-thymeleaf/chapter07-escaping
mvn clean package -DskipTests
步骤 2:运行应用
java -jar target/chapter07-escaping-1.0.0.jar
步骤 3:浏览器访问
http://localhost:8107/product
您应该看到以下页面内容:
商品详情
- 商品名称:MacBook Pro 16
- 商品价格:¥19999.00
文本转义对比
使用 th:text(自动转义):
搭载 <b>M3 Max 芯片</b>,<i>超强性能</i>,专业创作首选
- 显示的
<b>和<i>是纯文本,浏览器不会将其渲染为粗体和斜体
使用 th:utext(不转义):
搭载 M3 Max 芯片,超强性能,专业创作首选
- 浏览器将
<b>渲染为粗体,将<i>渲染为斜体
安全提示框
包含以下建议:
- 永远优先使用 th:text
- th:utext 只在内容完全可信时使用
- 若必须显示用户提交的 HTML,先通过白名单过滤
- 实际项目中慎用 utext
验证点
✅ 检查浏览器"查看源代码"(Ctrl+U),确认 th:text 版本中转义为 <b>
✅ 确认 th:utext 版本中 HTML 标签被浏览器实际渲染
页面效果
以下截图均为本地启动后浏览器真实渲染结果。
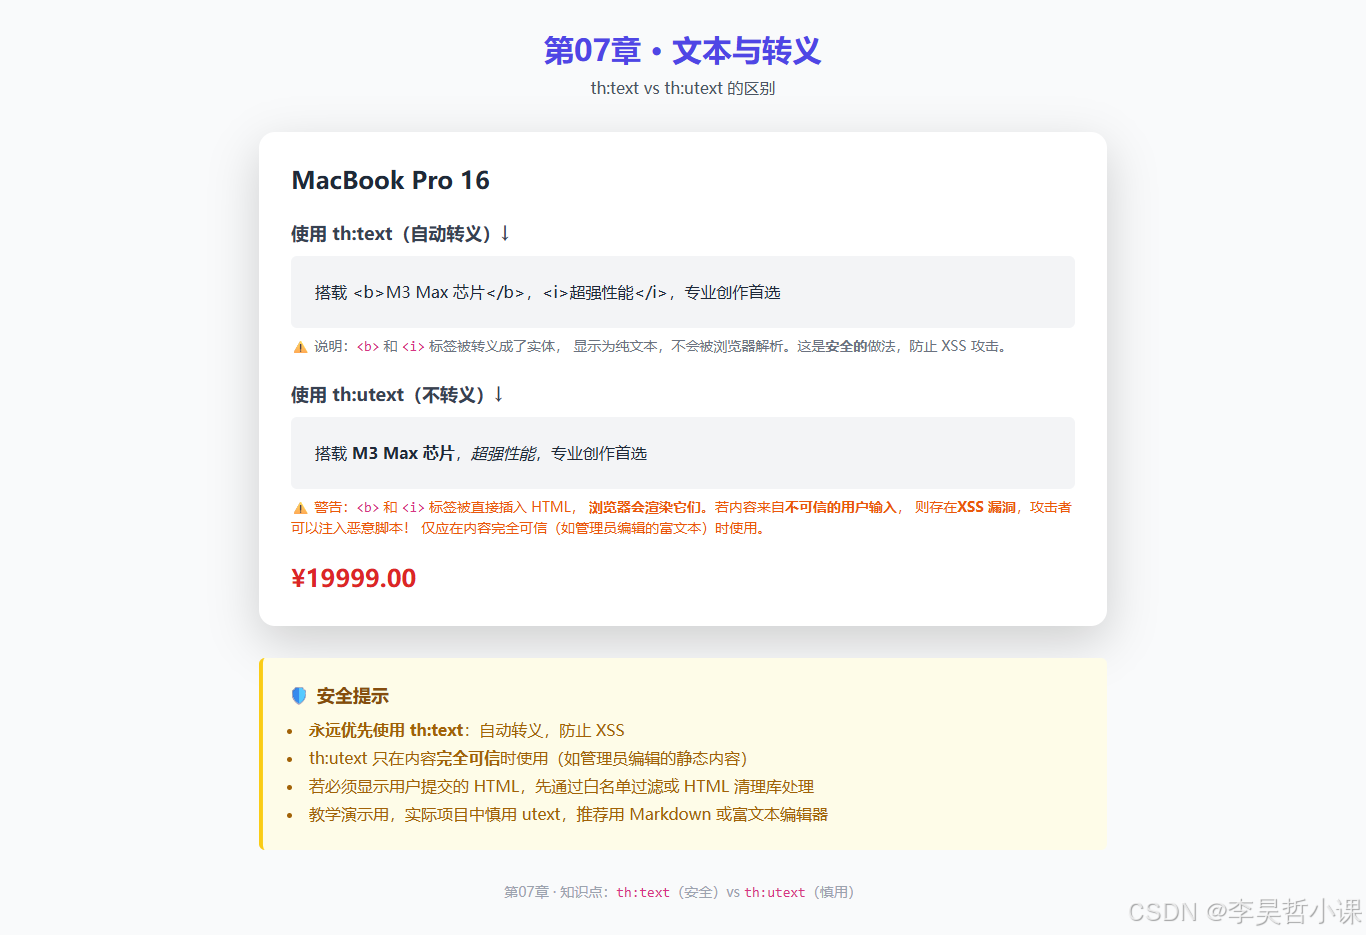
商品详情页面展示了文本转义的对比:左侧使用 th:text 自动转义,HTML 标签 <b> 和 <i> 被显示为纯文本;右侧使用 th:utext 不转义,相同的标签被浏览器渲染为粗体和斜体。这清晰地演示了 XSS 防护的重要性。
常见坑
坑 1:误用 th:utext 导致 XSS
问题:用户输入的评论被渲染为 HTML,执行了恶意脚本。
原因:使用 th:utext 显示用户提交的内容,未做转义。
解决:
- 改用
th:text,自动转义用户输入 - 或先对用户输入进行 HTML 清理,再使用
th:utext
// 不安全的做法
<div th:utext="${userComment}"></div>

// 安全的做法
<div th:text="${userComment}"></div>
坑 2:转义与未转义混淆
问题:期望 <b> 标签被渲染,但实际显示为纯文本。
原因:误用了 th:text(自动转义),而非 th:utext(不转义)。
解决:根据需求选择:
- 需要显示纯文本 → 使用
th:text - 需要渲染 HTML 且内容可信 → 使用
th:utext
<!-- 显示纯文本(标签不渲染) -->
<div th:text="${content}"></div>

<!-- 渲染 HTML(标签被解析) -->
<div th:utext="${content}"></div>
坑 3:混合使用导致不一致
问题:同一字段在一处用 th:text,另一处用 th:utext,显示效果不一致。
原因:未统一处理策略。
解决:对来自同一来源的数据,统一使用一种方式:
- 用户输入 → 始终
th:text - 系统静态内容 → 可用
th:utext(若需 HTML 渲染)
坑 4:忘记清理内容就使用 utext
问题:管理员编辑的富文本内容含有恶意脚本,使用了 th:utext 导致 XSS。
原因:即使内容来自"可信"的管理员,也可能被注入恶意代码。
解决:
-
使用 HTML 清理库对内容进行过滤:
// 使用 Jsoup 清理 HTML,仅保留白名单标签 String safeHtml = Jsoup.clean(html, Whitelist.basic()); -
或使用 Markdown 代替 HTML,客户端转换
-
或严格控制管理员权限,定期安全审计
第08章:迭代 th:each —— 遍历商品列表渲染网格卡片
章节目标
通过本章学习,你将能够:
- 掌握 Thymeleaf 的
th:each语法,遍历集合渲染列表/网格 - 理解迭代状态变量
iterStat的用法(index、count、odd、first、last 等) - 使用 Bootstrap 卡片组件展示商品数据
- 在模板中引用 Controller 通过 Model 传递的数据
理论知识
th:each 是 Thymeleaf 的"循环/迭代"指令,语法为 th:each="item : ${collection}",其中 ${collection} 是 Controller 放入 Model 的列表或数组,item 是每次迭代时的当前元素。
迭代时还可以获取一个隐式的状态变量(默认名为 iterStat),通过它可访问:
iterStat.index:当前索引(0 开始)iterStat.count:当前计数(1 开始)iterStat.size:集合大小iterStat.even/iterStat.odd:奇偶判断(odd 表示第奇数个元素,即 index 为偶数)iterStat.first/iterStat.last:是否首尾元素
若需要自定义状态变量名,可写为 th:each="item, myStat : ${collection}",此时 myStat 即为状态对象。
本章演示将商品列表(List)渲染成 Bootstrap 网格卡片,并显示迭代状态(索引、奇偶等)。
项目结构
chapter08-iteration/
├── pom.xml
├── src/main/java/com/lihaozhe/ch08/
│   ├── Ch08Application.java
│   └── controller/
│       └── ProductController.java
└── src/main/resources/
    ├── application.yml
    └── templates/
        └── products.html
完整代码
pom.xml
<?xml version="1.0" encoding="UTF-8"?>
<!--
  第08章:迭代 th:each —— 遍历商品列表渲染网格卡片

  本章依赖:
  - spring-boot-starter-webmvc:Spring Boot 4.x 的 Web 启动器
  - spring-boot-starter-thymeleaf:模板引擎启动器(核心依赖)
  - spring-boot-starter-test:单元测试(备用)
-->
<project xmlns="http://maven.apache.org/POM/4.0.0"
         xmlns:xsi="http://www.w3.org/2001/XMLSchema-instance"
         xsi:schemaLocation="http://maven.apache.org/POM/4.0.0 https://maven.apache.org/xsd/maven-4.0.0.xsd">
    <modelVersion>4.0.0</modelVersion>

    <!-- 继承教程根工程,共享版本管理 -->
    <parent>
        <groupId>com.lihaozhe</groupId>
        <artifactId>sb-thymeleaf</artifactId>
        <version>1.0.0</version>
    </parent>

    <artifactId>chapter08-iteration</artifactId>
    <!-- Web 应用打成可执行 jar,内嵌 Tomcat,java -jar 直接跑 -->
    <packaging>jar</packaging>

    <dependencies>
        <!-- Web 启动器(Boot 4 重命名后的名称) -->
        <dependency>
            <groupId>org.springframework.boot</groupId>
            <artifactId>spring-boot-starter-webmvc</artifactId>
        </dependency>
        <!-- Thymeleaf 模板引擎:服务端渲染 HTML -->
        <dependency>
            <groupId>org.springframework.boot</groupId>
            <artifactId>spring-boot-starter-thymeleaf</artifactId>
        </dependency>
        <!-- 单元测试 -->
        <dependency>
            <groupId>org.springframework.boot</groupId>
            <artifactId>spring-boot-starter-test</artifactId>
            <scope>test</scope>
        </dependency>
    </dependencies>

    <build>
        <plugins>
            <!-- Spring Boot Maven 插件:支持 mvn spring-boot:run 和可执行 jar -->
            <plugin>
                <groupId>org.springframework.boot</groupId>
                <artifactId>spring-boot-maven-plugin</artifactId>
            </plugin>
        </plugins>
    </build>
</project>
Ch08Application.java
package com.lihaozhe.ch08;

import org.springframework.boot.SpringApplication;
import org.springframework.boot.autoconfigure.SpringBootApplication;

/**
 * 第08章 启动入口。
 *
 * <p>理论知识:{@code @SpringBootApplication} 是一个组合注解,等价于同时加了
 * {@code @SpringBootConfiguration}(标记这是一个配置类)、
 * {@code @EnableAutoConfiguration}(根据 classpath 自动装配 Bean)、
 * {@code @ComponentScan}(扫描当前包及其子包下的组件)。</p>
 *
 * <p>启动类必须放在最外层包 {@code com.lihaozhe.ch08},
 * 这样 {@code @ComponentScan} 才能扫描到 controller / service 等子包中的组件。</p>
 */
@SpringBootApplication
public class Ch08Application {

    /**
     * 程序入口:SpringApplication.run 会启动内嵌 Tomcat 并初始化 Spring 容器。
     *
     * @param args 命令行参数(本教程不接收参数)
     */
    public static void main(String[] args) {
        SpringApplication.run(Ch08Application.class, args);
    }
}
ProductController.java
package com.lihaozhe.ch08.controller;

import org.springframework.stereotype.Controller;
import org.springframework.ui.Model;
import org.springframework.web.bind.annotation.GetMapping;

import java.util.ArrayList;
import java.util.List;

/**
 * 商品控制器:演示 th:each 迭代。
 *
 * <p>理论知识:{@code @Controller} 的方法返回值会被视图解析器当作"视图名",
 * 交给 Thymeleaf 渲染成 HTML。本章要展示商品列表,所以用 {@code @Controller}。</p>
 */
@Controller
public class ProductController {

    /**
     * 商品数据模型(使用 record 简化 POJO 定义)。
     *
     * <p>record 是 Java 14+ 引入的不可变数据类,编译器自动生成 getter、
     * equals、hashCode、toString 等方法。适合表示"值对象"。</p>
     */
    public record Product(
            Long id,           // 商品ID
            String name,       // 商品名称
            String category,   // 商品分类
            double price,      // 商品价格
            int stock,         // 库存数量
            String description // 商品描述
    ) {}

    /**
     * 处理根路径 GET 请求 "/"。
     *
     * <p>Model 是 Spring 提供的数据容器:往里面放的数据,
     * 模板里就能通过变量表达式 {@code ${key}} 取到。演示 th:each 时,
     * 通常把一组对象(List)放进 Model,模板再循环渲染。</p>
     *
     * @param model 视图模型(Spring 自动注入)
     * @return 视图名 "products",对应 templates/products.html
     */
    @GetMapping("/")
    public String index(Model model) {
        // 在内存中准备一组商品数据(实际项目会从数据库查询)
        List<Product> products = new ArrayList<>();
        products.add(new Product(1L, "iPhone 15 Pro", "手机", 7999.00, 50, "最新旗舰手机,钛金属边框"));
        products.add(new Product(2L, "MacBook Air M3", "电脑", 8999.00, 30, "轻薄便携,续航出色"));
        products.add(new Product(3L, "AirPods Pro", "配件", 1999.00, 100, "主动降噪无线耳机"));
        products.add(new Product(4L, "iPad Pro", "平板", 6499.00, 20, "大屏创作利器,支持Apple Pencil"));
        products.add(new Product(5L, "Apple Watch", "配件", 2999.00, 40, "健康监测,运动追踪"));
        products.add(new Product(6L, "Magic Mouse", "配件", 699.00, 60, "顺滑触控,无线设计"));

        // 把商品列表放进模型,键名为 "products"
        model.addAttribute("products", products);
        // 返回视图名,Thymeleaf 会去 classpath:/templates/ 找 products.html
        return "products";
    }
}
application.yml
# 第08章:迭代 th:each —— 遍历商品列表渲染网格卡片
# 端口规则:8080 + 章号 8 → 8108
server:
  port: 8108

spring:
  application:
    name: chapter08-iteration
  thymeleaf:
    # 开发期关闭缓存,修改模板后刷新浏览器即可看到效果(无需重启)
    cache: false
    # 模板/响应统一使用 UTF-8,保证中文不乱码
    encoding: UTF-8
    # 使用 HTML 模式解析(兼容标准 HTML5 标签)
    mode: HTML
    # 启动时校验模板是否存在、语法是否正确(开发期友好)
    check-template: true
    check-template-location: true
products.html
<!DOCTYPE html>
<!--
  xmlns:th 是 Thymeleaf 的命名空间声明:只有加上它,
  th:* 属性才会被 Thymeleaf 识别并解析。IDE(如 IDEA)也会因此获得 th: 的自动补全。
-->
<html lang="zh-CN" xmlns:th="http://www.thymeleaf.org">
<head>
    <meta charset="UTF-8">
    <!-- 响应式视口,移动端按设备宽度渲染 -->
    <meta name="viewport" content="width=device-width, initial-scale=1.0">
    <title>第08章 · 商品列表(th:each 迭代)</title>

    <!-- ===== 前端框架(全部走 CDN,免构建)===== -->
    <!-- Tailwind Play CDN:教学用零配置方案;生产环境请用 Tailwind CLI / PostCSS 构建 -->
    <script src="https://cdn.tailwindcss.com"></script>
    <!-- Bootstrap 5.3.x:提供现成组件(按钮/卡片/表单等) -->
    <link href="https://cdn.jsdelivr.net/npm/bootstrap@5.3.3/dist/css/bootstrap.min.css" rel="stylesheet">
    <script src="https://cdn.jsdelivr.net/npm/bootstrap@5.3.3/dist/js/bootstrap.bundle.min.js"></script>
    <!-- jQuery 4.x:DOM 操作与事件(后续章节异步请求会用到) -->
    <script src="https://code.jquery.com/jquery-4.0.0.min.js"></script>
    <!-- axios:基于 Promise 的 HTTP 客户端(后续章节异步加载数据会用到) -->
    <script src="https://cdn.jsdelivr.net/npm/axios@1.7.9/dist/axios.min.js"></script>
</head>
<body class="bg-gray-50 min-h-screen">

<!-- 页头:使用 Bootstrap 的 navbar 组件 -->
<nav class="navbar navbar-dark bg-primary">
    <div class="container">
        <span class="navbar-brand mb-0 h1">🛒 优选商城 · 第08章</span>
    </div>
</nav>

<!-- 主容器 -->
<div class="container my-5">
    <!-- 页面标题 -->
    <div class="text-center mb-5">
        <h1 class="display-5 fw-bold text-primary">商品列表(th:each 迭代)</h1>
        <p class="text-muted">演示 Thymeleaf 的 th:each 指令遍历商品列表,渲染网格卡片</p>
    </div>

    <!--
        th:each 是 Thymeleaf 的"循环"指令,语法:
        th:each="item : ${collection}"

        这里的 ${products} 是 Controller 放进 Model 的商品列表。
        每次迭代,item 会指向列表中的一个 Product 对象。

        状态变量(可选):th:each 还能自动提供一个"迭代状态变量",
        通过 iterStat 访问,包含:
        - index:当前索引(从 0 开始)
        - count:当前计数(从 1 开始)
        - size:集合大小
        - even/odd:奇偶(odd=true 表示第奇数个,index 为偶数)
        - first/last:是否首尾元素
    -->
    <div class="row g-4">
        <!-- 外层 div 使用 th:each 遍历 products 列表 -->
        <div class="col-md-4" th:each="product, iterStat : ${products}">
            <!-- 卡片:Bootstrap 的 card 组件 -->
            <div class="card h-100 shadow-sm">
                <!-- 卡片头部:显示商品名称 -->
                <div class="card-header bg-light">
                    <h5 class="card-title mb-0" th:text="${product.name}">商品名称</h5>
                </div>

                <!-- 卡片主体 -->
                <div class="card-body">
                    <!-- 商品分类 -->
                    <span class="badge bg-secondary mb-2" th:text="${product.category}">分类</span>

                    <!-- 商品描述 -->
                    <p class="card-text text-muted" th:text="${product.description}">商品描述</p>

                    <!-- 商品价格(使用 th:text 显示,保留两位小数) -->
                    <div class="mb-2">
                        <span class="text-muted">价格:</span>
                        <span class="h5 text-danger" th:text="${'¥' + #numbers.formatDecimal(product.price, 1, 2)}">¥0.00</span>
                    </div>

                    <!-- 商品库存 -->
                    <div class="mb-2">
                        <span class="text-muted">库存:</span>
                        <span class="badge bg-info" th:text="${product.stock + ' 件'}">0 件</span>
                    </div>

                    <!-- 状态变量演示:显示当前是第几个商品 -->
                    <div class="small text-muted">
                        索引:<span th:text="${iterStat.index}">0</span> |
                        计数:<span th:text="${iterStat.count}">1</span> |
                        奇偶:<span th:text="${iterStat.odd ? '奇数' : '偶数'}">奇数</span>
                        <span th:if="${iterStat.first}" class="badge bg-success">首个</span>
                        <span th:if="${iterStat.last}" class="badge bg-warning">末个</span>
                    </div>
                </div>

                <!-- 卡片底部:操作按钮 -->
                <div class="card-footer bg-white border-0">
                    <button class="btn btn-primary btn-sm w-100">查看详情</button>
                </div>
            </div>
        </div>
    </div>

    <!-- 说明:模板里写在标签之间的中文是"兜底文本",
         一旦 Thymeleaf 成功渲染,会被 th:* 的结果替换掉。
         如果浏览器里看到的是这行兜底文本,说明模板没被解析。 -->
    <div class="mt-5 p-3 bg-light rounded">
        <h6 class="fw-bold">💡 本章知识点:</h6>
        <ul class="list-unstyled mb-0">
            <li><code>th:each="item : ${collection}"</code> —— 遍历集合</li>
            <li><code>th:each="item, stat : ${collection}"</code> —— 遍历并获取状态变量</li>
            <li><code>stat.index / stat.count / stat.odd / stat.first / stat.last</code> —— 状态变量</li>
        </ul>
    </div>
</div>

</body>
</html>
运行验证
cd sb-thymeleaf/chapter08-iteration
mvn clean package -DskipTests
java -jar target/chapter08-iteration-1.0.0.jar
# 浏览器访问 http://localhost:8108/
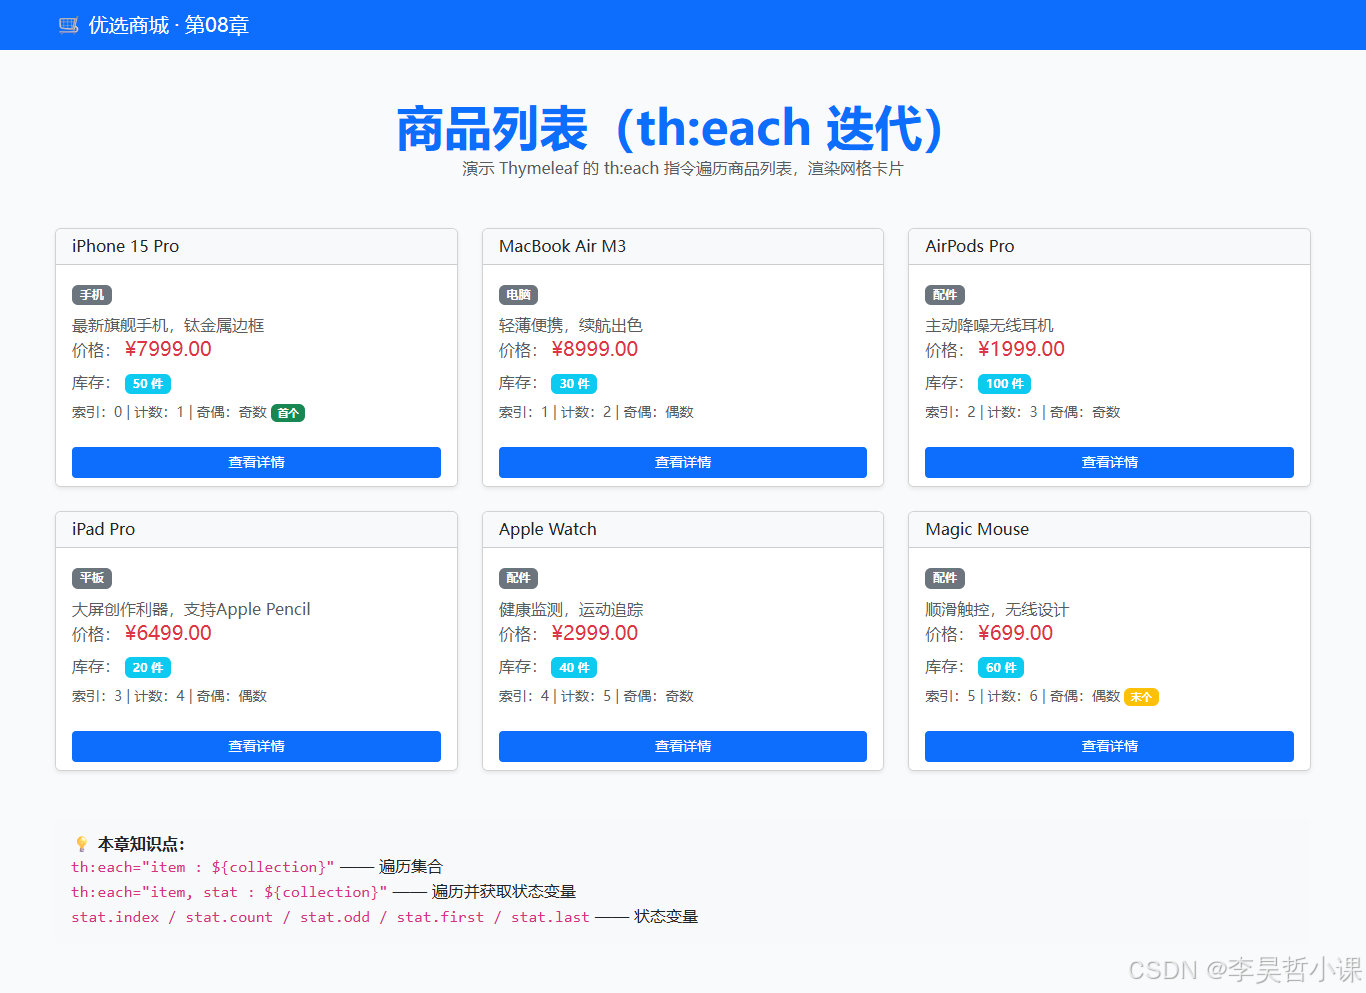
页面显示 6 个商品卡片,每个卡片显示商品名称、分类、描述、价格、库存,以及迭代状态信息(索引、计数、奇偶、是否首尾)。
页面效果
以下截图均为本地启动后浏览器真实渲染结果。
常见坑
-
忘记添加
xmlns:th命名空间声明:HTML 标签缺少xmlns:th="http://www.thymeleaf.org"会导致th:*属性不被解析,元素显示兜底文本而不是渲染结果。 -
th:each放在错误的元素上:th:each应该放在需要重复渲染的元素上(如<div class="col-md-4">),而不是其父容器。若放在父容器,会导致整个父容器被重复,而不是单个商品卡片。 -
状态变量名冲突:默认的迭代状态变量名是
iterStat,但若显式指定了其他名称(如th:each="item, stat : ${list}"),在模板中必须使用stat,不是iterStat。 -
模板缓存问题:生产环境 Thymeleaf 会缓存模板。开发期修改模板后需重启应用或关闭缓存(
spring.thymeleaf.cache=false),否则看不到更新。
第09章:条件渲染 th:if / th:unless / th:switch —— 库存徽章与状态判断
章节目标
通过本章学习,你将能够:
- 掌握
th:if条件渲染:条件为真时显示元素,否则完全移除 - 理解
th:unless反向条件:条件为假时显示元素 - 使用
th:switch/th:case实现多分支选择 - 根据商品库存和分类动态渲染不同的 UI 徽章与按钮
理论知识
Thymeleaf 的条件渲染指令允许根据数据的不同属性显示不同的 UI:
-
th:if="condition":当条件为true时,渲染该元素及其内容;否则整个元素被移除(完全不出现在 HTML 中) -
th:unless="condition":与th:if相反,当条件为false时渲染元素;条件为true时移除元素 -
th:switch/th:case:多分支选择,类似 Java 的 switch-case 语句th:switch="${variable}":指定要匹配的变量th:case="'value'":匹配具体值,执行该分支th:case="*":默认分支(default),类似 Java 的default
条件表达式返回 boolean,可使用逻辑运算符 and、or、not,以及比较运算符 >、<、== 等。
本章演示根据库存数量显示不同的状态徽章(有货绿色/缺货红色/紧张黄色),以及根据商品分类显示不同的图标。
项目结构
chapter09-condition/
├── pom.xml
├── src/main/java/com/lihaozhe/ch09/
│   ├── Ch09Application.java
│   └── controller/
│       └── ProductController.java
└── src/main/resources/
    ├── application.yml
    └── templates/
        └── products.html
完整代码
pom.xml
<?xml version="1.0" encoding="UTF-8"?>
<!--
  第09章:条件渲染 th:if / th:unless / th:switch —— 库存徽章与状态判断

  本章依赖:
  - spring-boot-starter-webmvc:Spring Boot 4.x 的 Web 启动器
  - spring-boot-starter-thymeleaf:模板引擎启动器(核心依赖)
  - spring-boot-starter-test:单元测试(备用)
-->
<project xmlns="http://maven.apache.org/POM/4.0.0"
         xmlns:xsi="http://www.w3.org/2001/XMLSchema-instance"
         xsi:schemaLocation="http://maven.apache.org/POM/4.0.0 https://maven.apache.org/xsd/maven-4.0.0.xsd">
    <modelVersion>4.0.0</modelVersion>

    <!-- 继承教程根工程,共享版本管理 -->
    <parent>
        <groupId>com.lihaozhe</groupId>
        <artifactId>sb-thymeleaf</artifactId>
        <version>1.0.0</version>
    </parent>

    <artifactId>chapter09-condition</artifactId>
    <!-- Web 应用打成可执行 jar,内嵌 Tomcat,java -jar 直接跑 -->
    <packaging>jar</packaging>

    <dependencies>
        <!-- Web 启动器(Boot 4 重命名后的名称) -->
        <dependency>
            <groupId>org.springframework.boot</groupId>
            <artifactId>spring-boot-starter-webmvc</artifactId>
        </dependency>
        <!-- Thymeleaf 模板引擎:服务端渲染 HTML -->
        <dependency>
            <groupId>org.springframework.boot</groupId>
            <artifactId>spring-boot-starter-thymeleaf</artifactId>
        </dependency>
        <!-- 单元测试 -->
        <dependency>
            <groupId>org.springframework.boot</groupId>
            <artifactId>spring-boot-starter-test</artifactId>
            <scope>test</scope>
        </dependency>
    </dependencies>

    <build>
        <plugins>
            <!-- Spring Boot Maven 插件:支持 mvn spring-boot:run 和可执行 jar -->
            <plugin>
                <groupId>org.springframework.boot</groupId>
                <artifactId>spring-boot-maven-plugin</artifactId>
            </plugin>
        </plugins>
    </build>
</project>
Ch09Application.java
package com.lihaozhe.ch09;

import org.springframework.boot.SpringApplication;
import org.springframework.boot.autoconfigure.SpringBootApplication;

/**
 * 第09章 启动入口。
 *
 * <p>理论知识:{@code @SpringBootApplication} 是一个组合注解,等价于同时加了
 * {@code @SpringBootConfiguration}(标记这是一个配置类)、
 * {@code @EnableAutoConfiguration}(根据 classpath 自动装配 Bean)、
 * {@code @ComponentScan}(扫描当前包及其子包下的组件)。</p>
 *
 * <p>启动类必须放在最外层包 {@code com.lihaozhe.ch09},
 * 这样 {@code @ComponentScan} 才能扫描到 controller / service 等子包中的组件。</p>
 */
@SpringBootApplication
public class Ch09Application {

    /**
     * 程序入口:SpringApplication.run 会启动内嵌 Tomcat 并初始化 Spring 容器。
     *
     * @param args 命令行参数(本教程不接收参数)
     */
    public static void main(String[] args) {
        SpringApplication.run(Ch09Application.class, args);
    }
}
ProductController.java
package com.lihaozhe.ch09.controller;

import org.springframework.stereotype.Controller;
import org.springframework.ui.Model;
import org.springframework.web.bind.annotation.GetMapping;

import java.util.ArrayList;
import java.util.List;

/**
 * 商品控制器:演示 th:if / th:unless / th:switch 条件渲染。
 *
 * <p>理论知识:{@code @Controller} 的方法返回值会被视图解析器当作"视图名",
 * 交给 Thymeleaf 渲染成 HTML。本章要展示商品库存状态,所以用 {@code @Controller}。</p>
 */
@Controller
public class ProductController {

    /**
     * 商品数据模型(使用 record 简化 POJO 定义)。
     */
    public record Product(
            Long id,           // 商品ID
            String name,       // 商品名称
            String category,   // 商品分类
            double price,      // 商品价格
            int stock,         // 库存数量
            String description // 商品描述
    ) {}

    /**
     * 处理根路径 GET 请求 "/"。
     *
     * <p>Model 是 Spring 提供的数据容器。演示条件渲染时,
     * 通常把一组对象放进 Model,模板根据每个对象的不同属性显示不同的 UI。</p>
     *
     * @param model 视图模型(Spring 自动注入)
     * @return 视图名 "products",对应 templates/products.html
     */
    @GetMapping("/")
    public String index(Model model) {
        // 在内存中准备一组商品数据,包括不同库存状态(有货/缺货/紧张)
        List<Product> products = new ArrayList<>();
        products.add(new Product(1L, "iPhone 15 Pro", "手机", 7999.00, 50, "最新旗舰手机,钛金属边框"));
        products.add(new Product(2L, "MacBook Air M3", "电脑", 8999.00, 3, "轻薄便携,续航出色(库存紧张)"));
        products.add(new Product(3L, "AirPods Pro", "配件", 1999.00, 0, "主动降噪无线耳机(暂时缺货)"));
        products.add(new Product(4L, "iPad Pro", "平板", 6499.00, 20, "大屏创作利器"));
        products.add(new Product(5L, "Apple Watch", "配件", 2999.00, 0, "健康监测(暂时缺货)"));
        products.add(new Product(6L, "Magic Mouse", "配件", 699.00, 60, "顺滑触控"));

        // 把商品列表放进模型,键名为 "products"
        model.addAttribute("products", products);
        // 返回视图名,Thymeleaf 会去 classpath:/templates/ 找 products.html
        return "products";
    }
}
application.yml
# 第09章:条件渲染 th:if / th:unless / th:switch —— 库存徽章与状态判断
# 端口规则:8080 + 章号 9 → 8109
server:
  port: 8109

spring:
  application:
    name: chapter09-condition
  thymeleaf:
    # 开发期关闭缓存,修改模板后刷新浏览器即可看到效果(无需重启)
    cache: false
    # 模板/响应统一使用 UTF-8,保证中文不乱码
    encoding: UTF-8
    # 使用 HTML 模式解析(兼容标准 HTML5 标签)
    mode: HTML
    # 启动时校验模板是否存在、语法是否正确(开发期友好)
    check-template: true
    check-template-location: true
products.html
<!DOCTYPE html>
<!--
  xmlns:th 是 Thymeleaf 的命名空间声明:只有加上它,
  th:* 属性才会被 Thymeleaf 识别并解析。IDE(如 IDEA)也会因此获得 th: 的自动补全。
-->
<html lang="zh-CN" xmlns:th="http://www.thymeleaf.org">
<head>
    <meta charset="UTF-8">
    <!-- 响应式视口,移动端按设备宽度渲染 -->
    <meta name="viewport" content="width=device-width, initial-scale=1.0">
    <title>第09章 · 商品库存状态(th:if 条件渲染)</title>

    <!-- ===== 前端框架(全部走 CDN,免构建)===== -->
    <!-- Tailwind Play CDN:教学用零配置方案;生产环境请用 Tailwind CLI / PostCSS 构建 -->
    <script src="https://cdn.tailwindcss.com"></script>
    <!-- Bootstrap 5.3.x:提供现成组件(按钮/卡片/表单等) -->
    <link href="https://cdn.jsdelivr.net/npm/bootstrap@5.3.3/dist/css/bootstrap.min.css" rel="stylesheet">
    <script src="https://cdn.jsdelivr.net/npm/bootstrap@5.3.3/dist/js/bootstrap.bundle.min.js"></script>
    <!-- jQuery 4.x:DOM 操作与事件(后续章节异步请求会用到) -->
    <script src="https://code.jquery.com/jquery-4.0.0.min.js"></script>
    <!-- axios:基于 Promise 的 HTTP 客户端(后续章节异步加载数据会用到) -->
    <script src="https://cdn.jsdelivr.net/npm/axios@1.7.9/dist/axios.min.js"></script>
</head>
<body class="bg-gray-50 min-h-screen">

<!-- 页头:使用 Bootstrap 的 navbar 组件 -->
<nav class="navbar navbar-dark bg-primary">
    <div class="container">
        <span class="navbar-brand mb-0 h1">🛒 优选商城 · 第09章</span>
    </div>
</nav>

<!-- 主容器 -->
<div class="container my-5">
    <!-- 页面标题 -->
    <div class="text-center mb-5">
        <h1 class="display-5 fw-bold text-primary">商品库存状态(th:if 条件渲染)</h1>
        <p class="text-muted">演示 Thymeleaf 的 th:if / th:unless / th:switch 指令实现条件渲染</p>
    </div>

    <!--
        条件渲染语法:

        1. th:if="condition" —— 当条件为 true 时,渲染该元素及其内容;否则整个元素被移除
        2. th:unless="condition" —— 当条件为 false 时,渲染该元素;否则移除(与 th:if 相反)
        3. th:switch / th:case —— 多分支选择,类似 Java 的 switch-case

        本章演示:
        - 根据库存数量显示不同的徽章(有货绿/缺货红/紧张黄)
        - 根据商品分类显示不同的图标
    -->
    <div class="row g-4">
        <!-- 遍历商品列表 -->
        <div class="col-md-4" th:each="product : ${products}">
            <!-- 卡片:Bootstrap 的 card 组件 -->
            <div class="card h-100 shadow-sm">
                <!-- 卡片头部:显示商品名称 -->
                <div class="card-header bg-light">
                    <h5 class="card-title mb-0" th:text="${product.name}">商品名称</h5>
                </div>

                <!-- 卡片主体 -->
                <div class="card-body">
                    <!-- 商品分类(用 th:switch 选择不同图标) -->
                    <div class="mb-2">
                        <span th:switch="${product.category}">
                            <!-- th:case 匹配不同分类,显示对应图标 -->
                            <span th:case="'手机'" class="badge bg-primary">📱 手机</span>
                            <span th:case="'电脑'" class="badge bg-success">💻 电脑</span>
                            <span th:case="'平板'" class="badge bg-info">📱 平板</span>
                            <span th:case="'配件'" class="badge bg-warning">🔌 配件</span>
                            <!-- th:case="*" 表示 default(不匹配任何 case 时) -->
                            <span th:case="*" class="badge bg-secondary">📦 其他</span>
                        </span>
                    </div>

                    <!-- 商品描述 -->
                    <p class="card-text text-muted" th:text="${product.description}">商品描述</p>

                    <!-- 商品价格 -->
                    <div class="mb-3">
                        <span class="text-muted">价格:</span>
                        <span class="h5 text-danger" th:text="${'¥' + #numbers.formatDecimal(product.price, 1, 2)}">¥0.00</span>
                    </div>

                    <!-- 库存状态徽章(用 th:if / th:unless 条件渲染) -->
                    <div class="mb-2">
                        <!--
                            th:if="product.stock > 0" —— 当库存 > 0 时显示"有货"绿色徽章
                            th:unless="product.stock > 0" —— 当库存 <= 0(缺货)时显示"缺货"红色徽章
                            两者可选其一,本章用 th:if 判断有货,用 th:if 判断紧张,否则显示缺货
                        -->
                        <span th:if="${product.stock > 5}"
                              class="badge bg-success">✓ 有货</span>
                        <span th:if="${product.stock > 0 and product.stock <= 5}"
                              class="badge bg-warning">⚠ 库存紧张</span>
                        <span th:if="${product.stock == 0}"
                              class="badge bg-danger">✕ 缺货</span>
                    </div>

                    <!-- 库存数量 -->
                    <div class="small text-muted">
                        剩余库存:<span th:text="${product.stock}">0</span> 件
                    </div>
                </div>

                <!-- 卡片底部:操作按钮(根据库存状态显示不同按钮) -->
                <div class="card-footer bg-white border-0">
                    <!-- th:if 判断库存 > 0,才显示"加入购物车"按钮 -->
                    <button th:if="${product.stock > 0}"
                            class="btn btn-primary btn-sm w-100">加入购物车</button>
                    <!-- th:unless 判断库存 == 0,显示"补货中"禁用按钮 -->
                    <button th:unless="${product.stock > 0}"
                            class="btn btn-secondary btn-sm w-100" disabled>补货中...</button>
                </div>
            </div>
        </div>
    </div>

    <!-- 说明:模板里写在标签之间的中文是"兜底文本",
         一旦 Thymeleaf 成功渲染,会被 th:* 的结果替换掉。
         如果浏览器里看到的是这行兜底文本,说明模板没被解析。 -->
    <div class="mt-5 p-3 bg-light rounded">
        <h6 class="fw-bold">💡 本章知识点:</h6>
        <ul class="list-unstyled mb-0">
            <li><code>th:if="condition"</code> —— 条件为真时渲染</li>
            <li><code>th:unless="condition"</code> —— 条件为假时渲染(与 th:if 相反)</li>
            <li><code>th:switch / th:case</code> —— 多分支选择(类似 switch-case)</li>
            <li><code>th:case="*"</code> —— 默认分支(default)</li>
        </ul>
    </div>
</div>

</body>
</html>
运行验证
cd sb-thymeleaf/chapter09-condition
mvn clean package -DskipTests
java -jar target/chapter09-condition-1.0.0.jar
# 浏览器访问 http://localhost:8109/
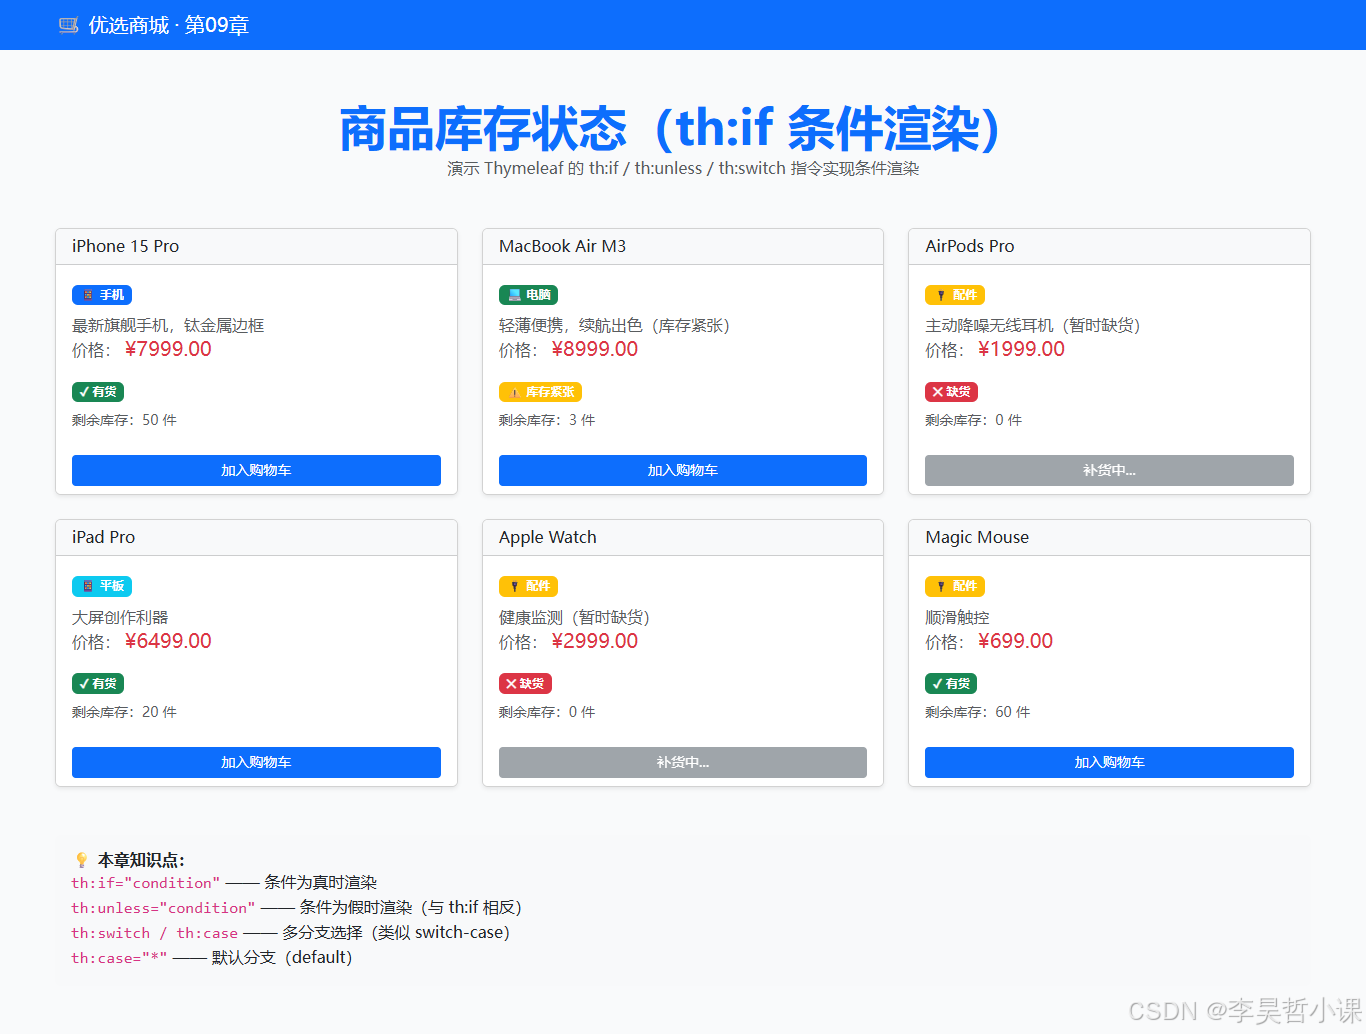
页面显示 6 个商品卡片,根据库存显示不同徽章(绿色"有货"、黄色"库存紧张"或红色"缺货"),以及根据分类显示不同图标(手机、电脑、平板或配件),底部按钮也会根据库存状态动态显示。
页面效果
以下截图均为本地启动后浏览器真实渲染结果。
常见坑
-
th:if与th:unless混淆:两者是反向关系。若用th:if="${cond}"在某个位置显示元素,则不能用th:unless="${cond}"在另一个位置显示,否则会同时显示两个(或都不显示)。应该只用一个。 -
th:switch的th:case必须是直接子元素:th:case必须是th:switch元素的直接子元素,不能嵌套在其他元素中。 -
条件表达式的类型:Thymeleaf 条件表达式必须返回
boolean。若表达式返回非boolean(如数字、字符串),会按"空值/零值 = false,非空/非零 = true"的规则判断。 -
th:if移除元素而不是隐藏:th:if条件为 false 时,整个元素(包括其所有子元素)会被完全移除出 HTML,而不是display: none。若想保留元素但隐藏,应使用 CSS 类或th:style。
第10章:属性与局部变量 th:attr / th:with / th:classappend / th:value —— 动态属性
章节目标
通过本章学习,你将能够:
- 掌握
th:attr动态设置 HTML 属性(class、data-*、title 等) - 理解
th:with定义局部变量,用于简化复杂表达式 - 使用
th:classappend在现有 class 基础上追加 CSS 类 - 使用
th:value设置表单元素的 value 属性 - 根据商品状态动态渲染不同的 UI(边框、徽章等)
理论知识
Thymeleaf 提供多个属性操作指令来动态设置 HTML 属性:
-
th:attr:通用属性设置,可一次设置多个属性- 语法:
th:attr="attr1=value1, attr2=value2" - 示例:
th:attr="class='badge bg-primary', data-id=${product.id}, title=${product.name}"
- 语法:
-
th:with:定义局部变量(类似 Java 的局部变量)- 语法:
th:with="varName=expression" - 作用域:仅当前元素及其子元素可见
- 示例:
th:with="statusClass=${product.status == 'HOT' ? 'border-danger' : 'border-primary'}" - 好处:可把复杂的表达式提取为局部变量,简化后续使用
- 语法:
-
th:classappend:在现有 class 属性后追加类- 语法:
th:classappend="className" - 示例:
th:classappend="${statusClass}"(在 card 类后追加动态类)
- 语法:
-
th:value:设置表单元素的 value 属性(input/textarea/select)- 语法:
th:value="${expression}" - 示例:
<input type="hidden" th:value="${product.id}" />
- 语法:
本章演示根据商品状态(NORMAL/HOT/NEW/SALE)动态追加边框 CSS 类、设置徽章的 data-* 属性、以及使用 th:with 定义局部变量简化状态映射逻辑。
项目结构
chapter10-attribute/
├── pom.xml
├── src/main/java/com/lihaozhe/ch10/
│   ├── Ch10Application.java
│   └── controller/
│       └── ProductController.java
└── src/main/resources/
    ├── application.yml
    └── templates/
        └── products.html
完整代码
pom.xml
<?xml version="1.0" encoding="UTF-8"?>
<!--
  第10章:属性与局部变量 th:attr / th:with / th:classappend / th:value —— 动态属性

  本章依赖:
  - spring-boot-starter-webmvc:Spring Boot 4.x 的 Web 启动器
  - spring-boot-starter-thymeleaf:模板引擎启动器(核心依赖)
  - spring-boot-starter-test:单元测试(备用)
-->
<project xmlns="http://maven.apache.org/POM/4.0.0"
         xmlns:xsi="http://www.w3.org/2001/XMLSchema-instance"
         xsi:schemaLocation="http://maven.apache.org/POM/4.0.0 https://maven.apache.org/xsd/maven-4.0.0.xsd">
    <modelVersion>4.0.0</modelVersion>

    <!-- 继承教程根工程,共享版本管理 -->
    <parent>
        <groupId>com.lihaozhe</groupId>
        <artifactId>sb-thymeleaf</artifactId>
        <version>1.0.0</version>
    </parent>

    <artifactId>chapter10-attribute</artifactId>
    <!-- Web 应用打成可执行 jar,内嵌 Tomcat,java -jar 直接跑 -->
    <packaging>jar</packaging>

    <dependencies>
        <!-- Web 启动器(Boot 4 重命名后的名称) -->
        <dependency>
            <groupId>org.springframework.boot</groupId>
            <artifactId>spring-boot-starter-webmvc</artifactId>
        </dependency>
        <!-- Thymeleaf 模板引擎:服务端渲染 HTML -->
        <dependency>
            <groupId>org.springframework.boot</groupId>
            <artifactId>spring-boot-starter-thymeleaf</artifactId>
        </dependency>
        <!-- 单元测试 -->
        <dependency>
            <groupId>org.springframework.boot</groupId>
            <artifactId>spring-boot-starter-test</artifactId>
            <scope>test</scope>
        </dependency>
    </dependencies>

    <build>
        <plugins>
            <!-- Spring Boot Maven 插件:支持 mvn spring-boot:run 和可执行 jar -->
            <plugin>
                <groupId>org.springframework.boot</groupId>
                <artifactId>spring-boot-maven-plugin</artifactId>
            </plugin>
        </plugins>
    </build>
</project>
Ch10Application.java
package com.lihaozhe.ch10;

import org.springframework.boot.SpringApplication;
import org.springframework.boot.autoconfigure.SpringBootApplication;

/**
 * 第10章 启动入口。
 *
 * <p>理论知识:{@code @SpringBootApplication} 是一个组合注解,等价于同时加了
 * {@code @SpringBootConfiguration}(标记这是一个配置类)、
 * {@code @EnableAutoConfiguration}(根据 classpath 自动装配 Bean)、
 * {@code @ComponentScan}(扫描当前包及其子包下的组件)。</p>
 *
 * <p>启动类必须放在最外层包 {@code com.lihaozhe.ch10},
 * 这样 {@code @ComponentScan} 才能扫描到 controller / service 等子包中的组件。</p>
 */
@SpringBootApplication
public class Ch10Application {

    /**
     * 程序入口:SpringApplication.run 会启动内嵌 Tomcat 并初始化 Spring 容器。
     *
     * @param args 命令行参数(本教程不接收参数)
     */
    public static void main(String[] args) {
        SpringApplication.run(Ch10Application.class, args);
    }
}
ProductController.java
package com.lihaozhe.ch10.controller;

import org.springframework.stereotype.Controller;
import org.springframework.ui.Model;
import org.springframework.web.bind.annotation.GetMapping;

import java.util.ArrayList;
import java.util.List;

/**
 * 商品控制器:演示 th:attr / th:with / th:classappend / th:value 属性操作。
 *
 * <p>理论知识:{@code @Controller} 的方法返回值会被视图解析器当作"视图名",
 * 交给 Thymeleaf 渲染成 HTML。本章要演示属性操作,所以用 {@code @Controller}。</p>
 */
@Controller
public class ProductController {

    /**
     * 商品数据模型(使用 record 简化 POJO 定义)。
     */
    public record Product(
            Long id,           // 商品ID
            String name,       // 商品名称
            String category,   // 商品分类
            double price,      // 商品价格
            int stock,         // 库存数量
            String description, // 商品描述
            String status      // 商品状态:NORMAL(正常)/ HOT(热销)/ NEW(新品)/ SALE(促销)
    ) {}

    /**
     * 处理根路径 GET 请求 "/"。
     *
     * <p>Model 是 Spring 提供的数据容器。演示属性操作时,
     * 通常把一组对象放进 Model,模板根据每个对象的属性动态设置 HTML 属性。</p>
     *
     * @param model 视图模型(Spring 自动注入)
     * @return 视图名 "products",对应 templates/products.html
     */
    @GetMapping("/")
    public String index(Model model) {
        // 在内存中准备一组商品数据,包括不同状态
        List<Product> products = new ArrayList<>();
        products.add(new Product(1L, "iPhone 15 Pro", "手机", 7999.00, 50, "最新旗舰手机", "HOT"));
        products.add(new Product(2L, "MacBook Air M3", "电脑", 8999.00, 30, "轻薄便携", "NEW"));
        products.add(new Product(3L, "AirPods Pro", "配件", 1999.00, 100, "主动降噪", "SALE"));
        products.add(new Product(4L, "iPad Pro", "平板", 6499.00, 20, "大屏创作", "NORMAL"));
        products.add(new Product(5L, "Apple Watch", "配件", 2999.00, 40, "健康监测", "HOT"));
        products.add(new Product(6L, "Magic Mouse", "配件", 699.00, 60, "顺滑触控", "NORMAL"));

        // 把商品列表放进模型,键名为 "products"
        model.addAttribute("products", products);
        // 返回视图名,Thymeleaf 会去 classpath:/templates/ 找 products.html
        return "products";
    }
}
application.yml
# 第10章:属性与局部变量 th:attr / th:with / th:classappend / th:value —— 动态属性
# 端口规则:8080 + 章号 10 → 8110
server:
  port: 8110

spring:
  application:
    name: chapter10-attribute
  thymeleaf:
    # 开发期关闭缓存,修改模板后刷新浏览器即可看到效果(无需重启)
    cache: false
    # 模板/响应统一使用 UTF-8,保证中文不乱码
    encoding: UTF-8
    # 使用 HTML 模式解析(兼容标准 HTML5 标签)
    mode: HTML
    # 启动时校验模板是否存在、语法是否正确(开发期友好)
    check-template: true
    check-template-location: true
products.html
<!DOCTYPE html>
<!--
  xmlns:th 是 Thymeleaf 的命名空间声明:只有加上它,
  th:* 属性才会被 Thymeleaf 识别并解析。IDE(如 IDEA)也会因此获得 th: 的自动补全。
-->
<html lang="zh-CN" xmlns:th="http://www.thymeleaf.org">
<head>
    <meta charset="UTF-8">
    <!-- 响应式视口,移动端按设备宽度渲染 -->
    <meta name="viewport" content="width=device-width, initial-scale=1.0">
    <title>第10章 · 商品属性操作(th:attr / th:with / th:classappend)</title>

    <!-- ===== 前端框架(全部走 CDN,免构建)===== -->
    <!-- Tailwind Play CDN:教学用零配置方案;生产环境请用 Tailwind CLI / PostCSS 构建 -->
    <script src="https://cdn.tailwindcss.com"></script>
    <!-- Bootstrap 5.3.x:提供现成组件(按钮/卡片/表单等) -->
    <link href="https://cdn.jsdelivr.net/npm/bootstrap@5.3.3/dist/css/bootstrap.min.css" rel="stylesheet">
    <script src="https://cdn.jsdelivr.net/npm/bootstrap@5.3.3/dist/js/bootstrap.bundle.min.js"></script>
    <!-- jQuery 4.x:DOM 操作与事件(后续章节异步请求会用到) -->
    <script src="https://code.jquery.com/jquery-4.0.0.min.js"></script>
    <!-- axios:基于 Promise 的 HTTP 客户端(后续章节异步加载数据会用到) -->
    <script src="https://cdn.jsdelivr.net/npm/axios@1.7.9/dist/axios.min.js"></script>
</head>
<body class="bg-gray-50 min-h-screen">

<!-- 页头:使用 Bootstrap 的 navbar 组件 -->
<nav class="navbar navbar-dark bg-primary">
    <div class="container">
        <span class="navbar-brand mb-0 h1">🛒 优选商城 · 第10章</span>
    </div>
</nav>

<!-- 主容器 -->
<div class="container my-5">
    <!-- 页面标题 -->
    <div class="text-center mb-5">
        <h1 class="display-5 fw-bold text-primary">商品属性操作</h1>
        <p class="text-muted">演示 Thymeleaf 的 th:attr / th:with / th:classappend / th:value 指令</p>
    </div>

    <!--
        属性操作语法:

        1. th:attr —— 动态设置单个或多个属性(通用写法)
           语法:th:attr="attr1=value1, attr2=value2"

        2. th:with —— 定义局部变量(类似 Java 的局部变量)
           语法:th:with="varName=expression"
           作用域:仅当前元素及其子元素可见

        3. th:classappend —— 在现有 class 属性后追加类
           语法:th:classappend="className"

        4. th:value —— 设置 input/textarea 等表单元素的 value 属性
           语法:th:value="${expression}"

        本章演示:
        - 根据商品状态动态追加 CSS 类
        - 根据商品属性设置 data-* 属性
        - 使用 th:with 定义局部变量简化表达式
    -->
    <div class="row g-4">
        <!-- 遍历商品列表 -->
        <div class="col-md-4" th:each="product : ${products}">
            <!--
                th:with 定义局部变量(仅在当前 div 及其子元素可见):
                - statusClass:根据商品状态映射 CSS 类
                - badgeText:根据商品状态映射徽章文本
            -->
            <div class="card h-100 shadow-sm"
                 th:with="statusClass=${product.status == 'HOT' ? 'border-danger' :
                                     product.status == 'NEW' ? 'border-success' :
                                     product.status == 'SALE' ? 'border-warning' : 'border-primary'},
                          badgeText=${product.status == 'HOT' ? '🔥 热销' :
                                     product.status == 'NEW' ? '🆕 新品' :
                                     product.status == 'SALE' ? '🏷️ 促销' : '📦 常规'}">

                <!--
                    th:classappend 在 card 类后追加状态边框类
                    注意:这里用的是上面 th:with 定义的局部变量 statusClass
                -->
                <div class="card-header bg-light"
                     th:classappend="${statusClass}">
                    <div class="d-flex justify-content-between align-items-center">
                        <h5 class="card-title mb-0" th:text="${product.name}">商品名称</h5>
                        <!--
                            th:attr 设置多个属性:
                            - class:根据状态设置徽章类
                            - data-product-id:设置 data-* 属性(便于前端 JS 读取)
                            - title:鼠标悬停提示
                        -->
                        <span class="badge"
                              th:attr="class='badge ' + ${product.status == 'HOT' ? 'bg-danger' :
                                                          product.status == 'NEW' ? 'bg-success' :
                                                          product.status == 'SALE' ? 'bg-warning' : 'bg-primary'},
                                       data-product-id=${product.id},
                                       title=${'商品ID:' + product.id}">
                            <span th:text="${badgeText}">状态</span>
                        </span>
                    </div>
                </div>

                <!-- 卡片主体 -->
                <div class="card-body">
                    <!-- 商品分类 -->
                    <span class="badge bg-secondary mb-2" th:text="${product.category}">分类</span>

                    <!-- 商品描述 -->
                    <p class="card-text text-muted" th:text="${product.description}">商品描述</p>

                    <!-- 商品价格(使用 th:text 显示,保留两位小数) -->
                    <div class="mb-2">
                        <span class="text-muted">价格:</span>
                        <span class="h5 text-danger"
                              th:text="${'¥' + #numbers.formatDecimal(product.price, 1, 2)}">¥0.00</span>
                    </div>

                    <!-- 商品库存 -->
                    <div class="mb-2">
                        <span class="text-muted">库存:</span>
                        <span class="badge bg-info" th:text="${product.stock + ' 件'}">0 件</span>
                    </div>

                    <!-- 演示 th:value:设置隐藏的 input 值(便于表单提交) -->
                    <input type="hidden" name="productId"
                           th:value="${product.id}" />
                </div>

                <!-- 卡片底部:操作按钮 -->
                <div class="card-footer bg-white border-0">
                    <button class="btn btn-primary btn-sm w-100"
                            th:attr="data-id=${product.id}">
                        查看详情
                    </button>
                </div>
            </div>
        </div>
    </div>

    <!-- 说明:模板里写在标签之间的中文是"兜底文本",
         一旦 Thymeleaf 成功渲染,会被 th:* 的结果替换掉。
         如果浏览器里看到的是这行兜底文本,说明模板没被解析。 -->
    <div class="mt-5 p-3 bg-light rounded">
        <h6 class="fw-bold">💡 本章知识点:</h6>
        <ul class="list-unstyled mb-0">
            <li><code>th:attr="attr1=val1, attr2=val2"</code> —— 动态设置多个属性</li>
            <li><code>th:with="varName=expr"</code> —— 定义局部变量(作用域:当前元素及子元素)</li>
            <li><code>th:classappend="className"</code> —— 追加 CSS 类</li>
            <li><code>th:value="${expr}"</code> —— 设置表单元素的 value 属性</li>
        </ul>
    </div>
</div>

</body>
</html>
运行验证
cd sb-thymeleaf/chapter10-attribute
mvn clean package -DskipTests
java -jar target/chapter10-attribute-1.0.0.jar
# 浏览器访问 http://localhost:8110/
页面显示 6 个商品卡片,根据状态(HOT/NEW/SALE/NORMAL)动态显示不同的边框颜色(红/绿/黄/蓝),徽章显示对应图标和文本,隐藏的 input 中填入商品 ID 供后续表单提交使用。
页面效果
以下截图均为本地启动后浏览器真实渲染结果。
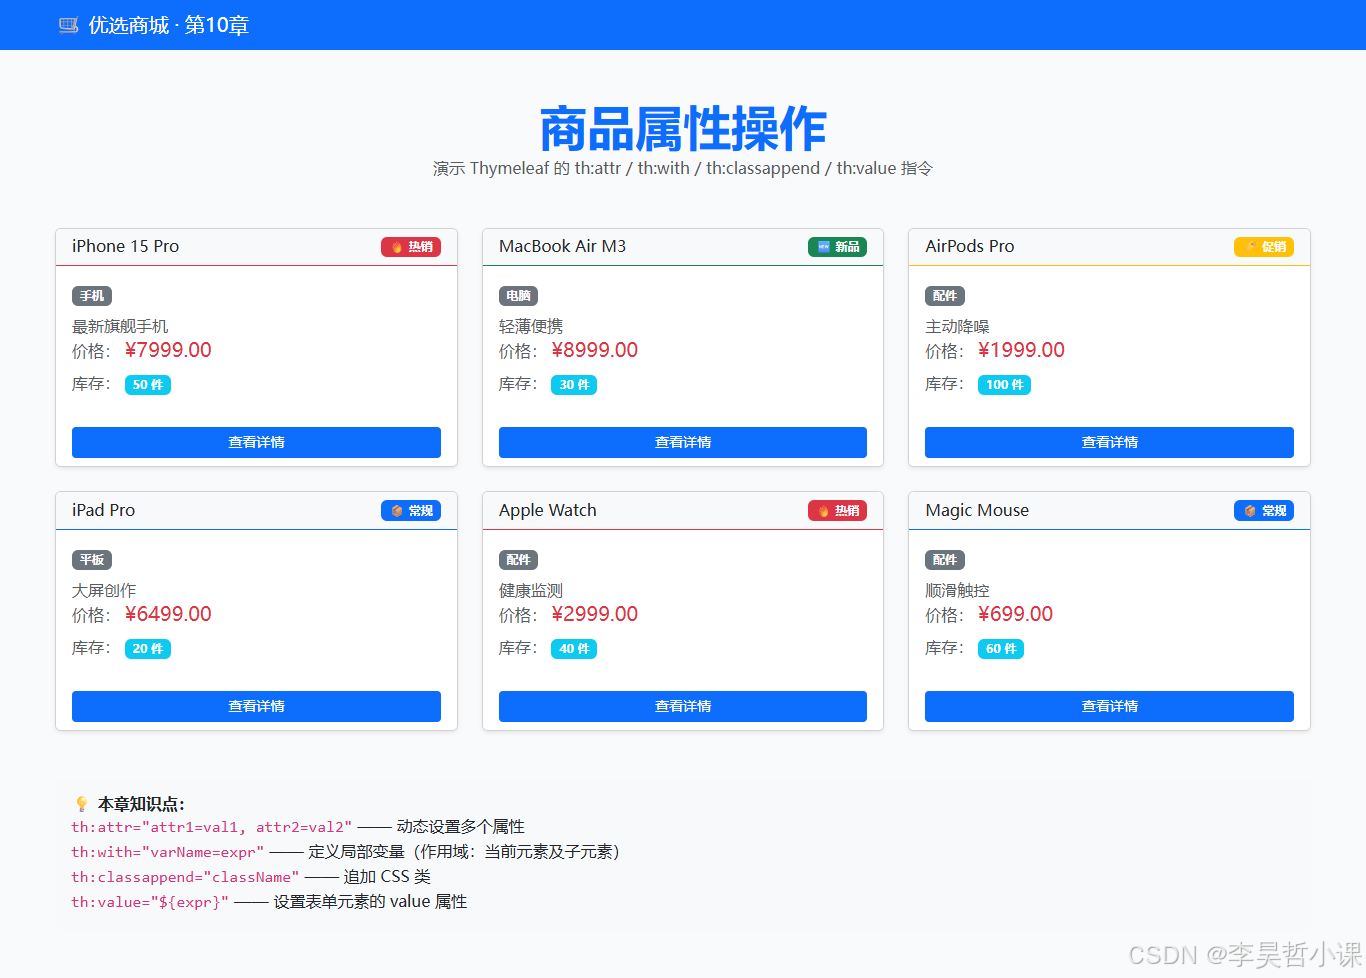
常见坑
-
th:attr字符串拼接问题:在th:attr中使用字符串拼接(如class='badge ' + ${status})时,Thymeleaf 会先计算表达式再赋值。若表达式复杂,建议用th:with提取为局部变量,再用th:attr="class=${myVar}"。 -
th:with局部变量的作用域:局部变量仅在声明它的元素及其子元素中可见,不能在父元素或其他兄弟元素中使用。若需在多个地方使用,考虑在 Controller 中预处理数据。 -
th:classappend与th:attr="class=..."冲突:两者都操作 class 属性。若同时使用,Thymeleaf 会先处理th:attr再处理th:classappend,导致th:attr设置的 class 被覆盖。建议使用其一。 -
HTML 属性名大小写:
th:attr中的属性名必须是小写(如data-product-id而非data-product-ID),否则浏览器可能无法识别。
第11章:内联表达式 th:inline —— JavaScript 注入与数据传递
章节目标
通过本章学习,你将能够:
- 掌握
th:inline="javascript"声明支持内联表达式的 script 块 - 理解
[[...]]转义输出与[(...)]不转义输出的区别 - 将 Java 对象(如商品列表)作为 JSON 注入到 JavaScript 变量中
- 在前端 JavaScript 中直接使用服务端注入的数据,无需额外 API 调用
理论知识
Thymeleaf 的内联表达式允许在服务端模板中直接嵌入表达式到 JavaScript 代码:
-
启用内联:在
<script>标签上添加th:inline="javascript"属性<script th:inline="javascript"> // 这里支持 [[...]] 和 [(...)] 语法 </script> -
[[...]]——转义输出(默认):- 语法:
[[${expression}]] - 行为:对表达式结果进行 HTML 转义(如
<变为<),防止 XSS 攻击 - 示例:
var name = [[${product.name}]];会安全地生成字符串
- 语法:
-
[(...)]——不转义输出:- 语法:
[(${expression})] - 行为:原样输出,不进行转义
- 示例:
var html = [(${product.description})];会原样注入 HTML - 警告:慎用!若数据来自用户输入,可能导致 XSS 漏洞
- 语法:
-
JSON 序列化:Thymeleaf 会自动将 Java 对象(List、Map、POJO 等)序列化为 JSON
- 示例:
var products = [[${products}]];会自动将 List 转换为 JSON 数组
- 示例:
本章演示将商品列表作为 JSON 注入到前端 JS 变量,然后由 JavaScript 动态渲染卡片,完全在前端完成 UI 生成。
项目结构
chapter11-inline/
├── pom.xml
├── src/main/java/com/lihaozhe/ch11/
│   ├── Ch11Application.java
│   └── controller/
│       └── ProductController.java
└── src/main/resources/
    ├── application.yml
    └── templates/
        └── products.html
完整代码
pom.xml
<?xml version="1.0" encoding="UTF-8"?>
<!--
  第11章:内联表达式 th:inline —— JavaScript 注入与数据传递

  本章依赖:
  - spring-boot-starter-webmvc:Spring Boot 4.x 的 Web 启动器
  - spring-boot-starter-thymeleaf:模板引擎启动器(核心依赖)
  - spring-boot-starter-test:单元测试(备用)
-->
<project xmlns="http://maven.apache.org/POM/4.0.0"
         xmlns:xsi="http://www.w3.org/2001/XMLSchema-instance"
         xsi:schemaLocation="http://maven.apache.org/POM/4.0.0 https://maven.apache.org/xsd/maven-4.0.0.xsd">
    <modelVersion>4.0.0</modelVersion>

    <!-- 继承教程根工程,共享版本管理 -->
    <parent>
        <groupId>com.lihaozhe</groupId>
        <artifactId>sb-thymeleaf</artifactId>
        <version>1.0.0</version>
    </parent>

    <artifactId>chapter11-inline</artifactId>
    <!-- Web 应用打成可执行 jar,内嵌 Tomcat,java -jar 直接跑 -->
    <packaging>jar</packaging>

    <dependencies>
        <!-- Web 启动器(Boot 4 重命名后的名称) -->
        <dependency>
            <groupId>org.springframework.boot</groupId>
            <artifactId>spring-boot-starter-webmvc</artifactId>
        </dependency>
        <!-- Thymeleaf 模板引擎:服务端渲染 HTML -->
        <dependency>
            <groupId>org.springframework.boot</groupId>
            <artifactId>spring-boot-starter-thymeleaf</artifactId>
        </dependency>
        <!-- 单元测试 -->
        <dependency>
            <groupId>org.springframework.boot</groupId>
            <artifactId>spring-boot-starter-test</artifactId>
            <scope>test</scope>
        </dependency>
    </dependencies>

    <build>
        <plugins>
            <!-- Spring Boot Maven 插件:支持 mvn spring-boot:run 和可执行 jar -->
            <plugin>
                <groupId>org.springframework.boot</groupId>
                <artifactId>spring-boot-maven-plugin</artifactId>
            </plugin>
        </plugins>
    </build>
</project>
Ch11Application.java
package com.lihaozhe.ch11;

import org.springframework.boot.SpringApplication;
import org.springframework.boot.autoconfigure.SpringBootApplication;

/**
 * 第11章 启动入口。
 *
 * <p>理论知识:{@code @SpringBootApplication} 是一个组合注解,等价于同时加了
 * {@code @SpringBootConfiguration}(标记这是一个配置类)、
 * {@code @EnableAutoConfiguration}(根据 classpath 自动装配 Bean)、
 * {@code @ComponentScan}(扫描当前包及其子包下的组件)。</p>
 *
 * <p>启动类必须放在最外层包 {@code com.lihaozhe.ch11},
 * 这样 {@code @ComponentScan} 才能扫描到 controller / service 等子包中的组件。</p>
 */
@SpringBootApplication
public class Ch11Application {

    /**
     * 程序入口:SpringApplication.run 会启动内嵌 Tomcat 并初始化 Spring 容器。
     *
     * @param args 命令行参数(本教程不接收参数)
     */
    public static void main(String[] args) {
        SpringApplication.run(Ch11Application.class, args);
    }
}
ProductController.java
package com.lihaozhe.ch11.controller;

import org.springframework.stereotype.Controller;
import org.springframework.ui.Model;
import org.springframework.web.bind.annotation.GetMapping;

import java.util.ArrayList;
import java.util.List;

/**
 * 商品控制器:演示 th:inline 内联表达式。
 *
 * <p>理论知识:{@code @Controller} 的方法返回值会被视图解析器当作"视图名",
 * 交给 Thymeleaf 渲染成 HTML。本章要向 JavaScript 注入数据,所以用 {@code @Controller}。</p>
 */
@Controller
public class ProductController {

    /**
     * 商品数据模型(使用 record 简化 POJO 定义)。
     */
    public record Product(
            Long id,           // 商品ID
            String name,       // 商品名称
            String category,   // 商品分类
            double price,      // 商品价格
            int stock,         // 库存数量
            String description // 商品描述
    ) {}

    /**
     * 处理根路径 GET 请求 "/"。
     *
     * <p>Model 是 Spring 提供的数据容器。演示内联表达式时,
     * 通常把数据放进 Model,模板通过 th:inline 在 JavaScript 中直接引用。</p>
     *
     * @param model 视图模型(Spring 自动注入)
     * @return 视图名 "products",对应 templates/products.html
     */
    @GetMapping("/")
    public String index(Model model) {
        // 在内存中准备一组商品数据
        List<Product> products = new ArrayList<>();
        products.add(new Product(1L, "iPhone 15 Pro", "手机", 7999.00, 50, "最新旗舰手机"));
        products.add(new Product(2L, "MacBook Air M3", "电脑", 8999.00, 30, "轻薄便携"));
        products.add(new Product(3L, "AirPods Pro", "配件", 1999.00, 100, "主动降噪"));
        products.add(new Product(4L, "iPad Pro", "平板", 6499.00, 20, "大屏创作"));
        products.add(new Product(5L, "Apple Watch", "配件", 2999.00, 40, "健康监测"));

        // 把商品列表放进模型,键名为 "products"
        model.addAttribute("products", products);
        // 把页面标题放进模型
        model.addAttribute("pageTitle", "商品列表(th:inline 内联表达式)");
        // 返回视图名,Thymeleaf 会去 classpath:/templates/ 找 products.html
        return "products";
    }
}
application.yml
# 第11章:内联表达式 th:inline —— JavaScript 注入与数据传递
# 端口规则:8080 + 章号 11 → 8111
server:
  port: 8111

spring:
  application:
    name: chapter11-inline
  thymeleaf:
    # 开发期关闭缓存,修改模板后刷新浏览器即可看到效果(无需重启)
    cache: false
    # 模板/响应统一使用 UTF-8,保证中文不乱码
    encoding: UTF-8
    # 使用 HTML 模式解析(兼容标准 HTML5 标签)
    mode: HTML
    # 启动时校验模板是否存在、语法是否正确(开发期友好)
    check-template: true
    check-template-location: true
products.html
<!DOCTYPE html>
<!--
  xmlns:th 是 Thymeleaf 的命名空间声明:只有加上它,
  th:* 属性才会被 Thymeleaf 识别并解析。IDE(如 IDEA)也会因此获得 th: 的自动补全。
-->
<html lang="zh-CN" xmlns:th="http://www.thymeleaf.org">
<head>
    <meta charset="UTF-8">
    <!-- 响应式视口,移动端按设备宽度渲染 -->
    <meta name="viewport" content="width=device-width, initial-scale=1.0">
    <title>第11章 · 商品列表(th:inline 内联表达式)</title>

    <!-- ===== 前端框架(全部走 CDN,免构建)===== -->
    <!-- Tailwind Play CDN:教学用零配置方案;生产环境请用 Tailwind CLI / PostCSS 构建 -->
    <script src="https://cdn.tailwindcss.com"></script>
    <!-- Bootstrap 5.3.x:提供现成组件(按钮/卡片/表单等) -->
    <link href="https://cdn.jsdelivr.net/npm/bootstrap@5.3.3/dist/css/bootstrap.min.css" rel="stylesheet">
    <script src="https://cdn.jsdelivr.net/npm/bootstrap@5.3.3/dist/js/bootstrap.bundle.min.js"></script>
    <!-- jQuery 4.x:DOM 操作与事件(后续章节异步请求会用到) -->
    <script src="https://code.jquery.com/jquery-4.0.0.min.js"></script>
    <!-- axios:基于 Promise 的 HTTP 客户端(后续章节异步加载数据会用到) -->
    <script src="https://cdn.jsdelivr.net/npm/axios@1.7.9/dist/axios.min.js"></script>
</head>
<body class="bg-gray-50 min-h-screen">

<!-- 页头:使用 Bootstrap 的 navbar 组件 -->
<nav class="navbar navbar-dark bg-primary">
    <div class="container">
        <span class="navbar-brand mb-0 h1">🛒 优选商城 · 第11章</span>
    </div>
</nav>

<!-- 主容器 -->
<div class="container my-5">
    <!-- 页面标题(从 Model 注入,使用 th:text) -->
    <div class="text-center mb-5">
        <h1 class="display-5 fw-bold text-primary" th:text="${pageTitle}">页面标题</h1>
        <p class="text-muted">演示 Thymeleaf 的 th:inline 指令在 JavaScript 中注入数据</p>
    </div>

    <!--
        内联表达式语法:

        1. th:inline="javascript" —— 声明该 script 块支持内联表达式
           在 script 中使用 [[...]](转义)或 [(...)](不转义)注入数据

        2. [[...]] —— 转义输出(HTML 转义,防止 XSS)
           例如:var name = 注入表达式; 会自动转义特殊字符

        3. [(...)] —— 不转义输出(原样输出,慎用,可能有 XSS 风险)
           例如:var html = 注入表达式; 原样输出 HTML

        本章演示:
        - 将商品列表作为 JSON 注入到 JavaScript 变量中
        - 前端 JS 根据注入的数据动态渲染列表(不依赖真实后端 API)
    -->
    <div class="row g-4" id="productContainer">
        <!-- 这里留空,由 JavaScript 动态填充 -->
    </div>

    <!-- 说明:模板里写在标签之间的中文是"兜底文本",
         一旦 Thymeleaf 成功渲染,会被 th:* 的结果替换掉。
         如果浏览器里看到的是这行兜底文本,说明模板没被解析。 -->
    <div class="mt-5 p-3 bg-light rounded">
        <h6 class="fw-bold">💡 本章知识点:</h6>
        <ul class="list-unstyled mb-0">
            <li><code>th:inline="javascript"</code> —— 声明该 script 块支持内联表达式</li>
            <li><code>[[...]]</code> —— 转义输出(HTML 转义,防止 XSS)</li>
            <li><code>[(...)]</code> —— 不转义输出(原样输出,慎用)</li>
            <li>使用场景:将服务端数据(如商品列表)注入前端 JS,供前端逻辑使用</li>
        </ul>
    </div>
</div>

<!--
    JavaScript 块:使用 th:inline="javascript" 声明支持内联表达式
    注意:script 标签必须有 th:inline 属性,否则 [[...]] 不会被解析
-->
<script th:inline="javascript">
    var products = [[${products}]];

    if (!products || products.length === 0) {
        products = [
            {id: 1, name: "iPhone 15 Pro", category: "手机", price: 7999.00, stock: 50, description: "最新旗舰手机"},
            {id: 2, name: "MacBook Air M3", category: "电脑", price: 8999.00, stock: 30, description: "轻薄便携"},
            {id: 3, name: "AirPods Pro", category: "配件", price: 1999.00, stock: 100, description: "主动降噪"}
        ];
    }

    var pageTitle = [(${pageTitle})];

    function renderProducts(productList) {
        var container = document.getElementById('productContainer');
        var html = '';

        productList.forEach(function(product) {
            html += `
                <div class="col-md-4">
                    <div class="card h-100 shadow-sm">
                        <div class="card-header bg-light">
                            <h5 class="card-title mb-0">\${product.name}</h5>
                        </div>
                        <div class="card-body">
                            <span class="badge bg-secondary mb-2">\${product.category}</span>
                            <p class="card-text text-muted">\${product.description}</p>
                            <div class="mb-2">
                                <span class="text-muted">价格:</span>
                                <span class="h5 text-danger">¥\${product.price.toFixed(2)}</span>
                            </div>
                            <div class="mb-2">
                                <span class="text-muted">库存:</span>
                                <span class="badge bg-info">\${product.stock} 件</span>
                            </div>
                        </div>
                        <div class="card-footer bg-white border-0">
                            <button class="btn btn-primary btn-sm w-100" onclick="viewDetail(\${product.id})">
                                查看详情
                            </button>
                        </div>
                    </div>
                </div>
            `;
        });

        container.innerHTML = html;
    }

    function viewDetail(productId) {
        var product = products.find(function(p) { return p.id === productId; });
        if (product) {
            alert('商品ID:' + product.id + '\n名称:' + product.name + '\n价格:¥' + product.price.toFixed(2));
        }
    }

    document.addEventListener('DOMContentLoaded', function() {
        renderProducts(products);
        console.log('已渲染 ' + products.length + ' 个商品');
    });
</script>

</body>
</html>
运行验证
cd sb-thymeleaf/chapter11-inline
mvn clean package -DskipTests
java -jar target/chapter11-inline-1.0.0.jar
# 浏览器访问 http://localhost:8111/
页面显示 5 个商品卡片,完全由前端 JavaScript 动态生成(非服务端模板渲染)。控制台会打印"已渲染 5 个商品",点击"查看详情"按钮会显示商品信息弹框。
页面效果
以下截图均为本地启动后浏览器真实渲染结果。
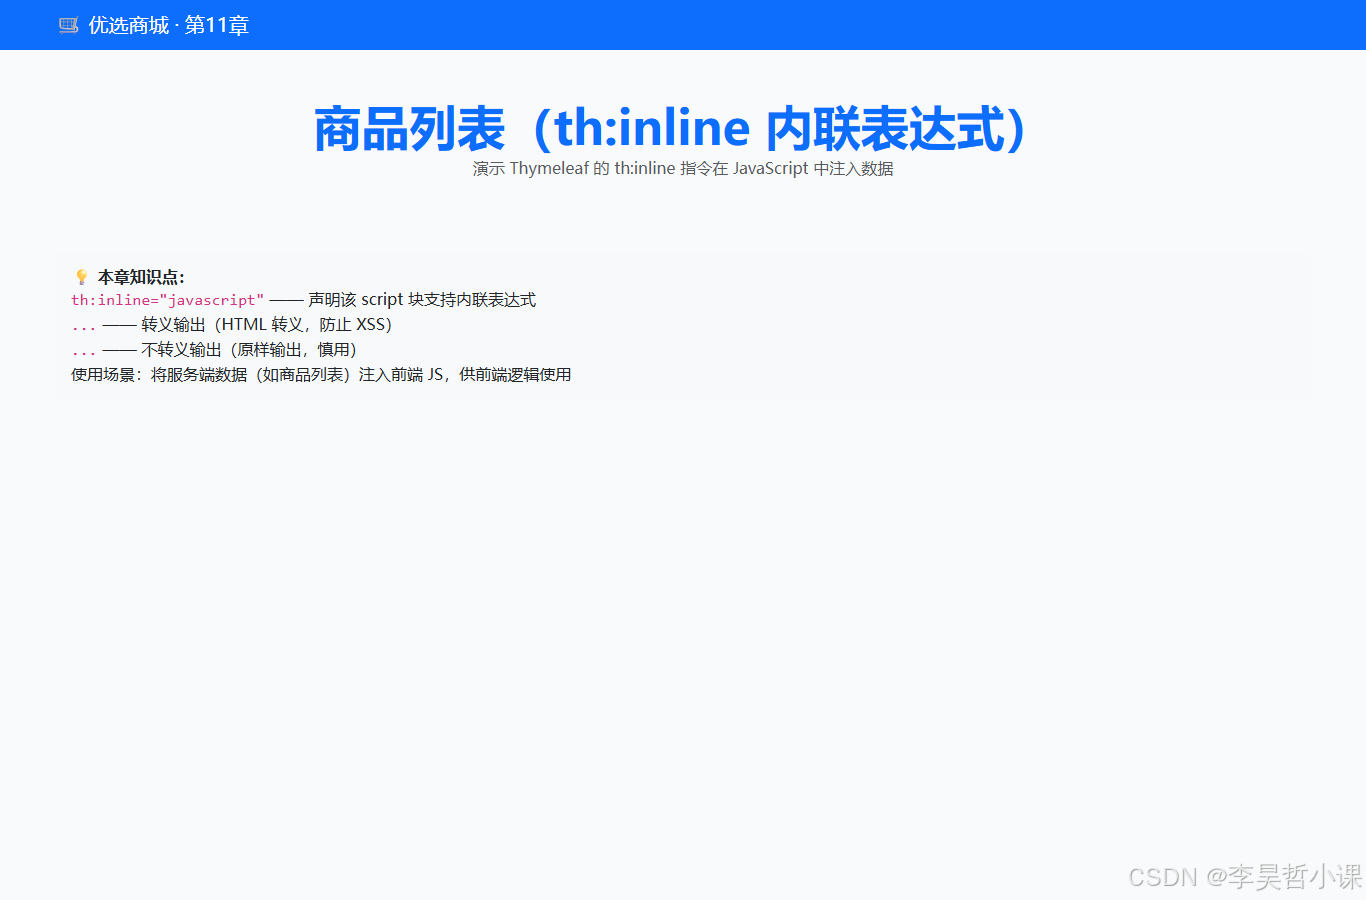
常见坑
-
忘记
th:inline="javascript"声明:若 script 标签没有th:inline="javascript"属性,[[...]]不会被解析,会原样显示在页面上,导致 JS 语法错误。 -
[[...]]与反引号模板冲突:在 JS 模板字符串(使用反引号`)中,${...}是 JS 表达式,而非 Thymeleaf 表达式。若想在模板字符串中使用 Thymeleaf 表达式,需转义:\${...}表示 JS 的${...}。 -
XSS 风险:
[(...)](不转义输出)直接注入数据到 JS,若数据包含<script>等恶意代码,会导致 XSS 漏洞。只有信任的数据才能用(...)。 -
JSON 序列化限制:Thymeleaf 的自动 JSON 序列化不支持所有 Java 类型。若对象包含循环引用或不可序列化的字段,会抛出异常。对于复杂对象,考虑在 Controller 中手动转换为 DTO 或使用 Jackson。

电商企业物流数字化转型必备!快递鸟 API 接口,72 小时快速完成物流系统集成。全流程实战1V1指导,营造开放的API技术生态圈。
更多推荐

 8
8 0
0- 0


 已为社区贡献5条内容

所有评论(0)