
“高可用负载均衡 + 双主互备 + 读写协同”的数据库架构:《Keepalived + LVS(DR)+ MariaDB 主主》
Keepalived + LVS(DR) + MariaDB 主主
项目背景
业务场景与数据库核心诉求
在企业级应用中,数据库作为业务数据的 “核心载体”,其高可用性、读写性能、数据一致性直接决定业务能否稳定运行。无论是电商交易系统(订单生成、库存扣减)、金融支付平台(交易对账、资金流转),还是政务管理系统(数据上报、业务审批),均对数据库提出以下刚性需求:
-
无间断服务(高可用)
数据库需实现 24×7 小时不间断运行,避免因单点故障(如数据库服务器宕机、磁盘损坏、网络中断)导致业务中断。例如:电商平台秒杀活动中,若数据库不可用,将直接导致订单无法生成,每中断 1 分钟可能造成数万元营收损失;金融系统中,数据库故障可能引发交易对账异常,甚至触发合规风险。
-
高并发承载(读写性能)
随着用户规模增长,数据库面临的读写请求呈指数级上升(如日均 SQL 执行量从 100 万次增至 1 亿次)。单台数据库服务器的 CPU、内存、IO 能力易成为瓶颈:读请求过多会导致查询延迟(如用户查询订单列表超时),写请求集中会造成事务阻塞(如多用户同时提交订单导致库存更新排队)。
-
数据零丢失(可靠性)
业务数据需具备 “抗丢失” 能力,即使遭遇硬件故障或软件异常,也需保证数据不损坏、不丢失。例如:用户充值记录、订单信息若因数据库故障丢失,将直接引发用户投诉与信任危机;同时,多节点间的数据需实时同步,避免出现 “主库数据已更新,从库仍展示旧数据” 的一致性问题。
-
灵活扩展(可扩展性)
业务增长过程中,需支持 “按需扩展” 数据库能力:读压力增大时可快速新增读节点,写压力上升时可优化写分发策略,避免因架构僵化导致 “业务倒逼重构” 的被动局面。
传统数据库架构的痛点与局限
在采用《Keepalived + LVS(DR)+ MariaDB 主主》方案前,多数企业曾使用 “单节点数据库” 或 “简单主从架构”,但面临以下难以突破的瓶颈:
-
单节点数据库:单点故障风险致命
问题核心:数据库仅部署在一台服务器上,一旦服务器硬件故障(如电源损坏、磁盘坏道)或软件崩溃(如 MariaDB 进程异常退出),将导致全量业务中断。
恢复效率低:依赖人工干预恢复(如更换服务器、重建数据库、恢复备份),平均恢复时间 (MTTR)通常超过 30 分钟,远无法满足 “秒级切换” 的业务需求;若备份数据不完整,还可能导致部分业务数据永久丢失。
-
简单主从架构(一主一从):读写瓶颈与切换缺陷
读性能局限:虽然通过 “主库写、从库读” 分摊读压力,但从库仅能扩展读能力,无法缓解主库的写压力(如大量订单写入仍集中在主库);且从库数量增多时,缺乏统一的读请求分发机制,易导致部分从库过载(如某台从库承担 80% 读请求)、部分从库空闲。
高可用缺陷:主库故障时,需手动将从库提升为新主库,再修改业务系统的数据库连接地址,切换过程耗时且易出错(如忘记同步从库未应用的 binlog 导致数据不一致);同时,从库仅作为 “备用节点”,写请求始终依赖主库,主库写瓶颈无法突破。
-
无负载均衡:请求分发混乱
部分企业尝试用 “业务层硬编码连接地址” 实现读写分离(如读请求连从库 IP,写请求连主库 IP), 但存在两大问题:
① 缺乏故障检测机制:若某台从库宕机,业务层无法实时感知,仍会将读请求分发至故障节点,导致部分读业务失败;
② 扩展性差:新增读节点时,需修改业务代码中的连接地址列表,重启服务才能生效,不符合 “无感知扩展” 的运维需求。
-
数据同步与一致性风险
传统主从架构依赖 MariaDB 原生的 binlog 同步,若网络延迟或主库 binlog 丢失,会导致从库数据滞后或同步失败;且主库故障时,若从库未完全同步主库数据,强制切换会造成 “数据断层”(如主库已提交的订单,从库未记录)。
技术方案的选型逻辑
针对上述痛点,需构建一套 “高可用负载均衡 + 双主互备 + 读写协同” 的数据库架构,而《Keepalived + LVS(DR)+ MariaDB 主主》组合正是基于以下核心诉求选型:
-
MariaDB 主主:突破写瓶颈与双活备份
采用 “双主互备” 模式(两台 MariaDB 均为主库,可同时处理写请求),彻底解决传统主从架构的 “写依赖单主” 问题,写性能理论上提升 2 倍;
两台主库实时同步数据(通过 binlog 双向同步),任一主库故障时,另一主库已拥有完整数据,避免数据丢失;同时,支持 “读写请求均分发至双主”,进一步提升整体并发能力。
-
LVS(DR 模式):高效分发读写请求
LVS 作为四层负载均衡器,基于 IP 和端口转发请求,具备超高并发承载能力(单机可支撑 10 万 + 并发连接),远超 Nginx 等七层负载均衡器;
采用 DR(直接路由)模式,请求仅经过 LVS 转发至后端 MariaDB 节点,响应数据直接从 MariaDB 返回给客户端,避免 “请求回程流量” 占用 LVS 带宽,转发效率接近物理机直连; 支持 “健康检查”,实时检测 MariaDB 节点状态,若某台主库宕机,LVS 自动将请求分发至另一台健康主库,避免业务访问故障节点。
-
Keepalived:负载均衡层高可用
LVS 作为请求分发核心,若自身单点故障,将导致全量数据库请求无法转发。通过 Keepalived 的 VRRP 协议实现 LVS 主备高可用:主 LVS 节点故障时,备 LVS 节点可在 1-3 秒内自动接管虚拟 IP(VIP),实现 “无感知切换”,彻底消除负载均衡层单点风险;
支持 “优先级配置”,可根据 LVS 节点性能设置主备角色,确保高性能节点优先承担转发任务。
项目价值与预期目标
通过部署《Keepalived + LVS(DR)+ MariaDB 主主》架构,预期实现以下技术与业务价值:
-
高可用升级:数据库层可用性从 99.9% 提升至 99.99%,年均故障中断时间从 8.76 小时降至 52.56 分钟,核心业务(如订单、支付)无服务中断风险;
-
性能翻倍:写性能从单主 500 TPS 提升至双主 1000+ TPS,读性能支持通过新增从节点无限扩展 (LVS 统一分发读请求),95% SQL 查询响应时间<200ms;
-
数据可靠:双主实时同步数据,任一节点故障无数据丢失;LVS 健康检查 + Keepalived 主备切换, 实现 “故障自动转移”,无需人工干预;
-
运维高效:新增数据库节点时,仅需接入 LVS 集群,无需修改业务代码;负载均衡与数据库节点状态可通过监控平台实时查看,故障定位效率提升 70%。
MariaDB 主从复制原理
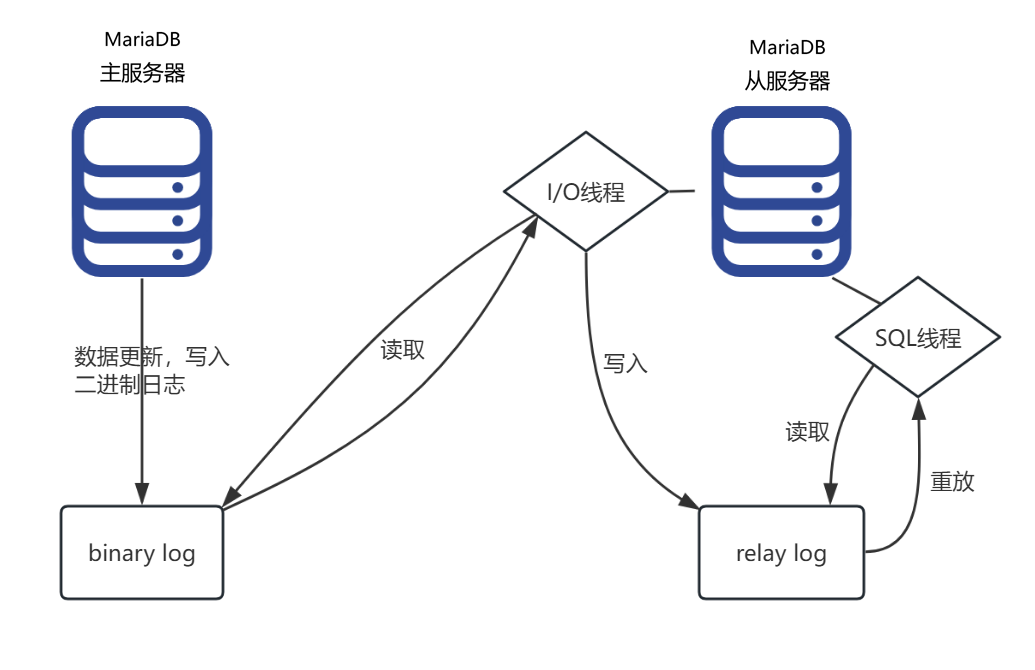
MariaDB 主从复制是指主库将数据变更以日志形式传输给从库,从库重放日志实现数据一致。
-
主库 二进制日志(binlog):主库核心日志,记录所有修改数据的 SQL(增删改、建表等),是主从同步的 “数据源头”;
-
从库 中继日志(relay log):从库本地日志,存储从主库获取的 binlog 内容,避免直接通过网络读取主库 binlog;
-
主库 binlog dump 线程:负责向从库传输 binlog;
-
从库 IO 线程:负责连接主库、拉取 binlog 并写入本地 relay log;
-
从库 SQL 线程:负责读取 relay log、执行其中的 SQL,还原主库数据变更。
- 主库 binlog dump 线程:负责向从库传输 binlog; - 从库 IO 线程:负责连接主库、拉取 binlog 并写入本地 relay log;意思是主库传binlog时候,从库也要同时拉取binlog,两者是个同时工作的,对吗 先给结论: 不是 “主库主动推送 + 从库同时主动拉取双向并行”,本质是「从库 IO 线程发起请求,主库 dump 线程持续推送」,是一条单向长连接上的协作关系。 拆开讲清楚两者配合流程: 1. 从库启动 IO 线程 IO 线程主动建立 TCP 连接连主库,发送 COM_BINLOG_DUMP 请求,告诉主库:我要从某个 binlog 位置开始接收日志。 2. 主库收到请求后,创建 binlog dump 线程 dump 线程不会一次性把所有 binlog 发完: - 已有 binlog:依次发送; - 主库后续新产生事务写入 binlog 后,dump 线程主动推送这条日志给从库; 这条连接会长期保持。 3. 数据流向 主库 dump 线程 → 网络 → 从库 IO 线程 → IO 线程把收到的 binlog 写入本地 relay log 纠正你理解里容易混淆的点 ❌ 错误理解: 主库主动往外发,从库另外开任务主动去抓,两个独立动作同时进行。 ✅ 真实模型: 只有一条 TCP 长连接,发起方是从库 IO 线程;数据推送方是主库 dump 线程。 - IO 线程:等待网络数据到达,收到就落盘 relay log; - dump 线程:监视主库 binlog,有新日志就往这条连接发送; 二者依托同一条连接成对配合工作,不存在两条独立通路。
主从同步完整原理流程
步骤 1:主库记录数据变更到 binlog
当主库执行数据变更操作(如 INSERT/UPDATE/DELETE 、CREATE TABLE 等)时:
-
操作先写入事务日志(redo log)保证数据持久化;
-
事务提交时,MySQL 会将该操作的 SQL(或数据变更事件)按顺序写入 binlog。
步骤 2:从库 IO 线程连接主库,请求同步 binlog
从库启动后,IO 线程会主动连接主库,并向主库发送两个关键信息:
-
要同步的主库 binlog 文件名称;
-
要同步的binlog 位置(position)(即从哪个位置开始读取); 首次同步时,从库会请求主库全量数据的 binlog(或先全量备份再同步增量),后续仅请求增量 binlog。
步骤 3:主库 binlog dump 线程传输 binlog 给从库
主库接收到从库的同步请求后,会创建 binlog dump 线程响应:
-
该线程根据从库指定的 binlog 文件和位置,读取主库 binlog 中的增量数据;
-
将读取到的 binlog 内容(事件)通过网络传输给从库的 IO 线程;
-
主库会记录 “哪些从库正在同步哪个 binlog 位置”,确保从库断线重连后能续传。
步骤 4:从库 IO 线程写入 relay log
从库 IO 线程接收到主库传输的 binlog 内容后:
-
不会直接执行,而是先写入本地的 relay log (中继日志),避免网络中断导致数据丢失;
-
同时更新从库状态文件(master.info/relay-log.info),记录:
-
已同步的主库 binlog 文件 + 位置;
-
本地 relay log 的文件 + 位置; 确保从库重启后能继续同步,不重复 / 遗漏数据。
-
步骤 5:从库 SQL 线程重放 relay log,实现数据一致
从库 SQL 线程会实时读取 relay log 中的内容:
-
按顺序解析 relay log 中的 binlog 事件(SQL 或行变更);
-
在从库本地执行这些事件对应的操作,还原主库的数据变更;
-
执行完成后,更新 relay-log.info ,标记已处理的 relay log 位置,避免重复执行。
主主复制:类似于主从复制,只需要把主节点当做从节点、从节点当做主节点再做一遍。
项目实践
项目环境
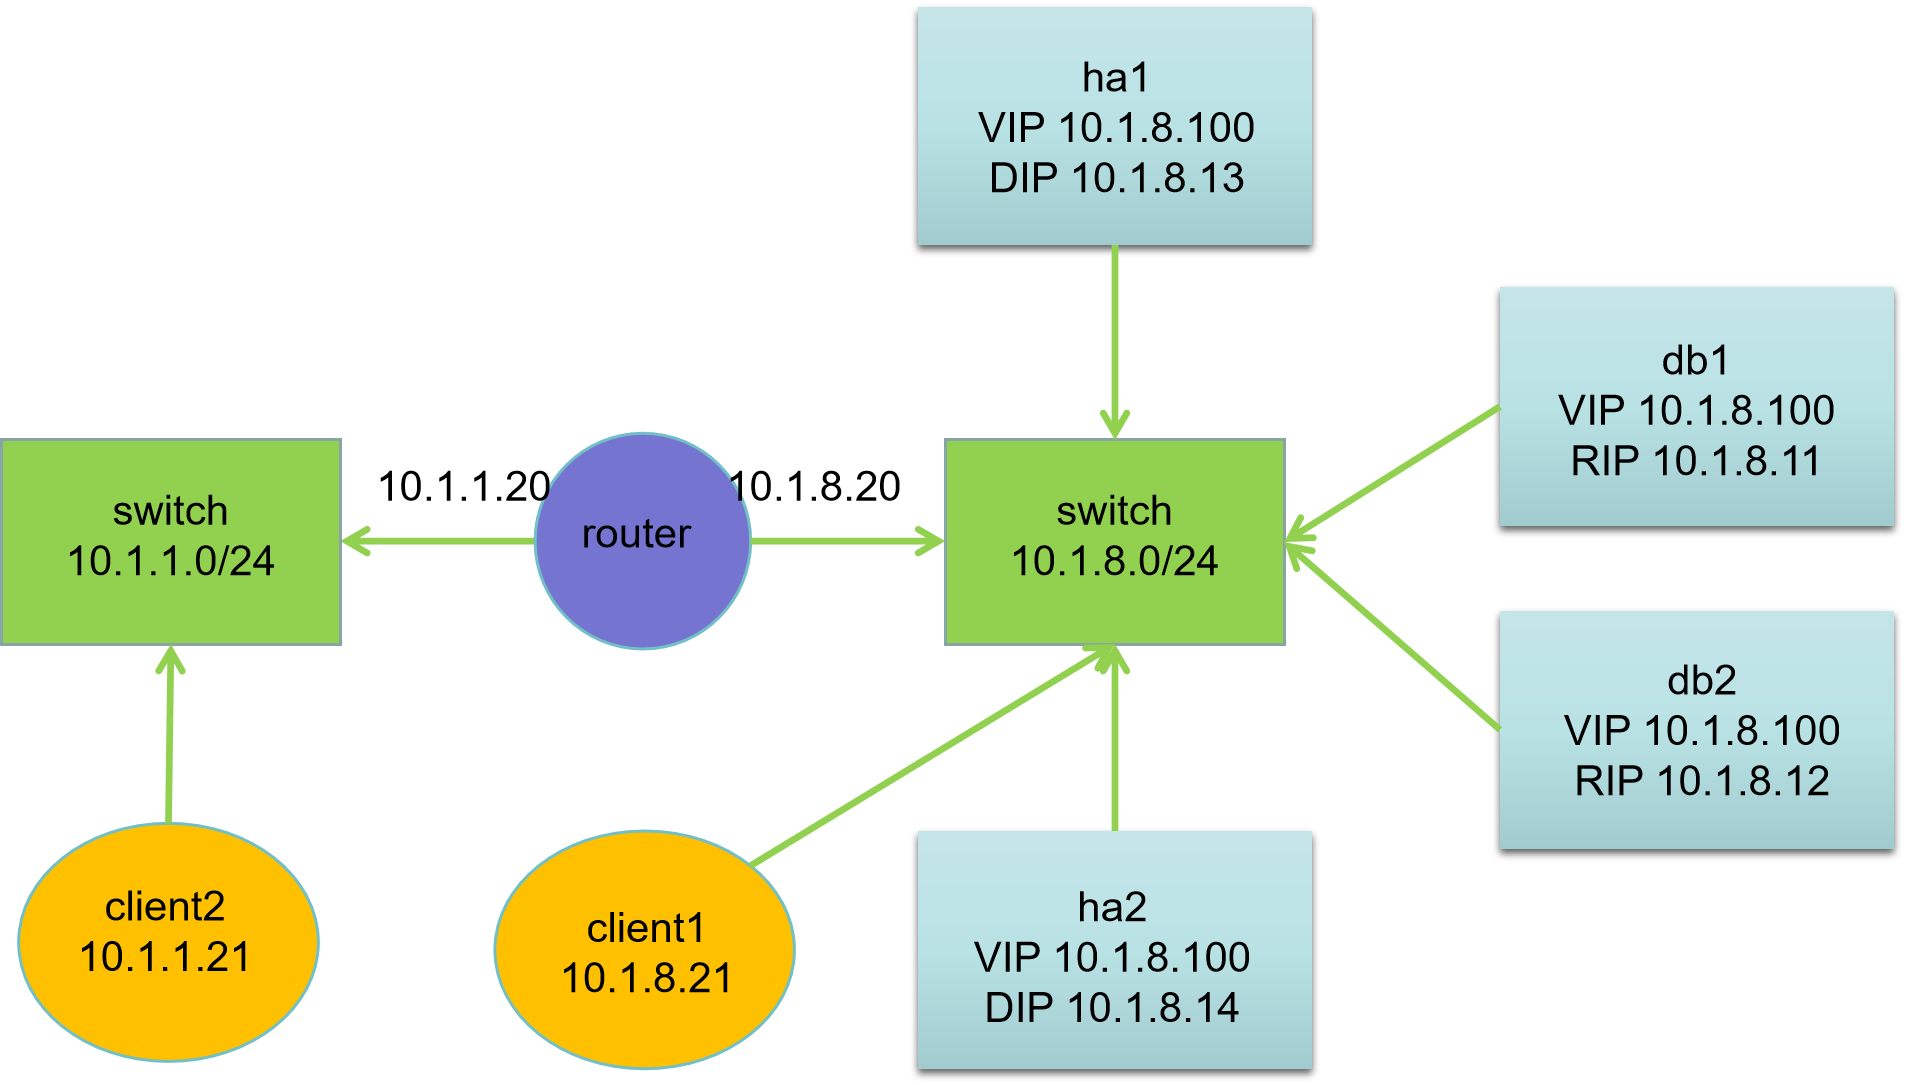
| 主机名 | IP 地址 | 网关 | DNS | VIP 地址 | 服务器角色 |
|---|---|---|---|---|---|
| client2.zy.cloud | 10.1.1.21(vmnet1) | 10.1.1.20 | 223.5.5.5 | 无 | 客户端 |
| client1.zy.cloud | 10.1.8.21(vmnet8 ) | 10.1.8.20 | 223.5.5.5 | 无 | 客户端 |
| ha1.zy.cloud | 10.1.8.13(vmnet8 ) | 10.1.8.20 | 223.5.5.5 | 10.1.8.100 | LVS+keepalived 服务器 |
| ha2.zy.cloud | 10.1.8.14(vmnet8 ) | 10.1.8.20 | 223.5.5.5 | 10.1.8.100 | LVS+keepalived 服务器 |
| db1.zy.cloud | 10.1.8.11(vmnet8 ) | 10.1.8.20 | 223.5.5.5 | 10.1.8.100 | DB 服务器 |
| db2.zy.cloud | 10.1.8.12(vmnet8 ) | 10.1.8.20 | 223.5.5.5 | 10.1.8.100 | DB 服务器 |
| router.zy.cloud | 10.1.8.20(vmnet8 ) 10.1.1.20(vmnet1 ) | 10.1.8.2 无网关 | 223.5.5.5 无 DNS | 无 | 路由器 |
基础配置
主机名
IP 地址
网关
client2
 hostnamectl set-hostname client2.zy.cloud
 nmcli connection modify ens33 ipv4.method manual ipv4.addresses 10.1.1.21/24 \
 ipv4.gateway 10.1.1.20 ipv4.dns 223.5.5.5 autoconnect yes
 nmcli connection up ens33
client1
 hostnamectl set-hostname client1.zy.cloud
 nmcli connection modify ens33 ipv4.method manual ipv4.addresses 10.1.8.21/24 \
 ipv4.gateway 10.1.8.20 ipv4.dns 223.5.5.5 autoconnect yes
 nmcli connection up ens33
ha1
 hostnamectl set-hostname ha1.zy.cloud
 nmcli connection modify ens33 ipv4.method manual ipv4.addresses 10.1.8.13/24 \
 ipv4.gateway 10.1.8.20 ipv4.dns 223.5.5.5 autoconnect yes
 nmcli connection up ens33
ha2
 hostnamectl set-hostname ha2.zy.cloud
 nmcli connection modify ens33 ipv4.method manual ipv4.addresses 10.1.8.14/24 \
 ipv4.gateway 10.1.8.20 ipv4.dns 223.5.5.5 autoconnect yes
 nmcli connection up ens33
db1
 hostnamectl set-hostname db1.zy.cloud
 nmcli connection modify ens33 ipv4.method manual ipv4.addresses 10.1.8.11/24 \
 ipv4.gateway 10.1.8.20 ipv4.dns 223.5.5.5 autoconnect yes
 nmcli connection up ens33
db2
 hostnamectl set-hostname db2.zy.cloud
 nmcli connection modify ens33 ipv4.method manual ipv4.addresses 10.1.8.12/24 \
 ipv4.gateway 10.1.8.20 ipv4.dns 223.5.5.5 autoconnect yes
 nmcli connection up ens33
router
 hostnamectl set-hostname router.zy.cloud
 nmcli connection modify ens33 ipv4.method manual ipv4.addresses 10.1.8.20/24 \
 ipv4.gateway 10.1.8.2 ipv4.dns 223.5.5.5 autoconnect yes
 nmcli connection up ens33
 nmcli connection add type ethernet con-name ens36 ifname ens36 ipv4.method manual \
 ipv4.addresses 10.1.1.20/24 autoconnect yes
 nmcli connection up ens36
配置 router
# 开启路由
[root@router ~ 19:59:28]# echo "net.ipv4.ip_forward=1" >> /etc/sysctl.conf
[root@router ~ 20:01:23]# sysctl -p
net.ipv4.ip_forward = 1

#命令 1:echo "net.ipv4.ip_forward=1" >> /etc/sysctl.conf
作用:永久开启内核路由转发功能。
细节:net.ipv4.ip_forward=1 表示开启路由转发(0 为关闭);>> /etc/sysctl.conf
是将该配置追加到系统内核参数配置文件中,确保重启系统后依然生效。

#命令 2:sysctl -p # 立即生效
作用:让刚刚写入 /etc/sysctl.conf 的路由转发配置无需重启系统,立即生效。
细节:sysctl -p 命令的核心功能是重新加载 /etc/sysctl.conf 文件中的所有内核参数
,避免因等待重启导致配置无法即时使用。

该配置是“跨网段访问”的核心前提——router 节点有两个网卡(分别属于 10.1.8.0/24
和 10.1.1.0/24 网段),开启路由转发后,它才能像“中转站”一样,将 client2(10.1
.1.21)的请求转发到 DB 节点(10.1.8.11/12),反之亦然。


# 设置防火墙
[root@router ~ 20:01:27]# systemctl enable firewalld.service --now
Created symlink from /etc/systemd/system/dbus-org.fedoraproject.FirewallD1.service to /usr/lib/systemd/system/firewalld.service.
Created symlink from /etc/systemd/system/multi-user.target.wants/firewalld.service to /usr/lib/systemd/system/firewalld.service.

[root@router ~ 20:01:47]# firewall-cmd --set-default-zone=trusted
[root@router ~ 20:01:47]# firewall-cmd --add-masquerade --permanent
[root@router ~ 20:01:47]# firewall-cmd --add-masquerade
MariaDB 安装和初始化
配置 db1
# 安装软件包
[root@db1 ~ 20:02:26]# yum install -y mariadb-server.x86_64

# 开启二进制日志
[root@db1 ~ 09:10:09]# vim /etc/my.cnf.d/server.cnf
# 在mysqld块最后添加如下内容
[mysqld]
server-id=1
log_bin=mysql-bin
relay_log=mysql-relay-bin

# 启用并启动服务
[root@db1 ~ 09:20:03]# systemctl  enable mariadb --now


# 安全初始化
[root@db1 ~ 09:20:21]# mysql_secure_installation

NOTE: RUNNING ALL PARTS OF THIS SCRIPT IS RECOMMENDED FOR ALL MariaDB
SERVERS IN PRODUCTION USE! PLEASE READ EACH STEP CAREFULLY!
In order to log into MariaDB to secure it, we'll need the current
password for the root user. If you've just installed MariaDB, and
you haven't set the root password yet, the password will be blank,
so you should just press enter here.
Enter current password for root (enter for none): `回车`
OK, successfully used password, moving on...
Setting the root password ensures that nobody can log into the MariaDB
root user without the proper authorisation.
Set root password? [Y/n] `回车`
New password: `huawei`
Re-enter new password: `huawei`
Password updated successfully!
Reloading privilege tables..
... Success!
By default, a MariaDB installation has an anonymous user, allowing anyone
to log into MariaDB without having to have a user account created for
them. This is intended only for testing, and to make the installation
go a bit smoother. You should remove them before moving into a
production environment.
Remove anonymous users? [Y/n] `回车`
... Success!
Normally, root should only be allowed to connect from 'localhost'. This
ensures that someone cannot guess at the root password from the network.
Disallow root login remotely? [Y/n] `回车`
... Success!
By default, MariaDB comes with a database named 'test' that anyone can
access. This is also intended only for testing, and should be removed
before moving into a production environment.
Remove test database and access to it? [Y/n] `回车`
- Dropping test database...
... Success!
- Removing privileges on test database...
... Success!
Reloading the privilege tables will ensure that all changes made so far
will take effect immediately.
Reload privilege tables now? [Y/n] `回车`
... Success!
Cleaning up...
All done! If you've completed all of the above steps, your MariaDB
installation should now be secure.
Thanks for using MariaDB!
配置 db2
# 安装软件包
[root@db2 ~ 09:06:45]# yum install -y mariadb-server.x86_64

# 开启二进制日志
[root@db2 ~]# vim /etc/my.cnf.d/server.cnf
# 在mysqld块最后添加如下内容
[mysqld]
skip-name-resolve
server-id=2
log_bin=mysql-bin
relay_log=mysql-relay-bin
# 启用并启动服务
[root@db2 ~ 09:50:31]# systemctl enable mariadb.service --now

# 安全初始化
[root@db2 ~ 09:50:33]# mysql_secure_installation
NOTE: RUNNING ALL PARTS OF THIS SCRIPT IS RECOMMENDED FOR ALL MariaDB
SERVERS IN PRODUCTION USE! PLEASE READ EACH STEP CAREFULLY!
In order to log into MariaDB to secure it, we'll need the current
password for the root user. If you've just installed MariaDB, and
you haven't set the root password yet, the password will be blank,
so you should just press enter here.
Enter current password for root (enter for none): `回车`
OK, successfully used password, moving on...
Setting the root password ensures that nobody can log into the MariaDB
root user without the proper authorisation.
Set root password? [Y/n] `回车`
New password: `huawei`
Re-enter new password: `huawei`
Password updated successfully!
Reloading privilege tables..
... Success!
By default, a MariaDB installation has an anonymous user, allowing anyone
to log into MariaDB without having to have a user account created for
them. This is intended only for testing, and to make the installation
go a bit smoother. You should remove them before moving into a
production environment.
Remove anonymous users? [Y/n] `回车`
... Success!
Normally, root should only be allowed to connect from 'localhost'. This
ensures that someone cannot guess at the root password from the network.
Disallow root login remotely? [Y/n] `回车`
... Success!
By default, MariaDB comes with a database named 'test' that anyone can
access. This is also intended only for testing, and should be removed
before moving into a production environment.
Remove test database and access to it? [Y/n] `回车`
- Dropping test database...
... Success!
- Removing privileges on test database...
... Success!
Reloading the privilege tables will ensure that all changes made so far
will take effect immediately.
Reload privilege tables now? [Y/n] `回车`
... Success!
Cleaning up...
All done! If you've completed all of the above steps, your MariaDB
installation should now be secure.
Thanks for using MariaDB!
MariaDB 主从:db2->db1
主库:db1,从库:db2
配置主数据库
# 配置主数据库
#创建主从复制专用账号:
[root@db1 ~ 10:08:26]# mysql -uroot -phuawei
Welcome to the MariaDB monitor.  Commands end with ; or \g.
Your MariaDB connection id is 5
Server version: 5.5.68-MariaDB MariaDB Server

Copyright (c) 2000, 2018, Oracle, MariaDB Corporation Ab and others.

Type 'help;' or '\h' for help. Type '\c' to clear the current input statement.

MariaDB [(none)]> grant replication slave, replication client on *.* to 'repl'@'10.1.8.12' identified by 'huawei';
Query OK, 0 rows affected (0.00 sec)

MariaDB [(none)]> flush privileges;
Query OK, 0 rows affected (0.01 sec)

MariaDB [(none)]> show master status\G;
*************************** 1. row ***************************
            File: mysql-bin.000004
        Position: 490
    Binlog_Do_DB:
Binlog_Ignore_DB:
1 row in set (0.00 sec)

ERROR: No query specified

MariaDB [(none)]>


# 配置从数据库
[root@db2 ~ 10:08:56]# mysql -uroot -phuawei
Welcome to the MariaDB monitor.  Commands end with ; or \g.
Your MariaDB connection id is 2
Server version: 5.5.68-MariaDB MariaDB Server

Copyright (c) 2000, 2018, Oracle, MariaDB Corporation Ab and others.

Type 'help;' or '\h' for help. Type '\c' to clear the current input statement.

MariaDB [(none)]> start slave;
ERROR 1200 (HY000): The server is not configured as slave; fix in config file or with CHANGE MASTER TO
MariaDB [(none)]> show slave status\G;
Empty set (0.00 sec)

ERROR: No query specified

MariaDB [(none)]> change master to master_host='10.1.8.11',
    -> master_user='repl',
    -> master_password='huawei',
    -> master_port=3306,
    -> master_log_file='mysql-bin.000004',
    -> master_log_pos=490,
    -> master_connect_retry=30;
Query OK, 0 rows affected (0.00 sec)

MariaDB [(none)]> start slave;
Query OK, 0 rows affected (0.00 sec)

MariaDB [(none)]> show slave status\G;
*************************** 1. row ***************************
               Slave_IO_State: Waiting for master to send event
                  Master_Host: 10.1.8.11
                  Master_User: repl
                  Master_Port: 3306
                Connect_Retry: 30
              Master_Log_File: mysql-bin.000004
          Read_Master_Log_Pos: 490
               Relay_Log_File: mysql-relay-bin.000002
                Relay_Log_Pos: 529
        Relay_Master_Log_File: mysql-bin.000004
             Slave_IO_Running: Yes
            Slave_SQL_Running: Yes
              Replicate_Do_DB:
          Replicate_Ignore_DB:
           Replicate_Do_Table:
       Replicate_Ignore_Table:
      Replicate_Wild_Do_Table:
  Replicate_Wild_Ignore_Table:
                   Last_Errno: 0
                   Last_Error:
                 Skip_Counter: 0
          Exec_Master_Log_Pos: 490
              Relay_Log_Space: 823
              Until_Condition: None
               Until_Log_File:
                Until_Log_Pos: 0
           Master_SSL_Allowed: No
           Master_SSL_CA_File:
           Master_SSL_CA_Path:
              Master_SSL_Cert:
            Master_SSL_Cipher:
               Master_SSL_Key:
        Seconds_Behind_Master: 0
Master_SSL_Verify_Server_Cert: No
                Last_IO_Errno: 0
                Last_IO_Error:
               Last_SQL_Errno: 0
               Last_SQL_Error:
  Replicate_Ignore_Server_Ids:
             Master_Server_Id: 1
1 row in set (0.00 sec)

ERROR: No query specified


# 主库写入数据
[root@db1 ~ 10:08:26]# mysql -uroot -phuawei
MariaDB [(none)]> create database zytest;
Query OK, 1 row affected (0.00 sec)

MariaDB [(none)]> use zytest;
Database changed
MariaDB [zytest]>  create table linux(username varchar(15) not null,password varchar(15) not null);Query OK, 0 rows affected (0.00 sec)

MariaDB [zytest]> insert into linux values ('zy1', 'huawei');
Query OK, 1 row affected (0.00 sec)

MariaDB [zytest]> insert into linux values ('zy2', 'huawei');
Query OK, 1 row affected (0.00 sec)

MariaDB [zytest]> insert into linux values ('zy3', 'huawei');
Query OK, 1 row affected (0.00 sec)

MariaDB [zytest]> commit;
Query OK, 0 rows affected (0.00 sec)

MariaDB [zytest]> select * from linux;
+----------+----------+
| username | password |
+----------+----------+
| zy1      | huawei   |
| zy2      | huawei   |
| zy3      | huawei   |
+----------+----------+
3 rows in set (0.00 sec)


# 从库查询
[root@db2 ~ 10:08:56]# mysql -uroot -phuawei
MariaDB [(none)]> select * from zytest.linux;
+----------+----------+
| username | password |
+----------+----------+
| zy1      | huawei   |
| zy2      | huawei   |
| zy3      | huawei   |
+----------+----------+
3 rows in set (0.00 sec)


grant replication slave, replication client on *.* to 'repl'@'10.1.8.12' identified by 'huawei'
作用
1. 创建主从复制专用账号:repl
2. 允许该账号仅从 [10.1.8.12](10.1.8.12)(db2 从库 IP) 连接主库
3. 授予两个核心权限:
  - REPLICATION SLAVE:必备权限
允许从库 IO 线程执行 COM_BINLOG_DUMP,主库 dump 线程推送 binlog 给从库;
  - REPLICATION CLIENT:可选权限
允许账号执行 show master status、show slave status,查看复制状态。
4. 账号密码:huawei
5. *.*:所有库所有表生效


show master status\G;
查看主库 binlog 位点:
关键用途
从库执行 CHANGE MASTER TO 时,必须填写这两个值:mysql-bin.000003,327
告诉从库 IO 线程:从这个文件、这个位置开始拉取 binlog。
MariaDB 主从:db1->db2
主库:db2,从库:db1
配置主数据库
# 配置主数据库
[root@db2 ~ 10:18:41]# mysql -uroot -phuawei
Welcome to the MariaDB monitor.  Commands end with ; or \g.
Your MariaDB connection id is 5
Server version: 5.5.68-MariaDB MariaDB Server

Copyright (c) 2000, 2018, Oracle, MariaDB Corporation Ab and others.

Type 'help;' or '\h' for help. Type '\c' to clear the current input statement.

MariaDB [(none)]> grant replication slave, replication client on *.* to 'repl'@'10.1.8.11' identified by 'huawei';
Query OK, 0 rows affected (0.00 sec)

MariaDB [(none)]> flush privileges;
Query OK, 0 rows affected (0.00 sec)

MariaDB [(none)]> show master status\G;
*************************** 1. row ***************************
            File: mysql-bin.000005
        Position: 490
    Binlog_Do_DB:
Binlog_Ignore_DB:
1 row in set (0.00 sec)

ERROR: No query specified

MariaDB [(none)]>


# 配置从数据库
[root@db1 ~ 10:18:45]# mysql -uroot -phuawei
Welcome to the MariaDB monitor.  Commands end with ; or \g.
Your MariaDB connection id is 29
Server version: 5.5.68-MariaDB MariaDB Server

Copyright (c) 2000, 2018, Oracle, MariaDB Corporation Ab and others.

Type 'help;' or '\h' for help. Type '\c' to clear the current input statement.

MariaDB [(none)]> change master to master_host='10.1.8.12',
    -> master_user='repl',
    -> master_password='huawei',
    -> master_port=3306,
    -> master_log_file='mysql-bin.000005',
    -> master_log_pos=490,
    -> master_connect_retry=30;
ERROR 1198 (HY000): This operation cannot be performed with a running slave; run STOP SLAVE first
MariaDB [(none)]> stop slave;
Query OK, 0 rows affected (0.01 sec)

MariaDB [(none)]> change master to master_host='10.1.8.12', master_user='repl', master_password='huawei', master_port=3306, master_log_file='mysql-bin.000005', master_log_pos=490, master_connect_retry=30;
Query OK, 0 rows affected (0.00 sec)

MariaDB [(none)]> start slave;
Query OK, 0 rows affected (0.00 sec)

MariaDB [(none)]> show slave status\G;
*************************** 1. row ***************************
               Slave_IO_State: Waiting for master to send event
                  Master_Host: 10.1.8.12
                  Master_User: repl
                  Master_Port: 3306
                Connect_Retry: 30
              Master_Log_File: mysql-bin.000005
          Read_Master_Log_Pos: 490
               Relay_Log_File: mysql-relay-bin.000002
                Relay_Log_Pos: 529
        Relay_Master_Log_File: mysql-bin.000005
             Slave_IO_Running: Yes
            Slave_SQL_Running: Yes
              Replicate_Do_DB:
          Replicate_Ignore_DB:
           Replicate_Do_Table:
       Replicate_Ignore_Table:
      Replicate_Wild_Do_Table:
  Replicate_Wild_Ignore_Table:
                   Last_Errno: 0
                   Last_Error:
                 Skip_Counter: 0
          Exec_Master_Log_Pos: 490
              Relay_Log_Space: 823
              Until_Condition: None
               Until_Log_File:
                Until_Log_Pos: 0
           Master_SSL_Allowed: No
           Master_SSL_CA_File:
           Master_SSL_CA_Path:
              Master_SSL_Cert:
            Master_SSL_Cipher:
               Master_SSL_Key:
        Seconds_Behind_Master: 0
Master_SSL_Verify_Server_Cert: No
                Last_IO_Errno: 0
                Last_IO_Error:
               Last_SQL_Errno: 0
               Last_SQL_Error:
  Replicate_Ignore_Server_Ids:
             Master_Server_Id: 2
1 row in set (0.00 sec)

ERROR: No query specified


# 主数据库(db2)创建数据
MariaDB [(none)]> create database zy;
Query OK, 1 row affected (0.00 sec)

MariaDB [(none)]> show databases;
+--------------------+
| Database           |
+--------------------+
| information_schema |
| mysql              |
| performance_schema |
| zy                 |
| zytest             |
+--------------------+
5 rows in set (0.01 sec)

MariaDB [(none)]>

# 从数据库(db1)查看
MariaDB [(none)]> show databases;
+--------------------+
| Database           |
+--------------------+
| information_schema |
| mysql              |
| performance_schema |
| zy                 |
| zytest             |
+--------------------+
5 rows in set (0.00 sec)
配置 LVS-RS
所有后端主机都要做相同配置。
#创建 dummy 虚拟网卡绑定 VIP 10.1.8.100
[root@db1-2 ~]#
# 增加虚拟网卡
nmcli connection add type dummy ifname dummy con-name dummy ipv4.method manual
ipv4.addresses 10.1.8.100/32
nmcli connection up dummy


作用
1. VIP 10.1.8.100 是对外统一访问数据库的入口 IP,这个 IP 只需要逻辑存在在两台 DB 服务器上,不能配置在物理网卡。
2. DR 模式转发逻辑:客户端请求到 LVS 调度器 (ha1/ha2),LVS 只修改二层 MAC 地址,直接把数据包转发给真实 DB 节点。
3. 如果 VIP 配置在物理网卡,网关、局域网内其他机器会发起 ARP 广播争抢 VIP,出现 IP 冲突、流量错乱。
4. dummy 是纯虚拟环回网卡,仅本机可见,/32掩码代表仅本机识别这个 VIP,不会对外广播路由。
5. 两台 db1、db2 都绑定同一个 VIP [10.1.8.100](10.1.8.100),实现负载均衡,两台数据库都能接收访问请求。


# 配置arp参数,关闭arp对dummy网卡的解析(核心,解决 DR 最经典 ARP 冲突问题)
[root@db1-2 ~]#
cat >> /etc/sysctl.conf << EOF
net.ipv4.conf.all.arp_ignore = 1
net.ipv4.conf.all.arp_announce = 2
net.ipv4.conf.dummy.arp_ignore = 1
net.ipv4.conf.dummy.arp_announce = 2
EOF


两个核心参数含义
1. net.ipv4.conf.all.arp_ignore = 1
  - 含义:只在接收数据包的网卡上,才回复 ARP 应答
  - 场景:局域网有人广播询问 VIP ([10.1.8.100](10.1.8.100)) 的 MAC 地址时,DB 服务器的物理网卡(ens33)不会回复 ARP;只有 dummy 虚拟网卡内部流量才响应。
  - 避免问题:如果不开启,db1、db2 会同时对外宣告 “VIP 是我的”,局域网 ARP 表乱掉,客户端流量随机丢到两台 DB,负载均衡完全失效。
2. net.ipv4.conf.all.arp_announce = 2
  - 含义:对外发送 ARP 广播时,只使用数据包出站网卡的真实 IP,不使用 dummy 上的 VIP
  - 场景:DB 服务器回包给客户端时,不会拿 VIP [10.1.8.100](10.1.8.100) 去发 ARP 广播,只用本机真实内网 IP([10.1.8.11/10.1.8.12](10.1.8.11/10.1.8.12))对外通信。
  - 避免问题:防止局域网其他机器误以为 VIP 绑定在 DB 物理网卡,覆盖 LVS 调度器的 ARP 记录。
针对 dummy 网卡单独配置
net.ipv4.conf.dummy.arp_ignore = 1
net.ipv4.conf.dummy.arp_announce = 2
单独给虚拟网卡生效 ARP 抑制规则,保证 VIP 只对内生效,不参与局域网 ARP 广播。
三、总结为什么必须配这两套(DR 模式硬性要求)
1. 不加 dummy 绑定 VIP:DB 没有 VIP,收到 LVS 转发的数据包后,目标 IP (VIP) 不属于本机,直接丢弃,客户端访问数据库超时。
2. 不修改 arp 内核参数:两台 DB 同时对外 ARP 宣告 VIP,局域网 IP 冲突,流量不经过 LVS 负载均衡,LVS 完全失效,还会出现随机连接失败、丢包。
3. 所有后端 RS(db1、db2)必须一模一样执行这两段命令,少一台配置都会集群故障。


#重新加载内核参数:
sysctl -p
配置 HA 和 LVS-DS
配置 ha1
[root@ha1 ~ 11:37:23]# yum install  -y keepalived.x86_64 ipvsadm.x86_64
[root@ha1 ~ 11:38:37]# cd /etc/keepalived/
[root@ha1 keepalived 11:39:31]# ls
keepalived.conf
[root@ha1 keepalived 11:39:32]# cp /etc/keepalived/keepalived.conf{,.bak}
[root@ha1 keepalived 11:40:32]# vim /etc/keepalived/keepalived.conf
配置文件内容:
! Configuration File for keepalived
# 全局定义模块
global_defs {
    router_id ha1          # 标识当前LVS调度器主机名,ha1/ha2区分,主备不能同名
}

# VRRP实例:实现VIP高可用漂移,主备切换
vrrp_instance db {
    state MASTER           # 当前节点角色:ha1为主节点;ha2需改为BACKUP
    interface ens33        # 承载VRRP心跳、VIP的物理内网网卡
    virtual_router_id 51   # VRRP组编号,ha1和ha2必须完全一致,同网段不能重复
    priority 110           # 节点优先级,数值越大越优先成为主;ha2建议设100
    advert_int 1           # VRRP心跳报文发送间隔,单位秒

    authentication {
        auth_type PASS     # VRRP认证方式:简单明文密码认证
        auth_pass zy@123   # 集群通信密码,ha1、ha2必须完全相同,否则无法同步心跳
    }

    virtual_ipaddress {
        10.1.8.100/24     # 业务统一访问VIP,数据库客户端只连接这个IP
    }
}

# LVS负载均衡模块,监听VIP:3306数据库端口
virtual_server 10.1.8.100 3306 {
    delay_loop 6           # 后端RS健康检查间隔,单位秒
    lb_algo rr             # 负载均衡调度算法:rr=轮询,两台MySQL轮流承接请求
    lb_kind DR             # LVS工作模式:DR直路由模式,和后端DB的dummy网卡配套
    #persistence_timeout 50  # 会话保持时长50秒,同一客户端短时间内固定访问同一台DB
    protocol TCP           # 负载均衡转发协议,数据库3306为TCP端口

    # 后端真实数据库节点 db1
    real_server 10.1.8.11 3306 {
        weight 1            # 节点权重,两台DB性能一致都设1
        TCP_CHECK {         # TCP端口健康检测机制
            connect_timeout 3  # 连接3306端口超时时间3秒
            retry 3            # 检测失败后重试3次
            delay_before_retry 3 # 重试前等待3秒
        }
    }

    # 后端真实数据库节点 db2
    real_server 10.1.8.12 3306 {
        weight 1
        TCP_CHECK {
            connect_timeout 3
            retry 3
            delay_before_retry 3
        }
    }
}

[root@ha1 keepalived 11:46:03]# systemctl  enable keepalived.service --now
Created symlink from /etc/systemd/system/multi-user.target.wants/keepalived.service to /usr/lib/systemd/system/keepalived.service.
[root@ha1 keepalived 12:46:34]# systemctl  start  keepalived.service
在 keepalived+LVS 配置中,后端 real_server 后端服务器不支持直接使用域名,必须指定 IP 地址。这是由 LVS 的工作原理和 Keepalived 的配置机制决定的。
原因:
-
LVS 工作在四层(传输层):LVS 基于 IP 地址和端口进行负载均衡转发,不涉及 DNS 解析,无法识别域名。
-
Keepalived 配置特性:Keepalived 的 real_server 配置项要求明确的 IP 地址(address 参数),其语法解析器不支持域名格式,会直接将域名视为无效配置。
-
启动验证失败:若强行在 real_server 中填写域名,Keepalived 启动时会报错(如 invalid IP address ),导致配置加载失败。
替代方案:通过脚本动态更新配置。
配置 ha2
[root@ha2 ~ 11:37:25]# yum install  -y keepalived.x86_64 ipvsadm.x86_64
[root@ha2 ~ 11:38:53]#  cp /etc/keepalived/keepalived.conf{,.bak}
[root@ha2 ~ 11:46:24]# vim /etc/keepalived/keepalived.conf
配置文件内容:
! Configuration File for keepalived
# 全局配置段
global_defs {
    router_id ha2          # 标识当前备调度器主机名,与主ha1区分
}

# VRRP高可用实例,和ha1同组
vrrp_instance db {
    state BACKUP           # 当前为备节点,主故障才接管VIP
    interface ens33        # 心跳、VIP使用的物理网卡,和ha1一致
    virtual_router_id 51   # VRRP组ID,ha1/ha2必须完全相同
    priority 100          # 优先级低于ha1(110),正常不抢占VIP
    advert_int 1          # VRRP心跳包发送间隔1秒
    authentication {
        auth_type PASS     # 简单密码认证
        auth_pass zy@123   # 集群密码必须和ha1完全一致
    }
    virtual_ipaddress {
        10.1.8.100/24      # 统一数据库访问VIP
    }
}

# LVS四层负载均衡配置,监听VIP 3306端口
virtual_server 10.1.8.100 3306 {
    delay_loop 6           # 每6秒对后端DB做一次健康检查
    lb_algo rr             # 调度算法:轮询分发请求
    lb_kind DR             # LVS工作模式:DR直路由,匹配后端dummy配置
    protocol TCP           # MySQL 3306为TCP协议

    # 后端数据库db1
    real_server 10.1.8.11 3306 {
        weight 1           # 节点权重,两台DB性能相同均为1
        TCP_CHECK {
            connect_timeout 3    # 端口连接超时3秒
            retry 3              # 检测失败重试3次
            delay_before_retry 3 # 重试前等待3秒
        }
    }

    # 后端数据库db2
    real_server 10.1.8.12 3306 {
        weight 1
        TCP_CHECK {
            connect_timeout 3
            retry 3
            delay_before_retry 3
        }
    }
}

[root@ha2 ~ 11:51:22]# systemctl enable keepalived.service --now
Created symlink from /etc/systemd/system/multi-user.target.wants/keepalived.service to /usr/lib/systemd/system/keepalived.service.
[root@ha2 ~ 11:51:27]# systemctl  start  keepalived.service
测试
# 创建测试账户
[root@db1 ~]# mysql -uroot -phuawei
MariaDB [(none)]> grant ALL PRIVILEGES on *.* to 'zy'@'%' identified by
'huawei';
MariaDB [(none)]> FLUSH PRIVILEGES;
MariaDB [(none)]> quit
Bye

# client测试
[root@client1,cient2 ~]# yum install mariadb
[root@client1,cient2 ~]# mysql -u zy -phuawei -h 10.1.8.100
# 停止ha1上Keepalived服务,测试mysql连接
[root@ha1 ~]# systemctl stop keepalived.service
# 启动ha1上Keepalived服务,测试mysql连接
[root@ha1 ~]# systemctl start keepalived.service
# 停止db1上mariadb服务,测试mysql连接
[root@db1 ~]# systemctl stop mariadb


# ===================== 测试前置:创建远程访问测试账号(db1执行)=====================
[root@db1 ~ 11:53:22]# mysql -uroot -phuawei
Welcome to the MariaDB monitor.  Commands end with ; or \g.
Your MariaDB connection id is 56
Server version: 5.5.68-MariaDB MariaDB Server

Copyright (c) 2000, 2018, Oracle, MariaDB Corporation Ab and others.

Type 'help;' or '\h' for help. Type '\c' to clear the current input statement.

MariaDB [(none)]> grant ALL PRIVILEGES on *.* to 'zy'@'%' identified by 'huawei';
Query OK, 0 rows affected (0.00 sec)

MariaDB [(none)]> flush privileges;
Query OK, 0 rows affected (0.00 sec)

MariaDB [(none)]> quit
Bye


[root@db2 ~ 11:37:11]# mysql -uroot -phuawei
Welcome to the MariaDB monitor.  Commands end with ; or \g.
Your MariaDB connection id is 37
Server version: 5.5.68-MariaDB MariaDB Server

Copyright (c) 2000, 2018, Oracle, MariaDB Corporation Ab and others.

Type 'help;' or '\h' for help. Type '\c' to clear the current input statement.

MariaDB [(none)]> grant ALL PRIVILEGES on *.* to 'zy'@'%' identified by 'huawei';
Query OK, 0 rows affected (0.00 sec)

MariaDB [(none)]> flush privileges;
Query OK, 0 rows affected (0.00 sec)

MariaDB [(none)]> quit


# ===================== 客户端环境准备(client1、client2分别执行)=====================
[root@client1 ~ 11:55:49]# yum install -y mariadb
[root@client2 ~ 11:55:49]# yum install -y mariadb

# ===================== 测试1:基础连通性测试 =====================
# 客户端访问LVS VIP
[root@client1 ~ 12:49:09]# mysql -uzy -phuawei -h 10.1.8.100
Welcome to the MariaDB monitor.  Commands end with ; or \g.
Your MariaDB connection id is 681
Server version: 5.5.68-MariaDB MariaDB Server

Copyright (c) 2000, 2018, Oracle, MariaDB Corporation Ab and others.

Type 'help;' or '\h' for help. Type '\c' to clear the current input statement.

MariaDB [(none)]> SELECT @@hostname;   # 验证语句(查看当前连接到哪台数据库节点)
+--------------+
| @@hostname   |
+--------------+
| db1.zy.cloud |     #发现连接的是db1
+--------------+
1 row in set (0.00 sec)


# 循环多次连接,观察主机名变化,验证LVS轮询调度
[root@client1 ~ 12:53:58]# for i in {1..10}; do mysql -uzy -phuawei -h 10.1.8.100 -e "SELECT @@hostname;"; sleep 1; done
+--------------+
| @@hostname   |
+--------------+
| db2.zy.cloud |
+--------------+
+--------------+
| @@hostname   |
+--------------+
| db1.zy.cloud |
+--------------+
+--------------+
| @@hostname   |
+--------------+
| db2.zy.cloud |
+--------------+
+--------------+
| @@hostname   |
+--------------+
| db1.zy.cloud |
+--------------+
+--------------+
| @@hostname   |
+--------------+
| db2.zy.cloud |
+--------------+
+--------------+
| @@hostname   |
+--------------+
| db1.zy.cloud |
+--------------+
+--------------+
| @@hostname   |
+--------------+
| db2.zy.cloud |
+--------------+
+--------------+
| @@hostname   |
+--------------+
| db1.zy.cloud |
+--------------+
+--------------+
| @@hostname   |
+--------------+
| db2.zy.cloud |
+--------------+
+--------------+
| @@hostname   |
+--------------+
| db1.zy.cloud |
+--------------+


# ===================== 测试2:Keepalived调度器高可用切换 =====================
# ha1执行,模拟主调度器故障
[root@ha1 keepalived 12:56:20]# systemctl stop keepalived.service
[root@ha1 keepalived 12:58:11]# systemctl  status  keepalived.service
● keepalived.service - LVS and VRRP High Availability Monitor
   Loaded: loaded (/usr/lib/systemd/system/keepalived.service; enabled; vendor preset: disabled)
   Active: inactive (dead) since Fri 2026-07-24 12:58:11 CST; 7s ago
  Process: 1748 ExecStart=/usr/sbin/keepalived $KEEPALIVED_OPTIONS (code=exited, status=0/SUCCESS)
 Main PID: 1749 (code=exited, status=0/SUCCESS)

Jul 24 12:58:10 ha1.zy.cloud Keepalived[1749]: Stopping
Jul 24 12:58:10 ha1.zy.cloud systemd[1]: Stopping LVS and VRRP High Availability Monitor...
Jul 24 12:58:10 ha1.zy.cloud Keepalived_vrrp[1751]: VRRP_Instance(db) sent 0 priority
Jul 24 12:58:10 ha1.zy.cloud Keepalived_vrrp[1751]: VRRP_Instance(db) removing protocol VIPs.
Jul 24 12:58:10 ha1.zy.cloud Keepalived_healthcheckers[1750]: Removing service [10.1.8.11...6
Jul 24 12:58:10 ha1.zy.cloud Keepalived_healthcheckers[1750]: Removing service [10.1.8.12...6
Jul 24 12:58:10 ha1.zy.cloud Keepalived_healthcheckers[1750]: Stopped
Jul 24 12:58:11 ha1.zy.cloud Keepalived_vrrp[1751]: Stopped
Jul 24 12:58:11 ha1.zy.cloud Keepalived[1749]: Stopped Keepalived v1.3.5 (03/19,2017), g...f2
Jul 24 12:58:11 ha1.zy.cloud systemd[1]: Stopped LVS and VRRP High Availability Monitor.
Hint: Some lines were ellipsized, use -l to show in full.

# 客户端持续连接VIP测试
[root@client1 ~ 12:59:53]# mysql -uzy -phuawei -h 10.1.8.100
Welcome to the MariaDB monitor.  Commands end with ; or \g.
Your MariaDB connection id is 111
Server version: 5.5.68-MariaDB MariaDB Server

Copyright (c) 2000, 2018, Oracle, MariaDB Corporation Ab and others.

Type 'help;' or '\h' for help. Type '\c' to clear the current input statement.

MariaDB [(none)]>


# ha2查看VIP是否成功漂移
[root@ha2 ~ 13:01:15]# ip a
1: lo: <LOOPBACK,UP,LOWER_UP> mtu 65536 qdisc noqueue state UNKNOWN group default qlen 1000
    link/loopback 00:00:00:00:00:00 brd 00:00:00:00:00:00
    inet 127.0.0.1/8 scope host lo
       valid_lft forever preferred_lft forever
    inet6 ::1/128 scope host
       valid_lft forever preferred_lft forever
2: ens33: <BROADCAST,MULTICAST,UP,LOWER_UP> mtu 1500 qdisc pfifo_fast state UP group default qlen 1000
    link/ether 00:0c:29:1f:2a:44 brd ff:ff:ff:ff:ff:ff
    inet 10.1.8.14/24 brd 10.1.8.255 scope global noprefixroute ens33
       valid_lft forever preferred_lft forever
    inet 10.1.8.100/24 scope global secondary ens33  #发现ens33上出现10.1.8.100/24,漂移成功,客户端可以正常 mysql 连接。
       valid_lft forever preferred_lft forever
    inet6 fe80::20c:29ff:fe1f:2a44/64 scope link
       valid_lft forever preferred_lft forever


# 恢复ha1调度器
[root@ha1 keepalived 12:58:18]# systemctl start keepalived.service


# ===================== 测试3:后端MariaDB节点故障测试 =====================
# 停止db1数据库服务
[root@db1 ~ 11:55:29]# systemctl stop mariadb
[root@db1 ~ 13:02:41]# systemctl  status  mariadb.service
● mariadb.service - MariaDB database server
   Loaded: loaded (/usr/lib/systemd/system/mariadb.service; enabled; vendor preset: disabled)
   Active: inactive (dead) since Fri 2026-07-24 13:02:41 CST; 8s ago
  Process: 2224 ExecStartPost=/usr/libexec/mariadb-wait-ready $MAINPID (code=exited, status=0/SUCCESS)
  Process: 2221 ExecStart=/usr/bin/mysqld_safe --basedir=/usr (code=exited, status=0/SUCCESS)
  Process: 2186 ExecStartPre=/usr/libexec/mariadb-prepare-db-dir %n (code=exited, status=0/SUCCESS)
 Main PID: 2221 (code=exited, status=0/SUCCESS)

Jul 24 10:08:24 db1.zy.cloud systemd[1]: Starting MariaDB database server...
Jul 24 10:08:24 db1.zy.cloud mariadb-prepare-db-dir[2186]: Database MariaDB is probably i....
Jul 24 10:08:24 db1.zy.cloud mariadb-prepare-db-dir[2186]: If this is not the case, make ....
Jul 24 10:08:24 db1.zy.cloud mysqld_safe[2221]: 260724 10:08:24 mysqld_safe Logging to '...'.
Jul 24 10:08:24 db1.zy.cloud mysqld_safe[2221]: 260724 10:08:24 mysqld_safe Starting mys...ql
Jul 24 10:08:26 db1.zy.cloud systemd[1]: Started MariaDB database server.
Jul 24 13:02:38 db1.zy.cloud systemd[1]: Stopping MariaDB database server...
Jul 24 13:02:41 db1.zy.cloud systemd[1]: Stopped MariaDB database server.
Hint: Some lines were ellipsized, use -l to show in full.


# 在调度器ha1查看LVS规则,确认db1被自动剔除
root@ha1 keepalived 13:02:21]# ipvsadm -Ln
IP Virtual Server version 1.2.1 (size=4096)
Prot LocalAddress:Port Scheduler Flags
  -> RemoteAddress:Port           Forward Weight ActiveConn InActConn
TCP  10.1.8.100:3306 rr
  -> 10.1.8.12:3306               Route   1      0          0


# 客户端访问VIP,验证依旧可以正常连接(自动调度至db2)
[root@client1 ~ 13:03:31]# mysql -uzy -phuawei -h 10.1.8.100
Welcome to the MariaDB monitor.  Commands end with ; or \g.
Your MariaDB connection id is 143
Server version: 5.5.68-MariaDB MariaDB Server

Copyright (c) 2000, 2018, Oracle, MariaDB Corporation Ab and others.

Type 'help;' or '\h' for help. Type '\c' to clear the current input statement.

MariaDB [(none)]> SELECT @@hostname;
+--------------+
| @@hostname   |
+--------------+
| db2.zy.cloud |      #自动调度至db2
+--------------+
1 row in set (0.00 sec)

MariaDB [(none)]>


# 恢复db1数据库
[root@db1 ~ 13:02:49]# systemctl start mariadb

# 等待几秒后再次查看ipvsadm,db1重新加入集群
[root@ha1 keepalived 13:03:10]# ipvsadm -Ln
IP Virtual Server version 1.2.1 (size=4096)
Prot LocalAddress:Port Scheduler Flags
  -> RemoteAddress:Port           Forward Weight ActiveConn InActConn
TCP  10.1.8.100:3306 rr
  -> 10.1.8.11:3306               Route   1      0          0
  -> 10.1.8.12:3306               Route   1      1          0
问题:我这个实验的lvs是不是用的是DR模式啊,为什么一个client设置仅主机,一个设计net模式
一、结论:你的 LVS 确实是 DR 模式
从架构和配置两处可以确认:
-
Keepalived 配置里写了
lb_kind DR,LVS 工作模式明确为直接路由 DR 模式; -
db1/db2 后端 RS 做了 DR 专属配置:dummy 网卡绑定 VIP + ARP 抑制内核参数,这是 DR 模式的标准配套操作;
-
流量逻辑:客户端请求先到 LVS 调度器,LVS 改二层 MAC 把包转给 DB,DB 处理后直接回包走网关返回客户端,不再经过 LVS,完全符合 DR 转发特征。
二、两个客户端网卡模式不一样的设计原因
1. client1:vmnet8(NAT 模式,10.1.8.0/24 网段)
-
和
ha1/ha2/db1/db2/router在同一个内网网段 10.1.8.0/24 -
作用:同网段本地测试 直接在 LVS 所在局域网内访问 VIP 10.1.8.100,验证 DR 模式最基础的转发、负载均衡、主备切换、后端故障剔除,是核心测试客户端。
-
vmnet8 NAT 特性:虚拟机可借助宿主机上网,方便安装软件、拉取 yum 源。
2. client2:vmnet1(仅主机 Host-Only,10.1.1.0/24 网段)
-
属于跨网段外网客户端,不和 LVS 集群同局域网
-
作用:模拟公网 / 异地客户端访问 必须经过中间
router路由器做跨网段转发 + NAT,从 10.1.1.0/24 路由到 10.1.8.0/24 再访问 VIP,用来验证两个关键能力:-
DR 模式跨网段访问是否正常(DR 不限制同网段,但依赖路由可达)
-
router 的路由转发、地址伪装(masquerade)配置是否生效,模拟真实生产里 “外部用户经过网关访问内网负载均衡 VIP” 的场景
-
为什么要分开两种模式做实验?
| 客户端 | 网段 | 测试目的 |
|---|---|---|
| client1(NAT/vmnet8) | 和集群同网段 | 基础连通、LVS 轮询、健康检查、Keepalived 主备漂移 |
| client2(仅主机 /vmnet1) | 跨网段 | 验证路由转发、真实外网用户访问场景、DR 跨网段兼容性 |
简单说:client1 测内网基础功能,client2 模拟真实外网用户访问,是这个实验刻意设计的双场景验证。
三、补充 DR 模式针对该拓扑的注意点
-
DR 模式要求:客户端回包路由可达,client2 跨网段能通,完全依赖 router 开启
ip_forward+ 防火墙 masquerade 地址伪装; -
db1/db2 回包出站走自身网关
10.1.8.20(router),由 router 把响应数据包转回 10.1.1.0/24 给 client2,回包全程不经过 LVS,符合 DR“请求过调度器、响应直回客户端” 的特点; -
两个客户端访问同一个 VIP
10.1.8.100,能同时验证「同网段」「跨网段」两种访问效果,实验完整性更高。

电商企业物流数字化转型必备!快递鸟 API 接口,72 小时快速完成物流系统集成。全流程实战1V1指导,营造开放的API技术生态圈。
更多推荐



 5
5 0
0- 0


 已为社区贡献1条内容

所有评论(0)