
【Spring Cloud 微服务】——第一章 微服务入门与服务拆分
目录
本文介绍了微服务架构的核心概念、拆分原则及实践方法。首先对比了单体架构与微服务架构的优缺点,指出微服务通过拆分功能模块为独立服务,解决了团队协作、发布效率和系统可用性问题。文章详细讲解了微服务的拆分时机(初创项目先单体后拆分,大型项目直接采用)和拆分原则(高内聚、低耦合),并以电商系统为例演示了商品和购物车服务的拆分过程。最后通过RestTemplate实现服务间HTTP调用,展示了微服务间通信的基本方式。文章还预告了后续将介绍服务注册发现和OpenFeign远程调用技术。
前言
在互联网时代,越来越多的一线互联网公司都在使用微服务技术。
那么:
-
到底什么是微服务?
-
企业该不该引入微服务?
-
微服务技术该如何在企业落地?
本篇文章带你揭开微服务的神秘面纱。
1. 认识微服务
1.1. 单体架构
单体架构(Monolithic Structure):顾名思义,整个项目中所有功能模块都在一个工程中开发;项目部署时需要对所有模块一起编译、打包;项目的架构设计、开发模式都非常简单。
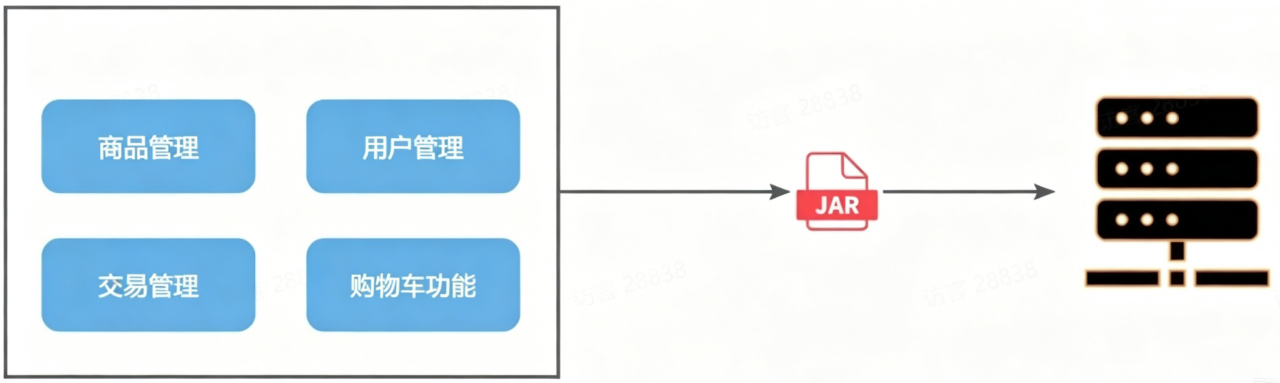
当项目规模较小时,这种模式上手快,部署、运维也都很方便,因此早期很多小型项目都采用这种模式。
但随着项目的业务规模越来越大,团队开发人员也不断增加,单体架构就呈现出越来越多的问题:
-
团队协作成本高:所有模块都在一个项目中,不同模块的代码之间物理边界越来越模糊。最终要把功能合并到一个分支,开发人员会陷入到解决冲突的泥潭之中。
-
系统发布效率低:任何模块变更都需要发布整个系统,往往一次发布需要数十分钟甚至数小时。
-
系统可用性差:单体架构各个功能模块相互之间会互相影响,热点功能会耗尽系统资源,导致其它服务低可用。
例如,当系统中某个接口是并发较高的热点接口时,该接口耗尽服务端资源,最终会导致其它本来正常的接口被拖慢,甚至因超时而无法访问。
可见,单体架构的扩展性较差,功能之间相互影响比较大。
1.2. 微服务
微服务架构,首先是服务化,就是将单体架构中的功能模块从单体应用中拆分出来,独立部署为多个服务。同时要满足下面的一些特点:
-
单一职责:一个微服务负责一部分业务功能,并且其核心数据不依赖于其它模块。
-
团队自治:每个微服务都有自己独立的开发、测试、发布、运维人员,团队人员规模不超过10人。
-
服务自治:每个微服务都独立打包部署,访问自己独立的数据库。并且要做好服务隔离,避免对其它微服务产生影响。
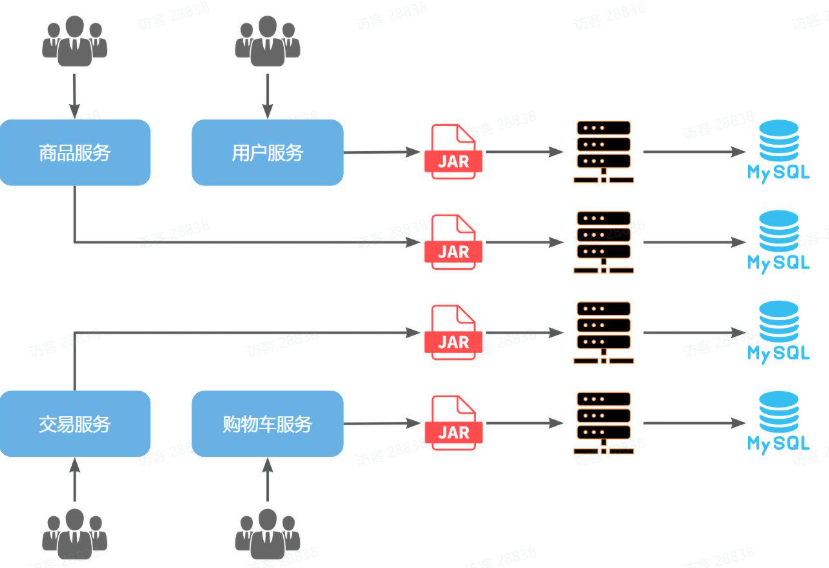
例如,一个电商项目,我们可以把商品、用户、购物车、交易等模块拆分,交给不同的团队去开发,并独立部署。
那么,单体架构存在的问题有没有解决呢?
-
团队协作成本高?
-
由于服务拆分,每个服务代码量大大减少,协作成本大大降低
-
-
系统发布效率低?
-
每个服务都是独立部署,当有某个服务有代码变更时,只需要打包部署该服务即可
-
-
系统可用性差?
-
每个服务独立部署,并且做好服务隔离,使用自己的服务器资源,不会影响到其它服务。
-
微服务架构解决了单体架构存在的问题,特别适合大型互联网项目的开发,因此被各大互联网公司普遍采用。分布式就是服务拆分的过程,微服务架构是分布式架构的一种最佳实践方案。
当然,微服务架构虽然能解决单体架构的各种问题,但在拆分的过程中,还会面临很多其它问题:
-
如果出现跨服务的业务该如何处理?
-
页面请求到底该访问哪个服务?
-
如何实现各个服务之间的服务隔离?
这些问题,我们在后续的学习中会给大家逐一解答。
1.3. Spring Cloud
微服务拆分以后碰到的各种问题都有对应的解决方案和微服务组件,而 Spring Cloud 框架可以说是目前 Java 领域最全面的微服务组件的集合了。
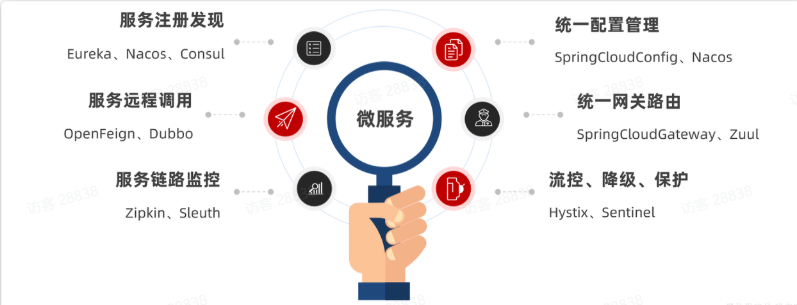
而且 Spring Cloud 依托于 Spring Boot 的自动装配能力,大大降低了其项目搭建、组件使用的成本。
官网地址:Spring Cloud
Spring Cloud 版本对应关系:
| Spring Cloud 版本 | Spring Boot 版本 |
|---|---|
| 2022.0.x (Kilburn) | 3.0.x |
| 2021.0.x (Jubilee) | 2.6.x, 2.7.x |
| 2020.0.x (Ilford) | 2.4.x, 2.5.x |
| Hoxton | 2.2.x, 2.3.x |
| Greenwich | 2.1.x |
| Finchley | 2.0.x |
推荐使用次新版本:Spring Cloud 2021.0.x 以及 Spring Boot 2.7.x 版本。
另外,Alibaba 的微服务产品 Spring Cloud Alibaba 目前也成为了 Spring Cloud 组件中的一员。
2. 微服务拆分
2.1. 服务拆分原则
服务拆分一定要考虑几个问题:
-
什么时候拆?
-
如何拆?
2.1.1. 什么时候拆
一般情况下,对于一个初创的项目,首先要做的是验证项目的可行性。因此这一阶段的首要任务是敏捷开发,快速产出生产可用的产品,投入市场做验证。
所以,对于大多数小型项目来说,一般是先采用单体架构,随着用户规模扩大、业务复杂后再逐渐拆分为微服务架构。这样初期成本会比较低,可以快速试错。
而对于一些大型项目,在立项之初目的就很明确,为了长远考虑,在架构设计时就直接选择微服务架构。
2.1.2. 怎么拆
微服务拆分时粒度要小,具体可以从两个角度来分析:
-
高内聚:每个微服务的职责要尽量单一,包含的业务相互关联度高、完整度高。
-
低耦合:每个微服务的功能要相对独立,尽量减少对其它微服务的依赖,或者依赖接口的稳定性要强。
明确了拆分目标,接下来就是拆分方式了。我们在做服务拆分时一般有两种方式:
-
纵向拆分:按照项目的功能模块来拆分。例如用户管理功能、订单管理功能、购物车功能、商品管理功能、支付功能等。这种拆分模式可以尽可能提高服务的内聚性。
-
横向拆分:看各个功能模块之间有没有公共的业务部分,如果有将其抽取出来作为通用服务。例如消息发送、风控数据记录就是通用的业务功能,可以抽取为公共服务。
按照纵向拆分,可以分为以下几个微服务:
-
用户服务
-
商品服务
-
订单服务
-
购物车服务
-
支付服务
2.2. 拆分购物车、商品服务
接下来,我们先把商品管理功能、购物车功能抽取为两个独立服务。
一般微服务项目有两种不同的工程结构:
-
完全解耦:每一个微服务都创建为一个独立的工程,甚至可以使用不同的开发语言来开发,项目完全解耦。
-
优点:服务之间耦合度低
-
缺点:每个项目都有自己的独立仓库,管理起来比较麻烦
-
-
Maven 聚合:整个项目为一个 Project,然后每个微服务是其中的一个 Module
-
优点:项目代码集中,管理和运维方便
-
缺点:服务之间耦合,编译时间较长
-
2.2.1. 创建商品服务
创建 Maven 模块 item-service后
引入依赖:
<?xml version="1.0" encoding="UTF-8"?>
<project xmlns="http://maven.apache.org/POM/4.0.0"
xmlns:xsi="http://www.w3.org/2001/XMLSchema-instance"
xsi:schemaLocation="http://maven.apache.org/POM/4.0.0 http://maven.apache.org/xsd/maven-4.0.0.xsd">
<parent>
<artifactId>demo-parent</artifactId>
<groupId>com.example</groupId>
<version>1.0.0</version>
</parent>
<modelVersion>4.0.0</modelVersion>
<artifactId>item-service</artifactId>
<properties>
<maven.compiler.source>11</maven.compiler.source>
<maven.compiler.target>11</maven.compiler.target>
</properties>
<dependencies>
<!--common-->
<dependency>
<groupId>com.example</groupId>
<artifactId>common</artifactId>
<version>1.0.0</version>
</dependency>
<!--web-->
<dependency>
<groupId>org.springframework.boot</groupId>
<artifactId>spring-boot-starter-web</artifactId>
</dependency>
<!--数据库-->
<dependency>
<groupId>mysql</groupId>
<artifactId>mysql-connector-java</artifactId>
</dependency>
<!--mybatis-->
<dependency>
<groupId>com.baomidou</groupId>
<artifactId>mybatis-plus-boot-starter</artifactId>
</dependency>
<!--单元测试-->
<dependency>
<groupId>org.springframework.boot</groupId>
<artifactId>spring-boot-starter-test</artifactId>
</dependency>
</dependencies>
<build>
<finalName>${project.artifactId}</finalName>
<plugins>
<plugin>
<groupId>org.springframework.boot</groupId>
<artifactId>spring-boot-maven-plugin</artifactId>
</plugin>
</plugins>
</build>
</project>启动类:
package com.example.item;
import org.mybatis.spring.annotation.MapperScan;
import org.springframework.boot.SpringApplication;
import org.springframework.boot.autoconfigure.SpringBootApplication;
@MapperScan("com.example.item.mapper")
@SpringBootApplication
public class ItemApplication {
public static void main(String[] args) {
SpringApplication.run(ItemApplication.class, args);
}
}配置文件 application.yaml:
server:
  port: 8081
spring:
  application:
    name: item-service
  profiles:
    active: dev
  datasource:
    url: jdbc:mysql://${db.host}:3306/hm-item?useUnicode=true&characterEncoding=UTF-8&autoReconnect=true&serverTimezone=Asia/Shanghai
    driver-class-name: com.mysql.cj.jdbc.Driver
    username: root
    password: ${db.pw}
mybatis-plus:
  configuration:
    default-enum-type-handler: com.baomidou.mybatisplus.core.handlers.MybatisEnumTypeHandler
  global-config:
    db-config:
      update-strategy: not_null
      id-type: auto
logging:
  level:
    com.example: debug
  pattern:
    dateformat: HH:mm:ss:SSS
  file:
    path: "logs/${spring.application.name}"
knife4j:
  enable: true
  openapi:
    title: 商品服务接口文档
    description: "商品服务接口文档"
    email: dev@example.com
    concat: 开发者
    url: https://www.example.com
    version: v1.0.0
    group:
      default:
        group-name: default
        api-rule: package
        api-rule-resources:
          - com.example.item.controller
2.2.2. 创建购物车服务
创建 Maven 模块 cart-service:
启动类:
package com.example.cart;
import org.mybatis.spring.annotation.MapperScan;
import org.springframework.boot.SpringApplication;
import org.springframework.boot.autoconfigure.SpringBootApplication;
@MapperScan("com.example.cart.mapper")
@SpringBootApplication
public class CartApplication {
public static void main(String[] args) {
SpringApplication.run(CartApplication.class, args);
}
}配置文件 application.yaml:
server:
  port: 8082
spring:
  application:
    name: cart-service
  profiles:
    active: dev
  datasource:
    url: jdbc:mysql://${db.host}:3306/hm-cart?useUnicode=true&characterEncoding=UTF-8&autoReconnect=true&serverTimezone=Asia/Shanghai
    driver-class-name: com.mysql.cj.jdbc.Driver
    username: root
    password: ${db.pw}
mybatis-plus:
  configuration:
    default-enum-type-handler: com.baomidou.mybatisplus.core.handlers.MybatisEnumTypeHandler
  global-config:
    db-config:
      update-strategy: not_null
      id-type: auto
logging:
  level:
    com.example: debug
  pattern:
    dateformat: HH:mm:ss:SSS
  file:
    path: "logs/${spring.application.name}"
knife4j:
  enable: true
  openapi:
    title: 购物车服务接口文档
    description: "购物车服务接口文档"
    email: dev@example.com
    concat: 开发者
    url: https://www.example.com
    version: v1.0.0
    group:
      default:
        group-name: default
        api-rule: package
        api-rule-resources:
          - com.example.cart.controller
2.3. 服务调用
在拆分的时候,我们发现一个问题:购物车业务中需要查询商品信息,但商品信息查询的逻辑全部迁移到了 item-service 服务,导致无法查询。
因此,现在查询购物车列表的流程变成了这样:
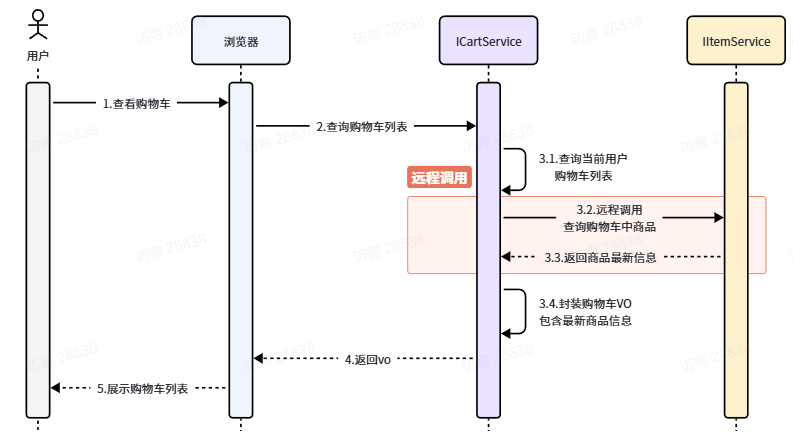
那么问题来了:我们该如何在 cart-service 中实现对 item-service 服务的查询呢?
答案是通过 HTTP 请求的方式来完成的,不仅仅可以实现远程查询,还可以实现新增、删除等各种远程请求。
2.3.1. RestTemplate
Spring 给我们提供了一个 RestTemplate 的 API,可以方便的实现 Http 请求的发送。
注册 RestTemplate:
package com.example.cart.config;
import org.springframework.context.annotation.Bean;
import org.springframework.context.annotation.Configuration;
import org.springframework.web.client.RestTemplate;
@Configuration
public class RemoteCallConfig {
@Bean
public RestTemplate restTemplate() {
return new RestTemplate();
}
}2.3.2. 远程调用
修改 CartServiceImpl 的 handleCartItems 方法:
private void handleCartItems(List<CartVO> vos) {
    // 1.获取商品id
    Set<Long> itemIds = vos.stream().map(CartVO::getItemId).collect(Collectors.toSet());
    // 2.查询商品
    // 2.1.利用RestTemplate发起http请求
    ResponseEntity<List<ItemDTO>> response = restTemplate.exchange(
            "http://localhost:8081/items?ids={ids}",
            HttpMethod.GET,
            null,
            new ParameterizedTypeReference<List<ItemDTO>>() {
            },
            Map.of("ids", CollUtil.join(itemIds, ","))
    );
    // 2.2.解析响应
    if(!response.getStatusCode().is2xxSuccessful()){
        return;
    }
    List<ItemDTO> items = response.getBody();
    if (CollUtils.isEmpty(items)) {
        return;
    }
    // 3.转为 id 到 item的map
    Map<Long, ItemDTO> itemMap = items.stream().collect(Collectors.toMap(ItemDTO::getId, Function.identity()));
    // 4.写入vo
    for (CartVO v : vos) {
        ItemDTO item = itemMap.get(v.getItemId());
        if (item == null) {
            continue;
        }
        v.setNewPrice(item.getPrice());
        v.setStatus(item.getStatus());
        v.setStock(item.getStock());
    }
}
其中 item-service 提供查询接口,cart-service 利用 Http 请求调用该接口。因此 item-service 可以称为服务的提供者,而 cart-service 则称为服务的消费者或服务调用者。
2.4. 总结
什么时候需要拆分微服务?
-
如果是创业型公司,最好先用单体架构快速迭代开发,验证市场运作模型,快速试错。当业务规模扩大、人员规模增加后,再考虑拆分微服务。
-
如果是大型企业,有充足的资源,可以在项目开始之初就搭建微服务架构。
如何拆分?
-
首先要做到高内聚、低耦合
-
从拆分方式来说,有横向拆分和纵向拆分两种。纵向就是按照业务功能模块,横向则是拆分通用性业务,提高复用性
服务拆分之后,不可避免的会出现跨微服务的业务,此时微服务之间就需要进行远程调用。微服务之间的远程调用被称为 RPC(Remote Procedure Call)。
Java 发送 http 请求可以使用 Spring 提供的 RestTemplate:
-
注册 RestTemplate 到 Spring 容器
-
调用 RestTemplate 的 API 发送请求
-
getForObject:发送 Get 请求并返回指定类型对象 -
PostForObject:发送 Post 请求并返回指定类型对象 -
put:发送 PUT 请求 -
delete:发送 Delete 请求 -
exchange:发送任意类型请求,返回 ResponseEntity
-
下一篇将介绍:服务注册与发现(Nacos)和远程调用(OpenFeign)

电商企业物流数字化转型必备!快递鸟 API 接口,72 小时快速完成物流系统集成。全流程实战1V1指导,营造开放的API技术生态圈。
更多推荐
 2
2 0
0- 0


 已为社区贡献1条内容

所有评论(0)