
影刀RPA批量图片处理:压缩、裁剪、加水印自动化
·
影刀RPA批量图片处理:压缩、裁剪、加水印自动化
作者:林焱
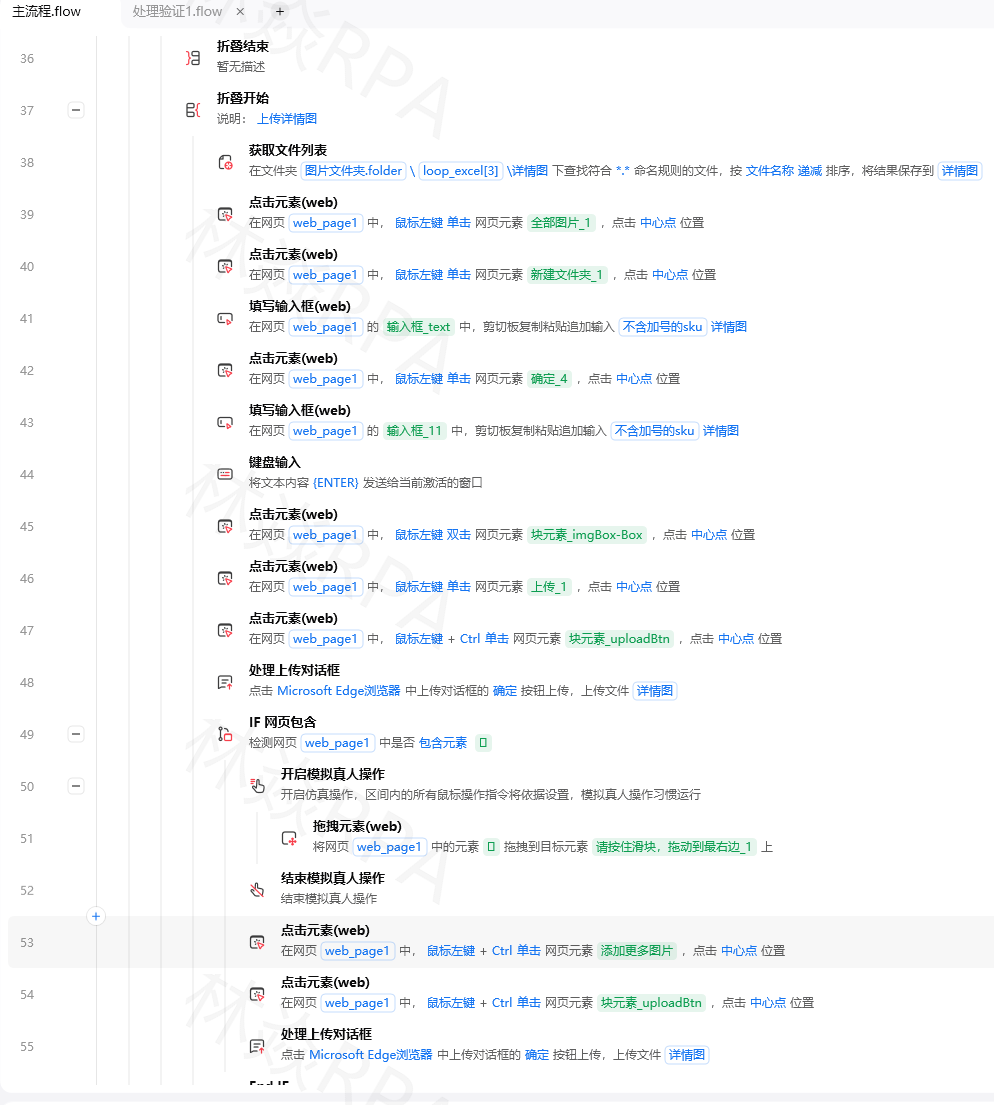
电商运营每天要处理大量商品图片——统一尺寸、压缩体积、添加水印、格式转换。手动用Photoshop一张张处理效率极低,用影刀RPA配合Pillow库可以全自动批量处理。这篇文章从基础的图片操作到完整的批量处理流水线,把图片自动化的各种玩法讲透。
一、Pillow基础操作
1.1 安装与基本概念
# 安装:pip install Pillow
from PIL import Image, ImageDraw, ImageFont, ImageFilter, ImageEnhance

# 打开图片
img = Image.open("D:/图片/product.jpg")

# 基本属性
print(f"尺寸:{img.size}")          # (宽, 高)
print(f"格式:{img.format}")        # JPEG
print(f"模式:{img.mode}")          # RGB
print(f"DPI:{img.info.get('dpi')}")

# 保存图片
img.save("D:/输出/product_new.jpg", quality=85)
1.2 尺寸调整
def 调整尺寸(input_path, output_path, size=(800, 800)):
    """调整图片尺寸(等比缩放+裁剪)"""
    img = Image.open(input_path)

    # 方式1:直接resize(可能变形)
    # img_resized = img.resize(size)

    # 方式2:等比缩放,短边填满(推荐)
    target_w, target_h = size
    orig_w, orig_h = img.size

    # 计算缩放比例
    ratio = max(target_w / orig_w, target_h / orig_h)
    new_w = int(orig_w * ratio)
    new_h = int(orig_h * ratio)

    # 缩放
    img_resized = img.resize((new_w, new_h), Image.LANCZOS)

    # 居中裁剪
    left = (new_w - target_w) // 2
    top = (new_h - target_h) // 2
    right = left + target_w
    bottom = top + target_h

    img_cropped = img_resized.crop((left, top, right, bottom))
    img_cropped.save(output_path, quality=90)

    return img_cropped

# 方式3:等比缩放,长边适配(不裁剪,留白边)
def 等比缩放(input_path, output_path, max_size=(800, 800), bg_color=(255, 255, 255)):
    """等比缩放,不足部分用背景色填充"""
    img = Image.open(input_path)
    max_w, max_h = max_size
    orig_w, orig_h = img.size

    ratio = min(max_w / orig_w, max_h / orig_h)
    new_w = int(orig_w * ratio)
    new_h = int(orig_h * ratio)

    img_resized = img.resize((new_w, new_h), Image.LANCZOS)

    # 创建背景
    canvas = Image.new("RGB", max_size, bg_color)

    # 居中粘贴
    paste_x = (max_w - new_w) // 2
    paste_y = (max_h - new_h) // 2

    # 处理透明通道
    if img_resized.mode == "RGBA":
        canvas.paste(img_resized, (paste_x, paste_y), img_resized)
    else:
        canvas.paste(img_resized, (paste_x, paste_y))

    canvas.save(output_path, quality=90)
    return canvas
1.3 格式转换
def 批量格式转换(input_dir, output_dir, target_format="WEBP", quality=85):
    """批量转换图片格式"""
    os.makedirs(output_dir, exist_ok=True)

    support_formats = {".jpg", ".jpeg", ".png", ".bmp", ".webp", ".tiff"}

    for filename in os.listdir(input_dir):
        ext = os.path.splitext(filename)[1].lower()
        if ext not in support_formats:
            continue

        input_path = os.path.join(input_dir, filename)
        name = os.path.splitext(filename)[0]
        output_path = os.path.join(output_dir, f"{name}.{target_format.lower()}")

        try:
            img = Image.open(input_path)

            # 处理RGBA→RGB(PNG有透明通道,JPEG不支持)
            if target_format.upper() in ["JPG", "JPEG"] and img.mode == "RGBA":
                bg = Image.new("RGB", img.size, (255, 255, 255))

[video(video-nC39Mq3f-1781887648677)(type-csdn)(url-https://live.csdn.net/v/embed/525000)(image-https://v-blog.csdnimg.cn/asset/23da3fe1f67a47106d725406cfde9a97/cover/Cover0.jpg)(title-拼多多店群自动化上架方案)]

                bg.paste(img, mask=img.split()[3])
                img = bg

            save_kwargs = {"quality": quality}
            if target_format.upper() == "WEBP":
                save_kwargs["method"] = 4  # 压缩速度

            img.save(output_path, **save_kwargs)

            # 计算压缩率
            orig_size = os.path.getsize(input_path)
            new_size = os.path.getsize(output_path)
            ratio = (1 - new_size / orig_size) * 100

            print(f"✅ {filename} → {target_format},压缩率:{ratio:.1f}%")

        except Exception as e:
            print(f"❌ {filename} 转换失败:{str(e)}")
二、图片压缩
2.1 质量压缩
def 压缩图片(input_path, output_path, target_size_kb=200):
    """压缩图片到指定大小以内"""
    img = Image.open(input_path)

    # 如果是RGBA模式,转为RGB
    if img.mode == "RGBA":
        bg = Image.new("RGB", img.size, (255, 255, 255))
        bg.paste(img, mask=img.split()[3])
        img = bg

    # 二分法调整质量
    quality = 85
    min_quality = 10
    max_quality = 85

    while min_quality < max_quality:
        img.save(output_path, quality=quality, optimize=True)

        file_size = os.path.getsize(output_path) / 1024  # KB

        if file_size <= target_size_kb:
            if max_quality - quality <= 5:
                break  # 质量够了,大小也满足
            min_quality = quality + 1
        else:
            max_quality = quality - 1

        quality = (min_quality + max_quality) // 2

    final_size = os.path.getsize(output_path) / 1024
    print(f"压缩完成:{final_size:.1f}KB(质量:{quality})")
    return output_path
2.2 尺寸压缩
def 尺寸压缩(input_path, output_path, max_dimension=1200):
    """按最大边长压缩图片尺寸"""
    img = Image.open(input_path)
    orig_w, orig_h = img.size

    # 判断是否需要压缩
    if max(orig_w, orig_h) <= max_dimension:
        img.save(output_path, quality=90)
        return output_path

    # 等比缩放
    ratio = max_dimension / max(orig_w, orig_h)
    new_w = int(orig_w * ratio)
    new_h = int(orig_h * ratio)

    img_resized = img.resize((new_w, new_h), Image.LANCZOS)
    img_resized.save(output_path, quality=90)

    return output_path
2.3 批量压缩
def 批量压缩图片(input_dir, output_dir, target_size_kb=200):
    """批量压缩目录下的所有图片"""
    os.makedirs(output_dir, exist_ok=True)

    results = {"success": 0, "fail": 0, "total_saved": 0}

    for filename in os.listdir(input_dir):
        if not filename.lower().endswith(('.jpg', '.jpeg', '.png', '.bmp')):
            continue

        input_path = os.path.join(input_dir, filename)
        output_path = os.path.join(output_dir, filename)

        try:
            orig_size = os.path.getsize(input_path)
            压缩图片(input_path, output_path, target_size_kb)
            new_size = os.path.getsize(output_path)

            saved = orig_size - new_size
            results["total_saved"] += saved
            results["success"] += 1

        except Exception as e:
            results["fail"] += 1
            print(f"❌ {filename} 压缩失败:{str(e)}")

    print(f"""批量压缩完成!
    成功:{results['success']}张
    失败:{results['fail']}张
    总节省:{results['total_saved']/1024/1024:.1f}MB""")

    return results
三、添加水印
3.1 文字水印
def 添加文字水印(input_path, output_path, text="版权所有", position="bottom_right"):
    """给图片添加文字水印"""
    img = Image.open(input_path)

    # 创建水印层
    watermark_layer = Image.new("RGBA", img.size, (0, 0, 0, 0))
    draw = ImageDraw.Draw(watermark_layer)

    # 加载字体
    try:
        font = ImageFont.truetype("C:/Windows/Fonts/simhei.ttf", 30)
    except:
        font = ImageFont.load_default()

    # 计算文字位置
    text_bbox = draw.textbbox((0, 0), text, font=font)
    text_w = text_bbox[2] - text_bbox[0]
    text_h = text_bbox[3] - text_bbox[1]

    margin = 20
    positions = {
        "top_left": (margin, margin),
        "top_right": (img.width - text_w - margin, margin),
        "bottom_left": (margin, img.height - text_h - margin),
        "bottom_right": (img.width - text_w - margin, img.height - text_h - margin),
        "center": ((img.width - text_w) // 2, (img.height - text_h) // 2),
    }

    x, y = positions.get(position, positions["bottom_right"])

    # 绘制半透明文字
    draw.text((x, y), text, font=font, fill=(255, 255, 255, 128))

    # 合并水印
    if img.mode != "RGBA":
        img = img.convert("RGBA")

    watermarked = Image.alpha_composite(img, watermark_layer)
    watermarked = watermarked.convert("RGB")
    watermarked.save(output_path, quality=90)

    return output_path
3.2 平铺水印
def 添加平铺水印(input_path, output_path, text="机密"):
    """添加平铺水印(覆盖整张图片)"""
    img = Image.open(input_path).convert("RGBA")

    # 创建水印层
    watermark_layer = Image.new("RGBA", img.size, (0, 0, 0, 0))
    draw = ImageDraw.Draw(watermark_layer)

    try:
        font = ImageFont.truetype("C:/Windows/Fonts/simhei.ttf", 36)
    except:
        font = ImageFont.load_default()

    # 平铺绘制
    text_bbox = draw.textbbox((0, 0), text, font=font)
    text_w = text_bbox[2] - text_bbox[0] + 50
    text_h = text_bbox[3] - text_bbox[1] + 80

    for y in range(0, img.height, text_h):
        for x in range(0, img.width, text_w):
            draw.text((x, y), text, font=font, fill=(200, 200, 200, 60))

    watermarked = Image.alpha_composite(img, watermark_layer)
    watermarked = watermarked.convert("RGB")
    watermarked.save(output_path, quality=90)

    return output_path
3.3 图片水印(Logo)
def 添加图片水印(input_path, logo_path, output_path, position="bottom_right", opacity=0.7):
    """添加图片水印(如公司Logo)"""
    img = Image.open(input_path).convert("RGBA")
    logo = Image.open(logo_path).convert("RGBA")

    # 调整Logo大小
    logo_size = min(img.width, img.height) // 5
    logo = logo.resize((logo_size, int(logo_size * logo.height / logo.width)), Image.LANCZOS)

    # 调整透明度
    logo_with_opacity = Image.new("RGBA", logo.size, (0, 0, 0, 0))
    for x in range(logo.width):
        for y in range(logo.height):
            r, g, b, a = logo.getpixel((x, y))
            logo_with_opacity.putpixel((x, y), (r, g, b, int(a * opacity)))

    # 计算位置
    margin = 20
    positions = {
        "top_left": (margin, margin),
        "top_right": (img.width - logo.width - margin, margin),
        "bottom_left": (margin, img.height - logo.height - margin),
        "bottom_right": (img.width - logo.width - margin, img.height - logo.height - margin),
    }

    pos = positions.get(position, positions["bottom_right"])
    img.paste(logo_with_opacity, pos, logo_with_opacity)

    img = img.convert("RGB")
    img.save(output_path, quality=90)

    return output_path
四、图片裁剪与拼接
4.1 智能裁剪
def 智能裁剪(input_path, output_path, aspect_ratio="1:1"):
    """智能裁剪(保留图片主体区域)"""
    img = Image.open(input_path)
    orig_w, orig_h = img.size

    # 解析目标比例
    ratio_map = {
        "1:1": 1.0,
        "4:3": 4/3,
        "16:9": 16/9,
        "3:4": 3/4,
    }
    target_ratio = ratio_map.get(aspect_ratio, 1.0)
    current_ratio = orig_w / orig_h


[video(video-MKTGiaHr-1781887655379)(type-csdn)(url-https://live.csdn.net/v/embed/524993)(image-https://v-blog.csdnimg.cn/asset/a547123d88ad712dccba346c9217e237/cover/Cover0.jpg)(title-TEMU店群如何管理运营?)]

    if current_ratio > target_ratio:
        # 当前更宽,裁左右
        new_w = int(orig_h * target_ratio)
        left = (orig_w - new_w) // 2
        img_cropped = img.crop((left, 0, left + new_w, orig_h))
    else:
        # 当前更高,裁上下
        new_h = int(orig_w / target_ratio)
        top = (orig_h - new_h) // 2
        img_cropped = img.crop((0, top, orig_w, top + new_h))

    img_cropped.save(output_path, quality=90)
    return output_path
4.2 图片拼接
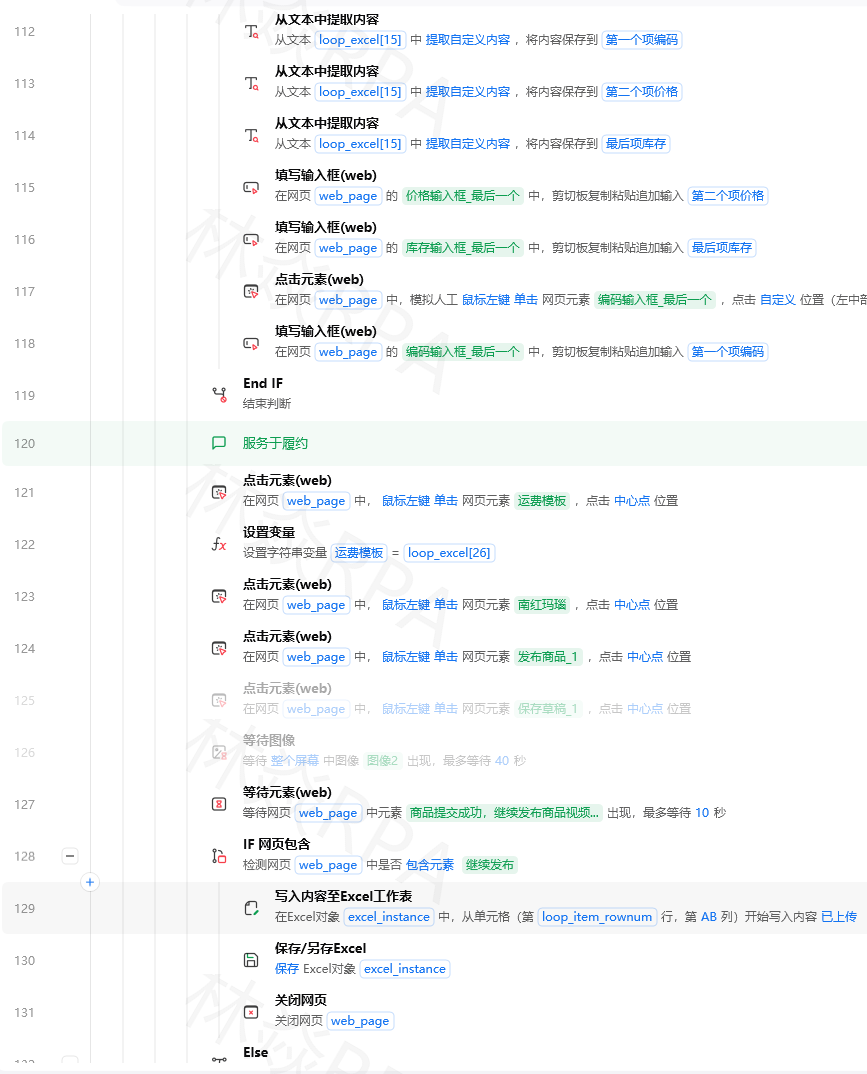
def 横向拼接(image_paths, output_path, gap=0):
    """多张图片横向拼接"""
    images = [Image.open(p) for p in image_paths]

    # 统一高度为第一张图的高度
    target_h = images[0].height
    resized = []
    for img in images:
        ratio = target_h / img.height
        new_w = int(img.width * ratio)
        resized.append(img.resize((new_w, target_h), Image.LANCZOS))

    # 计算总宽度
    total_w = sum(img.width for img in resized) + gap * (len(resized) - 1)

    # 创建画布
    canvas = Image.new("RGB", (total_w, target_h), (255, 255, 255))

    # 粘贴
    x_offset = 0
    for img in resized:
        canvas.paste(img, (x_offset, 0))
        x_offset += img.width + gap

    canvas.save(output_path, quality=90)
    return output_path

def 网格拼接(image_paths, output_path, cols=3, gap=10):
    """多张图片网格拼接"""
    images = [Image.open(p) for p in image_paths]

    # 统一尺寸
    cell_size = 300
    resized = []
    for img in images:
        resized.append(调整尺寸_内部(img, (cell_size, cell_size)))

    rows = (len(resized) + cols - 1) // cols

    canvas_w = cols * cell_size + (cols - 1) * gap
    canvas_h = rows * cell_size + (rows - 1) * gap

    canvas = Image.new("RGB", (canvas_w, canvas_h), (255, 255, 255))

    for i, img in enumerate(resized):
        col = i % cols
        row = i // cols
        x = col * (cell_size + gap)
        y = row * (cell_size + gap)
        canvas.paste(img, (x, y))

    canvas.save(output_path, quality=90)
    return output_path
五、完整流水线:电商商品图片处理
class ProductImageProcessor:
    """电商商品图片处理流水线"""

    def __init__(self, config):
        self.config = config
        self.results = {"success": 0, "fail": 0, "errors": []}

    def process_all(self, input_dir, output_dir):
        """处理所有商品图片"""
        os.makedirs(output_dir, exist_ok=True)

        for filename in os.listdir(input_dir):
            if not filename.lower().endswith(('.jpg', '.jpeg', '.png', '.webp')):
                continue

            input_path = os.path.join(input_dir, filename)

            try:
                img = Image.open(input_path)

                # 1. 调整尺寸
                img = self._resize(img)

                # 2. 压缩
                img = self._compress(img)

                # 3. 添加水印
                if self.config.get("watermark"):
                    img = self._add_watermark(img)

                # 4. 格式转换
                output_format = self.config.get("output_format", "JPEG")
                name = os.path.splitext(filename)[0]
                ext = "jpg" if output_format == "JPEG" else output_format.lower()
                output_path = os.path.join(output_dir, f"{name}.{ext}")

                # 保存
                save_kwargs = {"quality": self.config.get("quality", 85)}
                if output_format == "JPEG" and img.mode == "RGBA":
                    bg = Image.new("RGB", img.size, (255, 255, 255))
                    bg.paste(img, mask=img.split()[3])
                    img = bg

                img.save(output_path, **save_kwargs)
                self.results["success"] += 1

            except Exception as e:
                self.results["fail"] += 1
                self.results["errors"].append({"file": filename, "error": str(e)})

        return self.results

    def _resize(self, img):
        size = self.config.get("target_size", (800, 800))
        return img.resize(size, Image.LANCZOS)

    def _compress(self, img):
        # 压缩在保存时通过quality参数控制
        return img

    def _add_watermark(self, img):
        if img.mode != "RGBA":
            img = img.convert("RGBA")

        watermark_layer = Image.new("RGBA", img.size, (0, 0, 0, 0))
        draw = ImageDraw.Draw(watermark_layer)

        text = self.config.get("watermark_text", "版权所有")
        try:
            font = ImageFont.truetype("C:/Windows/Fonts/simhei.ttf", 24)
        except:
            font = ImageFont.load_default()

        draw.text((img.width - 200, img.height - 50), text, font=font, fill=(255, 255, 255, 100))

        return Image.alpha_composite(img, watermark_layer)


# 配置
config = {
    "target_size": (800, 800),
    "quality": 85,
    "output_format": "WEBP",
    "watermark": True,
    "watermark_text": "XX旗舰店",
}

# 执行
processor = ProductImageProcessor(config)
results = processor.process_all("D:/商品图片/原始/", "D:/商品图片/处理后/")
print(f"处理完成:成功{results['success']}张,失败{results['fail']}张")
总结
图片批量处理的核心操作与工具选择:
| 操作 | 方法 | 关键参数 |
|---|---|---|
| 调整尺寸 | resize + crop | 保持比例、居中裁剪 |
| 格式转换 | save(format) | RGBA→RGB、质量参数 |
| 质量压缩 | save(quality) | 二分法逼近目标大小 |
| 文字水印 | ImageDraw.text | 字体、颜色、透明度 |
| 图片水印 | paste(mask) | Logo透明度调整 |
| 智能裁剪 | crop | 按比例裁剪保留主体 |
| 图片拼接 | new + paste | 统一尺寸后拼接 |
图片处理最大的坑是RGBA/RGB模式转换——PNG有透明通道,JPEG不支持,忘记转换会报错。建议所有操作前先统一转成RGBA模式处理,最后保存时再转回RGB。
作者:林焱 | 觉得有用就收藏,后续分享更多影刀RPA实战技巧

电商企业物流数字化转型必备!快递鸟 API 接口,72 小时快速完成物流系统集成。全流程实战1V1指导,营造开放的API技术生态圈。
更多推荐


 9
9 0
0- 0


 已为社区贡献95条内容

所有评论(0)