
教程:Nano Banana2+ Milvus+ qwen3.5,打造电商生图爆款流水线
Nano Banana 2:完成度直接拉满,加了窗框做前景有纵深感,东方明珠细节清、黄浦江有船只,光影层次分明,雨滴和水渍的质感几乎和实拍没差,4:1 超宽比例也没透视畸变,电商图绕不开文字,价签、营销标语、跨境多语言文案,这些都是是过去 AI 生图的通病,Nano Banana 2 的优势在于,能生成无错漏的易读文本,还支持多语言翻译和本地化。整体效果可以看到,初代 Nano Banana比较中

本文来自Milvus电商SaaS用户的投稿,根据用户提供的资料与访谈加工而成。
我们做电商 AI SaaS,遇到最多的需求就是来自义乌的跨境商家的提问:新出了一个版,能不能在不请模特、不拍场景的情况下,用AI立刻出图,要便宜,还得是爆款。
人话翻译一下,就是怎么能不违规地抄个爆款图?
也是因此,昨天谷歌 Nano Banana2 一发布,我们就做了上手实测,并与 Milvus 向量数据库打通。实测整体生图成本降至原来的 1/3,出图效率翻倍。
接下来,我会从模型实测细节和端到端实操教程两部分,拆解这套适合中小电商SaaS 公司、零本地 GPU 的 AI 生图解决方案。
01
Nano Banana 2实测,降本三分之二,不再抽卡
电商场景,对AI 生图就三个要求:成本低、爆款复刻得像、不侵权,顺带还要适配跨境的多平台规格、支持多语言文字.
而Nano Banana 2的这次更新,几乎满足所有要求。
(1)成本砍到 1/3
Nano Banana 2 最直观的优势,就是便宜,单张图从 Pro 版的 0.134 美元干到 0.067 美元,直接省一半。
但更重要的是,返工成本直接砍没了,过去用其他模型,调比例、调清晰度,要花很多返工时间(亚马逊主图要 1:1,独立站要 3:4),Nano Banana 2 直接解决这个问题,让成本直接降到原本的三分之一:
分辨率覆盖 512px-4K 全规格,512px 做虾皮、速卖通缩略图,4K 做亚马逊详情页,不用二次放大;
新增 4:1、1:4、8:1、1:8 超宽 / 超高比例,跨境横幅广告、直播间背景,一次出图到位,不用扩边修图。
(2)14 张参考图融合,稳定性大幅提升
这次更新最实用的其实是多参考图融合:Nano Banana 2 支持 14 张参考图混合生成,10 张高保真对象图 + 4 张角色图,单个工作流能保 5 个角色、14 个对象的特征一致。
简单说,它能同时导入多款爆款的场景、模特、道具特征,新图直接继承爆款基因,不用反复调 prompt,这也是我们能把它和 Milvus 爆款检索打通的关键。
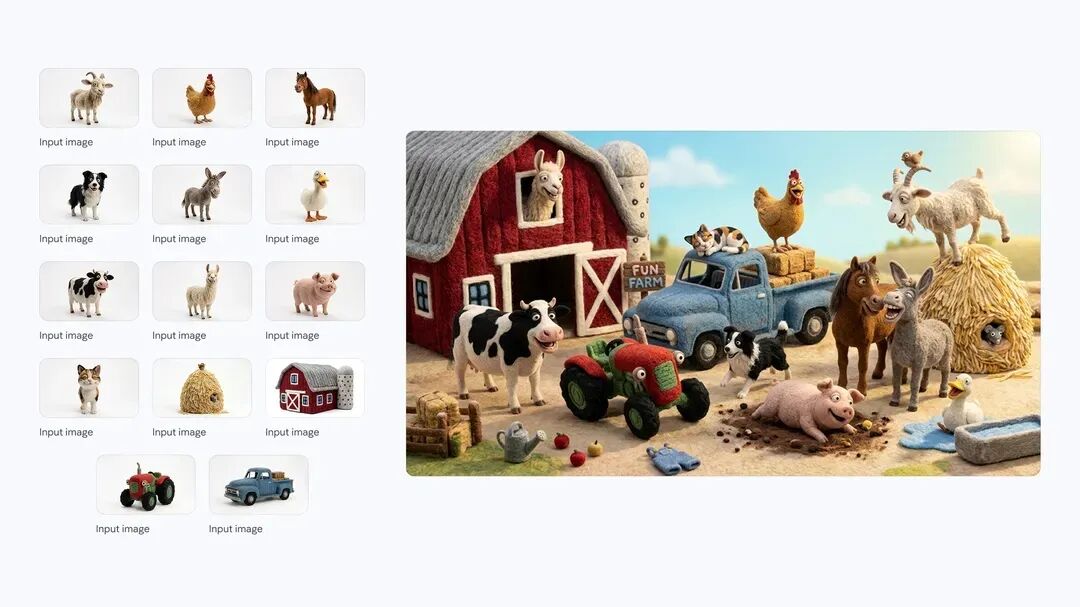
(3)商业级场景生成,更真实细节
一般来说,要稳定出图,一般不能一次性把所有要求都喂给AI,比较稳妥的办法是,先生成背景图,然后生成模特图,最后融图。
我们拿背景生成需求测了三代模型,要求生成 4:1 的上海写字楼雨天图,透过窗户看东方明珠(这题考的是构图、细节、真实感)。
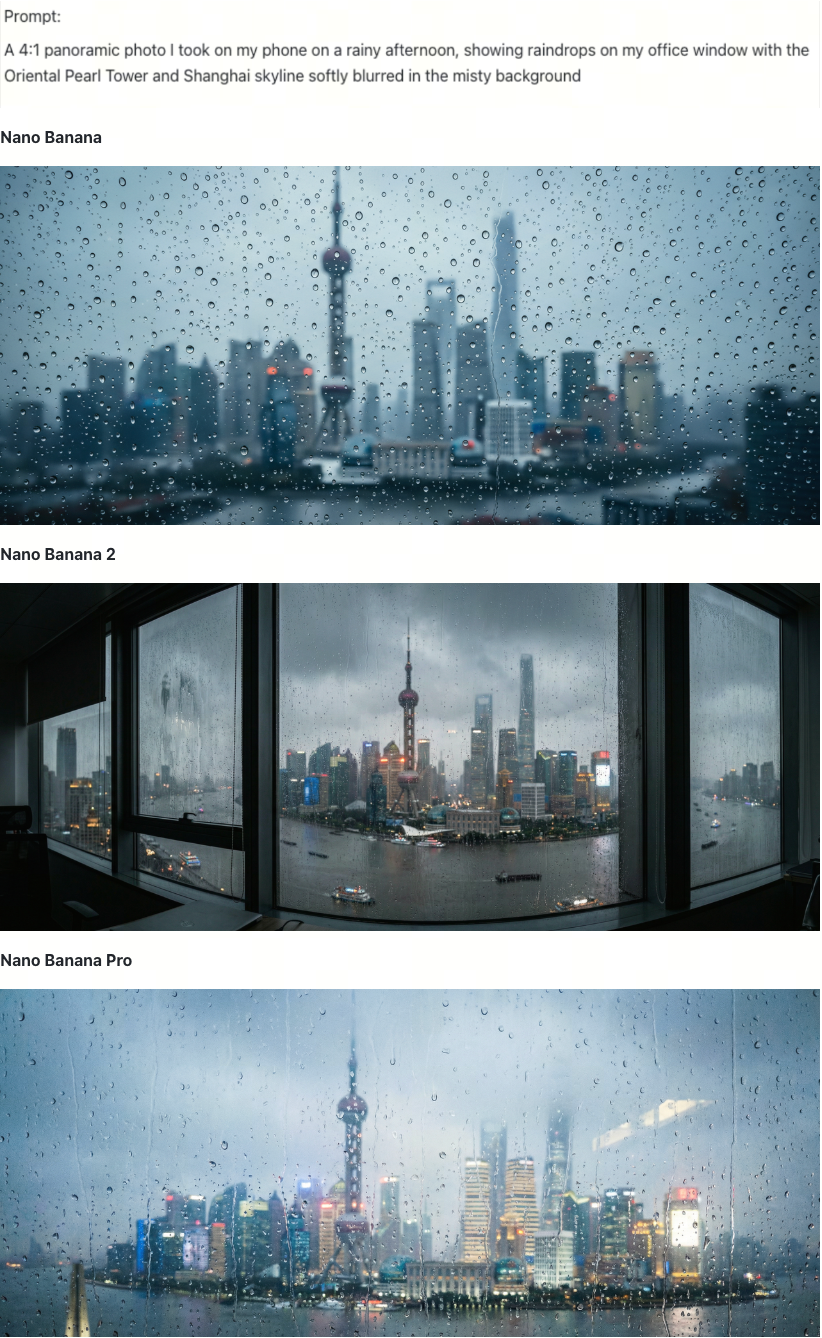
整体效果可以看到,初代 Nano Banana比较中规中矩,色调灰蓝平淡, 雨滴质感不错,大小分布自然,但建筑细节虚化丢太多,东方明珠辨识度低,分辨率也不够;
Pro 版:氛围感拉满,暖色灯光配冷雨有电影感,但没前景窗框,画面扁平,适合做辅图,撑不起主图;
Nano Banana 2:完成度直接拉满,加了窗框做前景有纵深感,东方明珠细节清、黄浦江有船只,光影层次分明,雨滴和水渍的质感几乎和实拍没差,4:1 超宽比例也没透视畸变,不用修图,直接当主图用。唯一小瑕疵是窗框左侧有轻微畸变,但对比商业价值,这点问题完全可以忽略。
(4)文字处理:跨境电商的一大痛点
电商图绕不开文字,价签、营销标语、跨境多语言文案,这些都是是过去 AI 生图的通病,Nano Banana 2 的优势在于,能生成无错漏的易读文本,还支持多语言翻译和本地化。
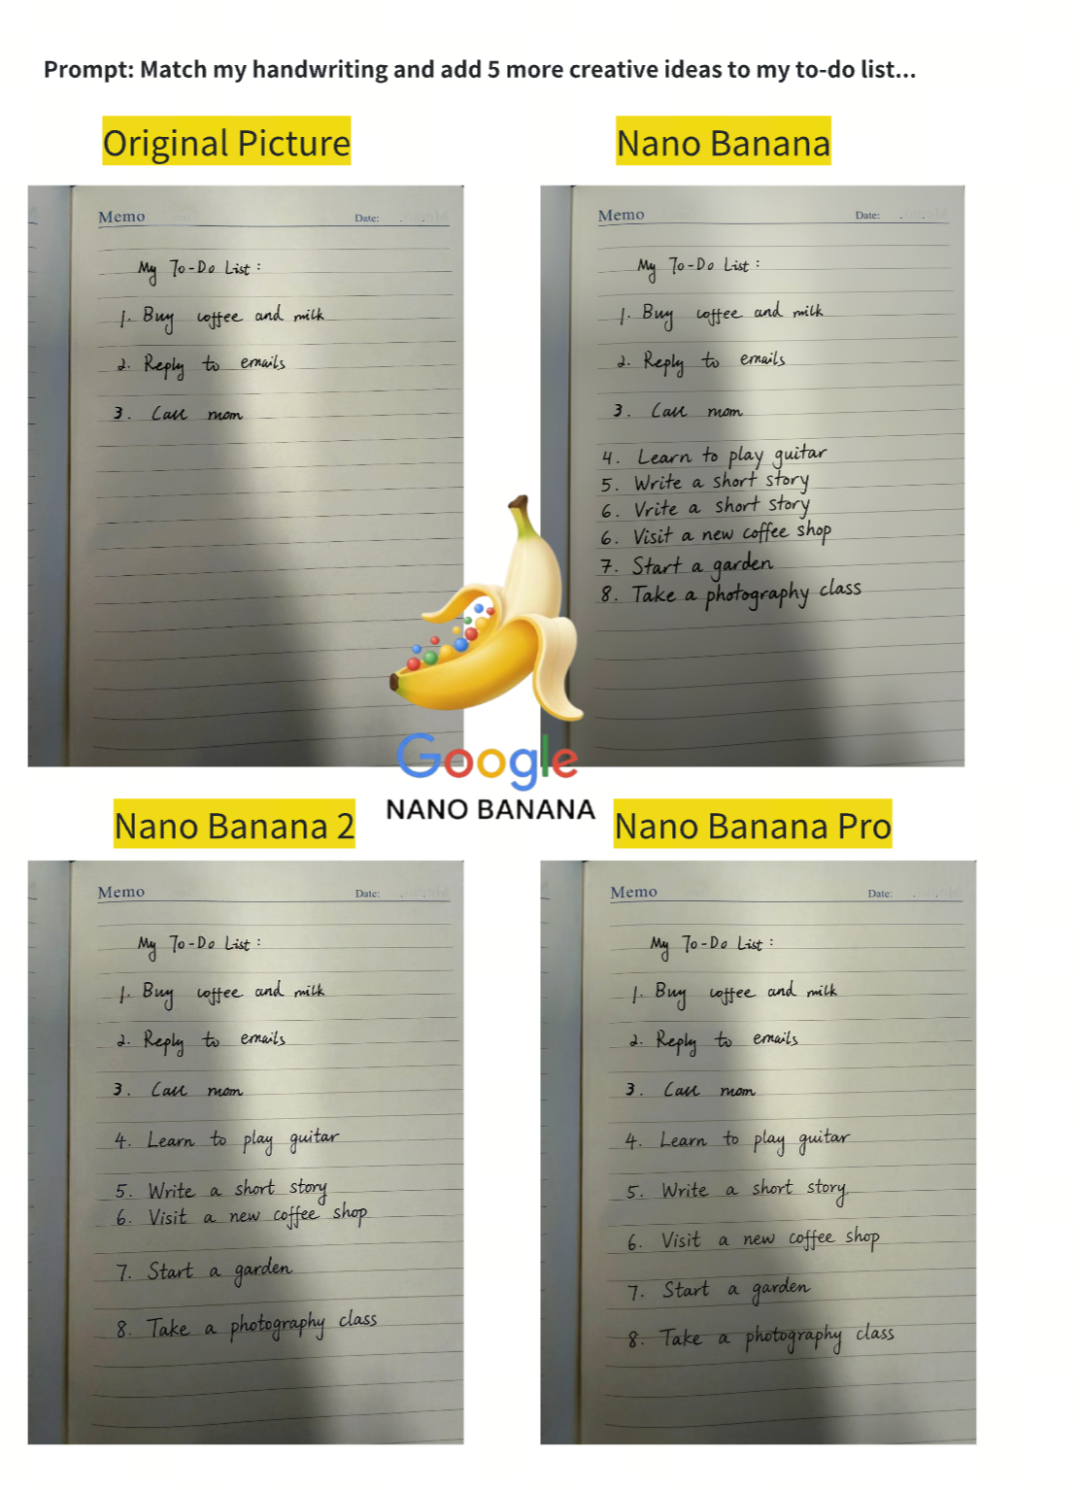
另外,我们还测了手写续写(贴合电商手写价签、个性化卡片),结果也很顶:初代Nano Banana 序号重复、结构理解错,Pro 版排版好但字体还原一般,Nano Banana 2 不仅续写零错误,字体还原度甚至比 Pro 版还好,笔画粗细、字形风格几乎和原图一致,完全能直接用。
(5)全景还原:一个意外之喜
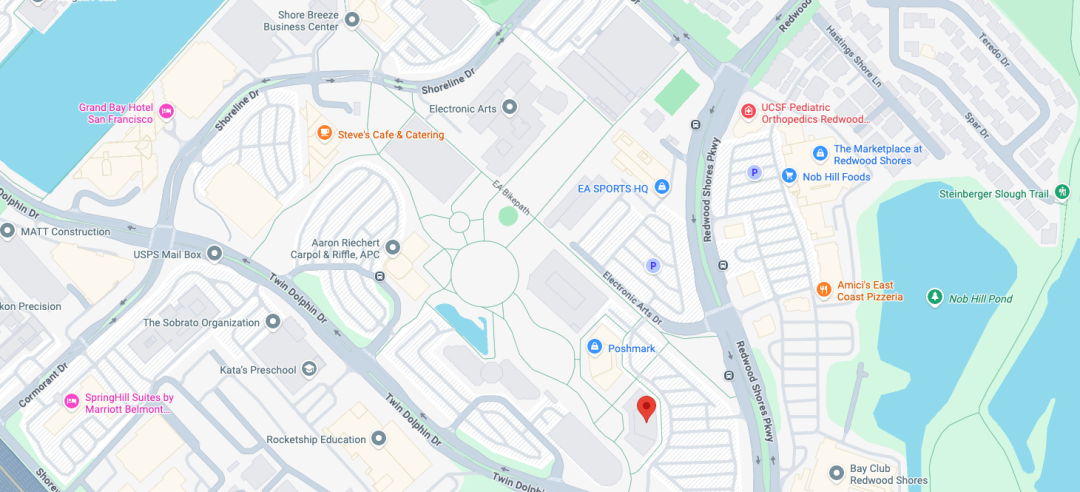
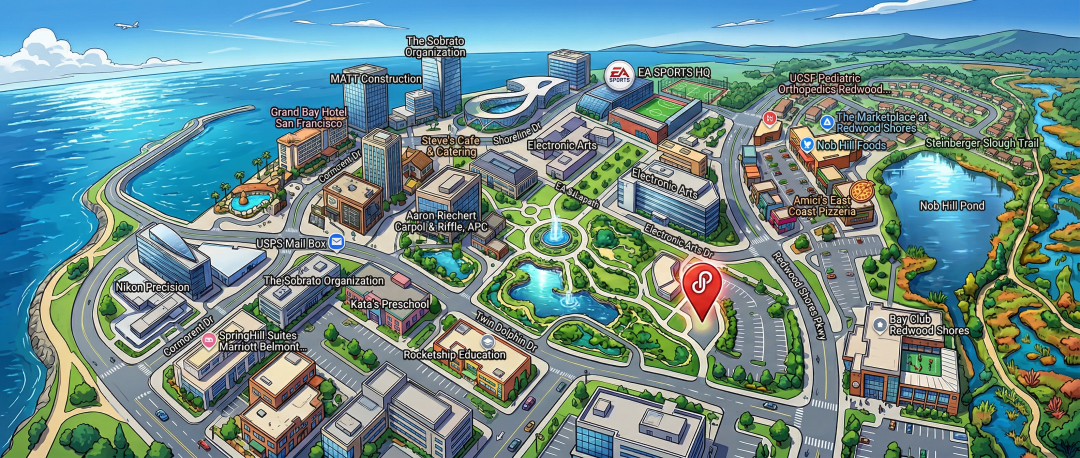
以下是国外一个玩疯了的prompt,随手从谷歌地图上截个地图,发给它,让它生成当前地址的全景动画风格,也非常逼真形象。
Prompt: make me a 4:1 panorama of this location in an anime style
02
快时尚 AI:找爆款+自动生成商品宣传图教程
(1)模型准备与架构搭建
为了避免AI出图抽卡,我们会把每一环节都拆开细化,做到可控,采用了Milvus 混合检索 + Qwen3.5 做元素分析+ Nano Banana 2出图的三步流水线。
这里很多人问,生图为啥要用向量数据库?因为电商的核心资产之一,是海量市场验证过的爆款图,模特表现力、场景、光影,都是花钱试出来的,直接复用这些特征,比重构 prompt 高效 10 倍。
整体的框架性过程如下(所有模型通过 OpenRouter API 调用,无需本地 GPU,无需下载模型):
新品平铺图 ──→ llama-nemotron-embed-vl-1b-v2 (Embedding API )──→ Milvus 混合检索 ──→ 找到相似爆款 │ ├── Dense 向量检索(视觉相似度) ├── Sparse 向量检索(文字关键词匹配) └── 标量筛选(品类 + 销量过滤) │ 检索到的爆款宣传图 │ ▼ Qwen3.5 分析爆款风格 (场景 / 灯光 / 姿势 / 氛围) │ ▼ Nano Banana 2 生成新品宣传图 (新品图 + 爆款参考 + 风格描述 → 宣传图)而关于Milvus,我们主要会用到三个能力。
1.Dense + Sparse 混合检索:图片向量 + 文字 TF-IDF 向量联合搜索,通过 RRF 重排序融合结果
2.标量字段筛选:按品类(category)、销量(sales_count)等字段过滤
3.多字段混合 Schema:同一个 Collection 中同时存储向量、稀疏向量和标量字段
(2)数据准备
历史商品数据
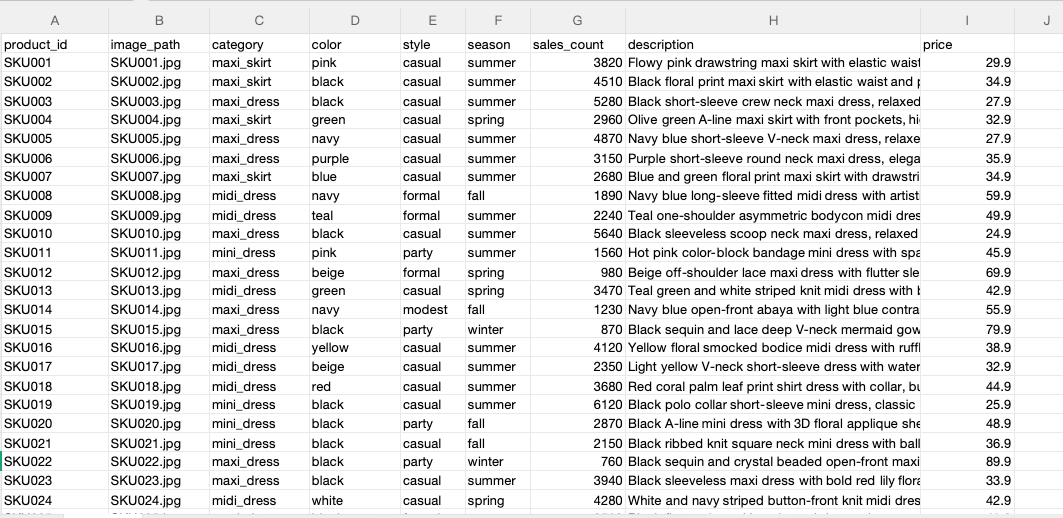
准备一个 images/ 文件夹和 products.csv 元数据文件:
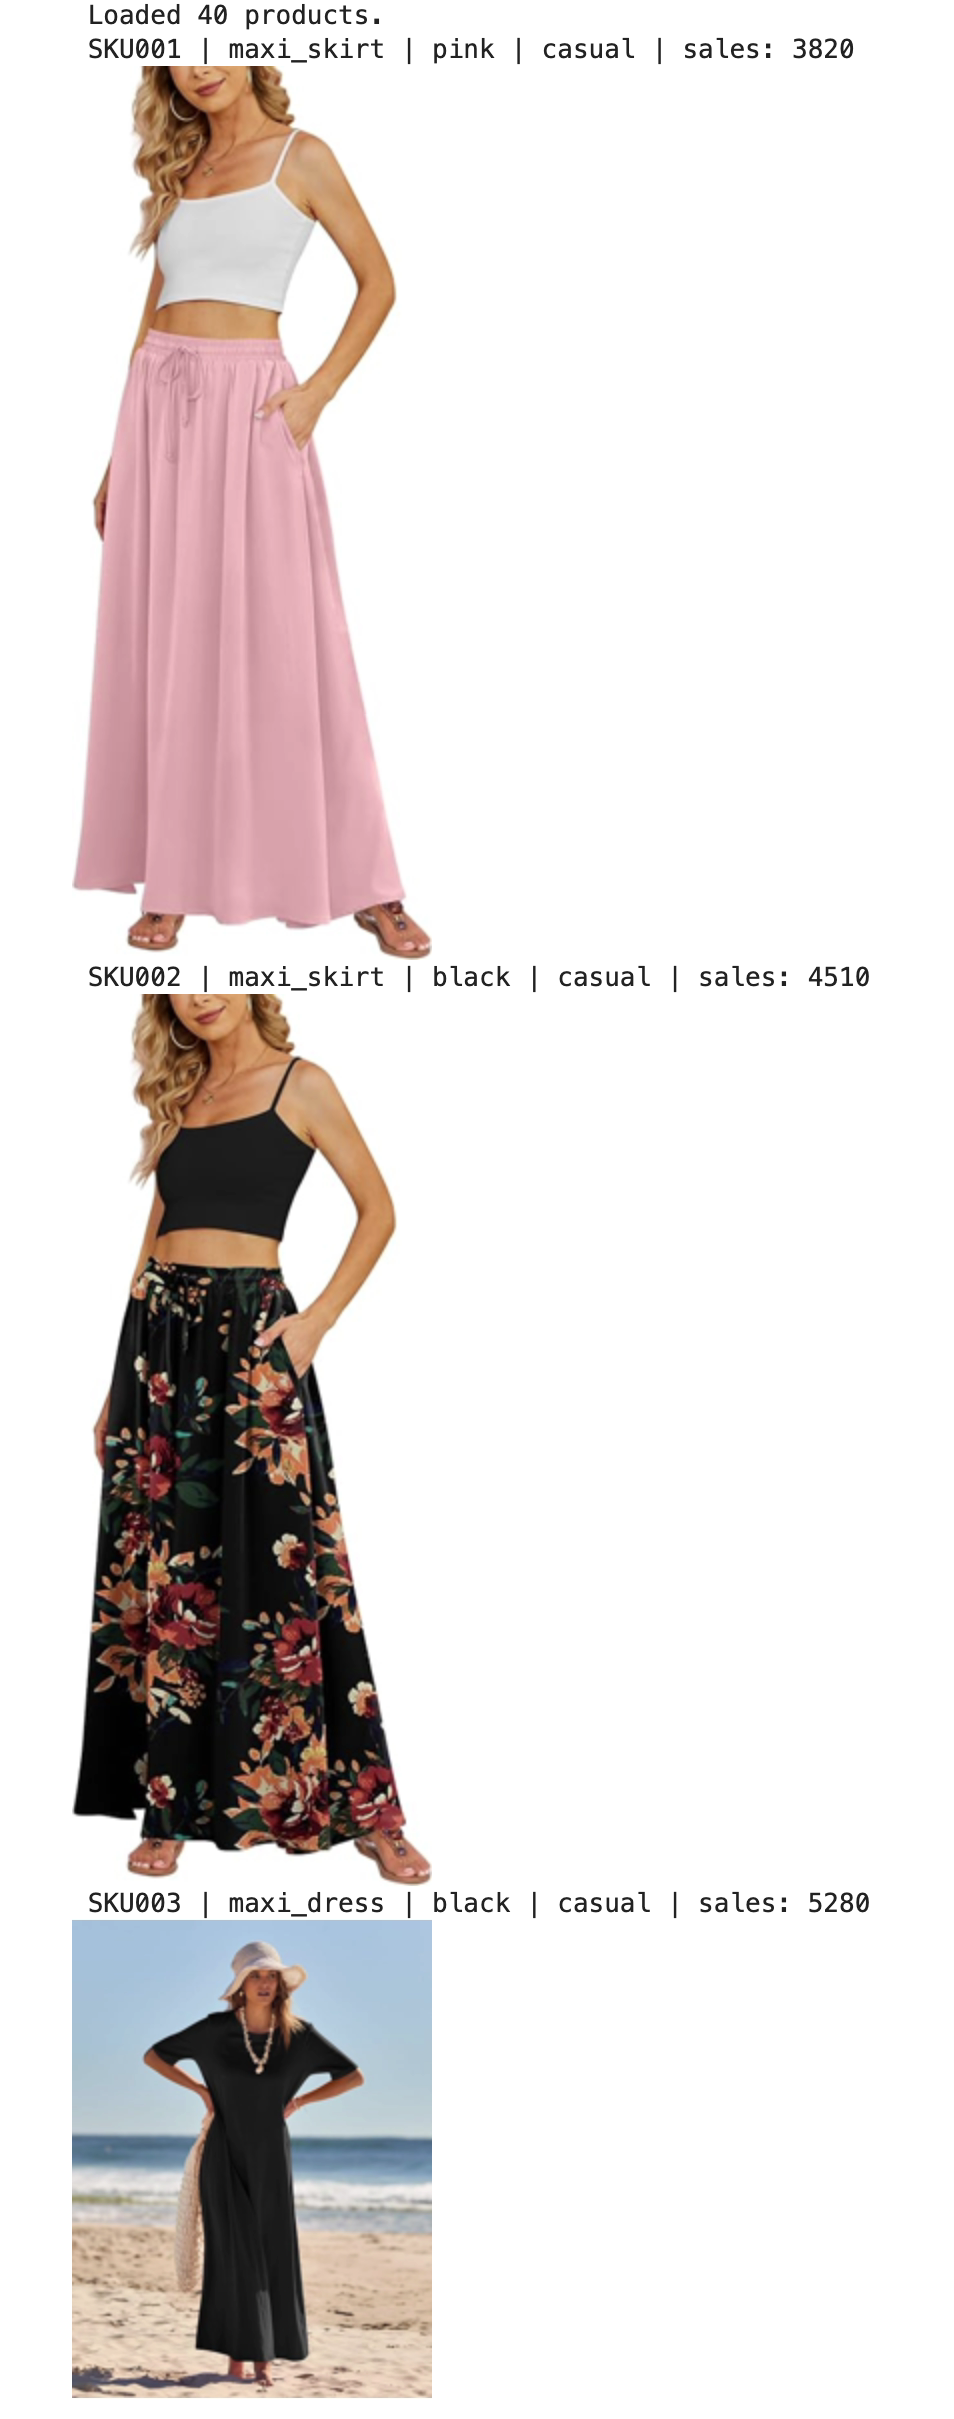
images/├── SKU001.jpg    # 粉色抽绳长裙├── SKU002.jpg    # 黑色碎花长裙├── ...└── SKU040.jpg
products.csv 字段:product_id, image_path, category, color, style, season, sales_count, description, price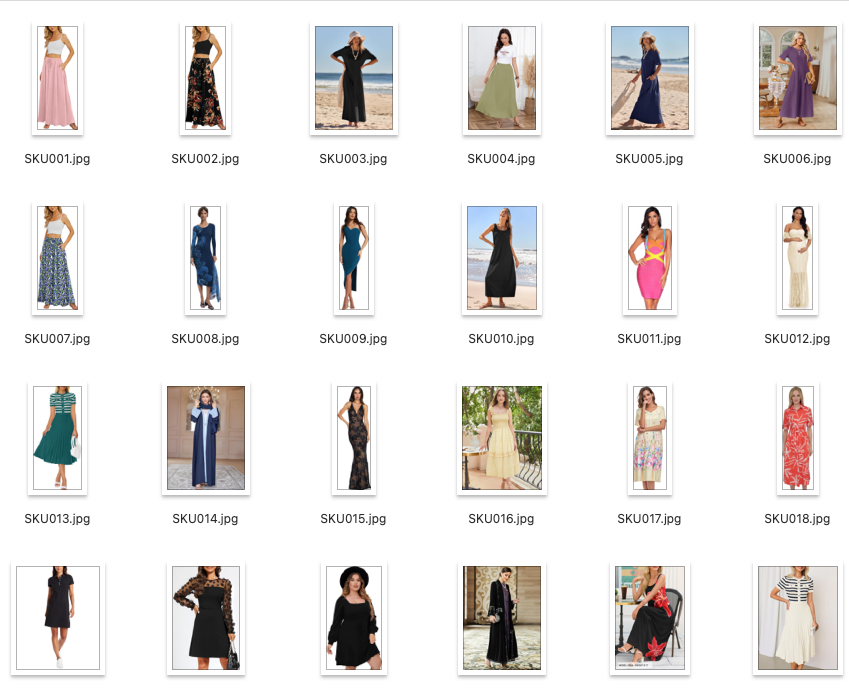
新品数据
准备 new_products/ 文件夹和 new_products.csv:
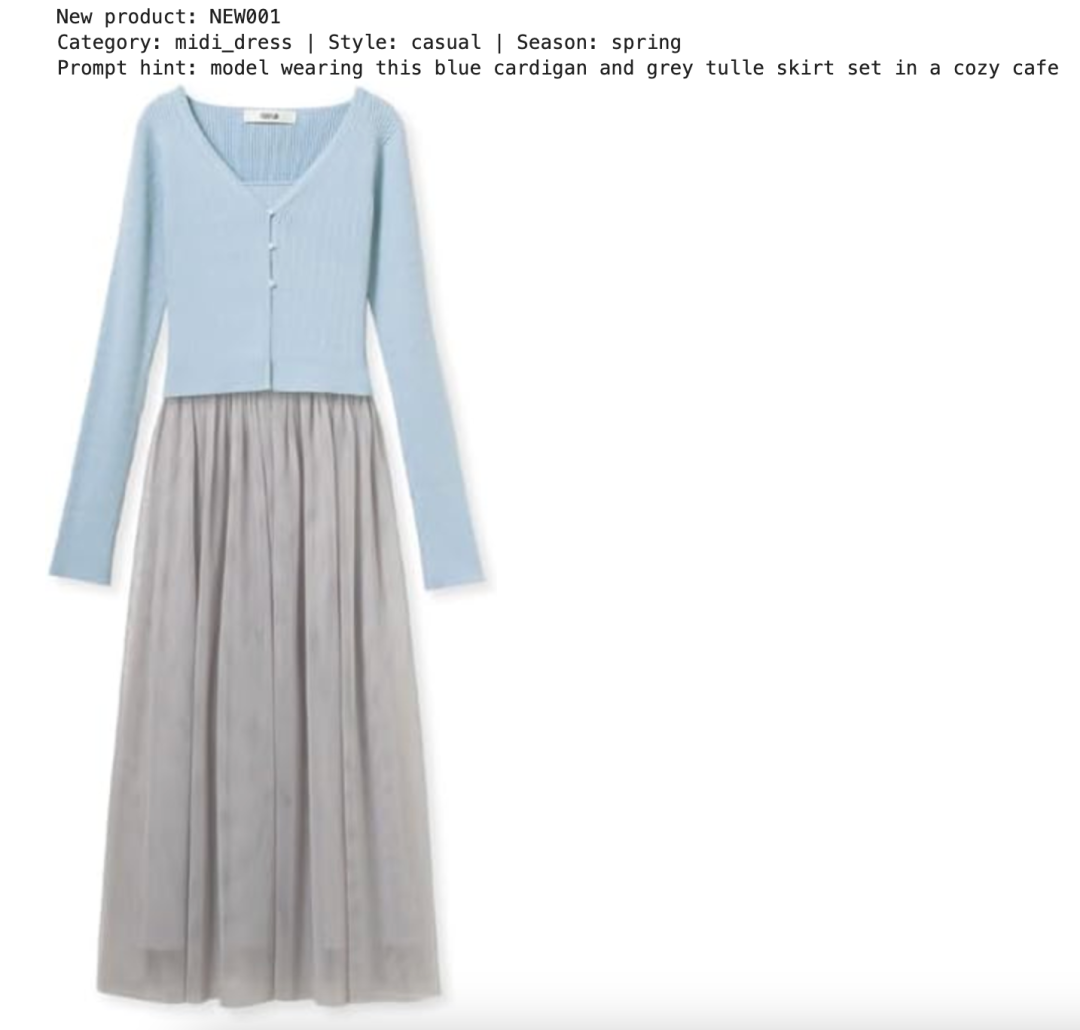
new_products/├── NEW001.jpg    # 蓝色针织开衫 + 灰色纱裙套装├── NEW002.jpg    # 浅绿色碎花荷叶边长裙├── NEW003.jpg    # 驼色高领针织连衣裙└── NEW004.jpg    # 深灰色民族风堆堆领上衣裙
new_products.csv 字段:new_id, image_path, category, style, season, prompt_hint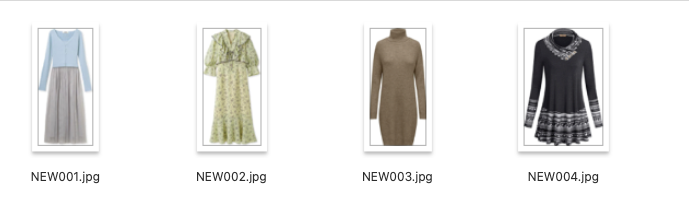

Step 1:安装依赖
!pip install pymilvus openai requests pillow scikit-learn tqdmStep 2:导入模块和配置
import os, io, base64, csv, timeimport requests as reqimport numpy as npfrom PIL import Imagefrom tqdm.notebook import tqdmfrom sklearn.feature_extraction.text import TfidfVectorizerfrom IPython.display import display
from openai import OpenAIfrom pymilvus import MilvusClient, DataType, AnnSearchRequest, RRFRanker
配置所有模型和路径:
# -- Config --OPENROUTER_API_KEY = os.environ.get(    "OPENROUTER_API_KEY",    "<YOUR_OPENROUTER_API_KEY>",)
# Models (all via OpenRouter, no local download needed)EMBED_MODEL = "nvidia/llama-nemotron-embed-vl-1b-v2"  # free, image+text → 2048dEMBED_DIM = 2048LLM_MODEL = "qwen/qwen3.5-397b-a17b"                 # style analysisIMAGE_GEN_MODEL = "google/gemini-3.1-flash-image-preview"  # Nano Banana 2
# MilvusMILVUS_URI = "./milvus_fashion.db"COLLECTION = "fashion_products"TOP_K = 3
# PathsIMAGE_DIR = "./images"NEW_PRODUCT_DIR = "./new_products"PRODUCT_CSV = "./products.csv"NEW_PRODUCT_CSV = "./new_products.csv"
# OpenRouter client (shared for LLM + image gen)llm = OpenAI(api_key=OPENROUTER_API_KEY, base_url="https://openrouter.ai/api/v1")
print("Config loaded. All models via OpenRouter API.")
工具函数
定义一组工具函数,用于图片编码、API 调用和结果解析:
image_to_uri():将 PIL 图片转为 base64 data URI,用于 API 传输
get_image_embeddings():批量调用 OpenRouter Embedding API,图片 → 2048 维向量
get_text_embedding():文本 → 2048 维向量(同一向量空间)
sparse_to_dict():将 scipy 稀疏矩阵行转为 Milvus 稀疏向量格式 {index: value}
extract_images():从 Nano Banana 2 的 API 响应中提取生成的图片
# -- Utility functions --
def image_to_uri(img, max_size=1024):    """Convert PIL Image to base64 data URI."""    img = img.copy()    w, h = img.size    if max(w, h) > max_size:        r = max_size / max(w, h)        img = img.resize((int(w * r), int(h * r)), Image.LANCZOS)    buf = io.BytesIO()    img.save(buf, format="JPEG", quality=85)    return f"data:image/jpeg;base64,{base64.b64encode(buf.getvalue()).decode()}"

def get_image_embeddings(images, batch_size=5):    """Encode images via OpenRouter embedding API."""    all_embs = []    for i in tqdm(range(0, len(images), batch_size), desc="Encoding images"):        batch = images[i : i + batch_size]        inputs = [            {"content": [{"type": "image_url", "image_url": {"url": image_to_uri(img, max_size=512)}}]}            for img in batch        ]        resp = req.post(            "https://openrouter.ai/api/v1/embeddings",            headers={"Authorization": f"Bearer {OPENROUTER_API_KEY}"},            json={"model": EMBED_MODEL, "input": inputs},            timeout=120,        )        data = resp.json()        if "data" not in data:            print(f"API error: {data}")            continue        for item in sorted(data["data"], key=lambda x: x["index"]):            all_embs.append(item["embedding"])        time.sleep(0.5)  # rate limit friendly    return np.array(all_embs, dtype=np.float32)

def get_text_embedding(text):    """Encode text via OpenRouter embedding API."""    resp = req.post(        "https://openrouter.ai/api/v1/embeddings",        headers={"Authorization": f"Bearer {OPENROUTER_API_KEY}"},        json={"model": EMBED_MODEL, "input": text},        timeout=60,    )    return np.array(resp.json()["data"][0]["embedding"], dtype=np.float32)

def sparse_to_dict(sparse_row):    """Convert scipy sparse row to Milvus sparse vector format {index: value}."""    coo = sparse_row.tocoo()    return {int(i): float(v) for i, v in zip(coo.col, coo.data)}

def extract_images(response):    """Extract generated images from OpenRouter response."""    images = []    raw = response.model_dump()    msg = raw["choices"][0]["message"]    # Method 1: images field (OpenRouter extension)    if "images" in msg and msg["images"]:        for img_data in msg["images"]:            url = img_data["image_url"]["url"]            b64 = url.split(",", 1)[1]            images.append(Image.open(io.BytesIO(base64.b64decode(b64))))    # Method 2: inline base64 in content parts    if not images and isinstance(msg.get("content"), list):        for part in msg["content"]:            if isinstance(part, dict) and part.get("type") == "image_url":                url = part["image_url"]["url"]                if url.startswith("data:image"):                    b64 = url.split(",", 1)[1]                    images.append(Image.open(io.BytesIO(base64.b64decode(b64))))    return images
print("Utility functions ready.")
Step 3:加载商品目录
读取 products.csv 元数据和对应的商品图片:
with open(PRODUCT_CSV, newline="", encoding="utf-8") as f:    products = list(csv.DictReader(f))
product_images = []for p in products:    img = Image.open(os.path.join(IMAGE_DIR, p["image_path"])).convert("RGB")    product_images.append(img)
print(f"Loaded {len(products)} products.")for i in range(3):    p = products[i]    print(f"{p['product_id']} | {p['category']} | {p['color']} | {p['style']} | sales: {p['sales_count']}")    display(product_images[i].resize((180, int(180 * product_images[i].height / product_images[i].width))))
输出示例:
Step 4:生成 Embedding
为混合检索生成两种类型的向量:
4.1 Dense 向量:图片 Embedding
通过 OpenRouter 调用 `nvidia/llama-nemotron-embed-vl-1b-v2` 模型,将每张商品图编码为 2048 维稠密向量。该模型支持图文混合编码,同一向量空间内既可以搜图,也可以搜文。
# Dense embeddings: image → 2048-dim vector via OpenRouter APIdense_vectors = get_image_embeddings(product_images, batch_size=5)print(f"Dense vectors: {dense_vectors.shape} (products x {EMBED_DIM}d)")输出:
Dense vectors: (40, 2048) (products x 2048d)4.2 Sparse 向量:TF-IDF 文本 Embedding
对商品的文字描述(description 字段)使用 sklearn 的 TF-IDF 生成稀疏向量,用于关键词匹配:
# Sparse embeddings: TF-IDF on product descriptionsdescriptions = [p["description"] for p in products]tfidf = TfidfVectorizer(stop_words="english", max_features=500)tfidf_matrix = tfidf.fit_transform(descriptions)
sparse_vectors = [sparse_to_dict(tfidf_matrix[i]) for i in range(len(products))]print(f"Sparse vectors: {len(sparse_vectors)} products, vocab size: {len(tfidf.vocabulary_)}")print(f"Sample sparse vector (SKU001): {len(sparse_vectors[0])} non-zero terms")
输出:
Sparse vectors: 40 products, vocab size: 179Sample sparse vector (SKU001): 11 non-zero terms>为什么需要两种向量?两者结合,检索效果显著优于单一方式
- Dense 向量捕捉视觉特征(颜色、款式、风格),适合「以图搜图」
- Sparse 向量捕捉关键词语义("floral"、"midi"、"chiffon"),适合文字匹配
Step 5:创建 Milvus Collection(混合 Schema)
这是本教程的核心步骤:
创建一个同时包含 Dense 向量、Sparse 向量和标量字段的混合 Schema:
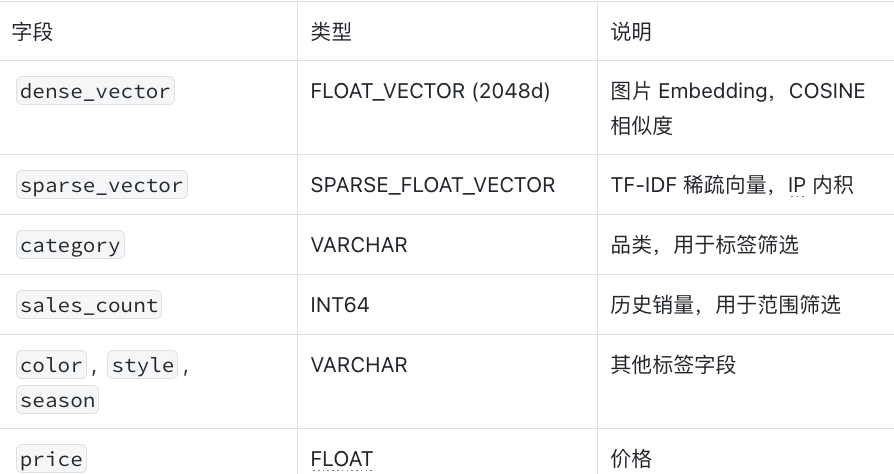
milvus_client = MilvusClient(uri=MILVUS_URI)
if milvus_client.has_collection(COLLECTION):    milvus_client.drop_collection(COLLECTION)
schema = milvus_client.create_schema(auto_id=True, enable_dynamic_field=True)schema.add_field("id", DataType.INT64, is_primary=True)schema.add_field("product_id", DataType.VARCHAR, max_length=20)schema.add_field("category", DataType.VARCHAR, max_length=50)schema.add_field("color", DataType.VARCHAR, max_length=50)schema.add_field("style", DataType.VARCHAR, max_length=50)schema.add_field("season", DataType.VARCHAR, max_length=50)schema.add_field("sales_count", DataType.INT64)schema.add_field("description", DataType.VARCHAR, max_length=500)schema.add_field("price", DataType.FLOAT)schema.add_field("dense_vector", DataType.FLOAT_VECTOR, dim=EMBED_DIM)schema.add_field("sparse_vector", DataType.SPARSE_FLOAT_VECTOR)
index_params = milvus_client.prepare_index_params()index_params.add_index(field_name="dense_vector", index_type="FLAT", metric_type="COSINE")index_params.add_index(field_name="sparse_vector", index_type="SPARSE_INVERTED_INDEX", metric_type="IP")
milvus_client.create_collection(COLLECTION, schema=schema, index_params=index_params)print(f"Milvus collection '{COLLECTION}' created with hybrid schema.")
插入数据
# Insert all productsrows = []for i, p in enumerate(products):    rows.append({        "product_id": p["product_id"],        "category": p["category"],        "color": p["color"],        "style": p["style"],        "season": p["season"],        "sales_count": int(p["sales_count"]),        "description": p["description"],        "price": float(p["price"]),        "dense_vector": dense_vectors[i].tolist(),        "sparse_vector": sparse_vectors[i],    })
milvus_client.insert(COLLECTION, rows)stats = milvus_client.get_collection_stats(COLLECTION)print(f"Inserted {stats['row_count']} products into Milvus.")
输出:
Inserted 40 products into Milvus.Step 6:混合检索——为新品找到相似爆款
这是 Milvus 高级功能的核心演示。对于每个新品,我们同时执行:
1.Dense 检索:图片 Embedding 相似度(新品长什么样?)
2.Sparse 检索:TF-IDF 文字匹配(关键词是否一致?)
3.标量筛选:品类匹配 + 只看爆款(`sales_count > 1500`)
4.RRF 重排序:融合 Dense + Sparse 结果
加载新品
# Load new productswith open(NEW_PRODUCT_CSV, newline="", encoding="utf-8") as f:    new_products = list(csv.DictReader(f))
# Pick the first new product for demonew_prod = new_products[0]new_img = Image.open(os.path.join(NEW_PRODUCT_DIR, new_prod["image_path"])).convert("RGB")
print(f"New product: {new_prod['new_id']}")print(f"Category: {new_prod['category']} | Style: {new_prod['style']} | Season: {new_prod['season']}")print(f"Prompt hint: {new_prod['prompt_hint']}")display(new_img.resize((300, int(300 * new_img.height / new_img.width))))
输出:
编码新品
# Encode new product# Dense: image embedding via APIquery_dense = get_image_embeddings([new_img], batch_size=1)[0]
# Sparse: TF-IDF from text queryquery_text = f"{new_prod['category']} {new_prod['style']} {new_prod['season']} {new_prod['prompt_hint']}"query_sparse = sparse_to_dict(tfidf.transform([query_text])[0])
# Scalar filterfilter_expr = f'category == "{new_prod["category"]}" and sales_count > 1500'
print(f"Dense query: {query_dense.shape}")print(f"Sparse query: {len(query_sparse)} non-zero terms")print(f"Filter: {filter_expr}")
输出:
Dense query: (2048,)Sparse query: 6 non-zero termsFilter: category == "midi_dress" and sales_count > 1500执行混合检索
>关键代码解析:
AnnSearchRequest分别为 Dense 和 Sparse 向量创建搜索请求
expr=filter_expr在每个请求中加入标量过滤条件
RRFRanker(k=60)使用 Reciprocal Rank Fusion 算法融合两路搜索结果
hybrid_search将所有请求合并执行,返回综合排名
# Hybrid search: dense + sparse + scalar filter + RRF rerankingdense_req = AnnSearchRequest(    data=[query_dense.tolist()],    anns_field="dense_vector",    param={"metric_type": "COSINE"},    limit=20,    expr=filter_expr,)sparse_req = AnnSearchRequest(    data=[query_sparse],    anns_field="sparse_vector",    param={"metric_type": "IP"},    limit=20,    expr=filter_expr,)
results = milvus_client.hybrid_search(    collection_name=COLLECTION,    reqs=[dense_req, sparse_req],    ranker=RRFRanker(k=60),    limit=TOP_K,    output_fields=["product_id", "category", "color", "style", "season",                   "sales_count", "description", "price"],)
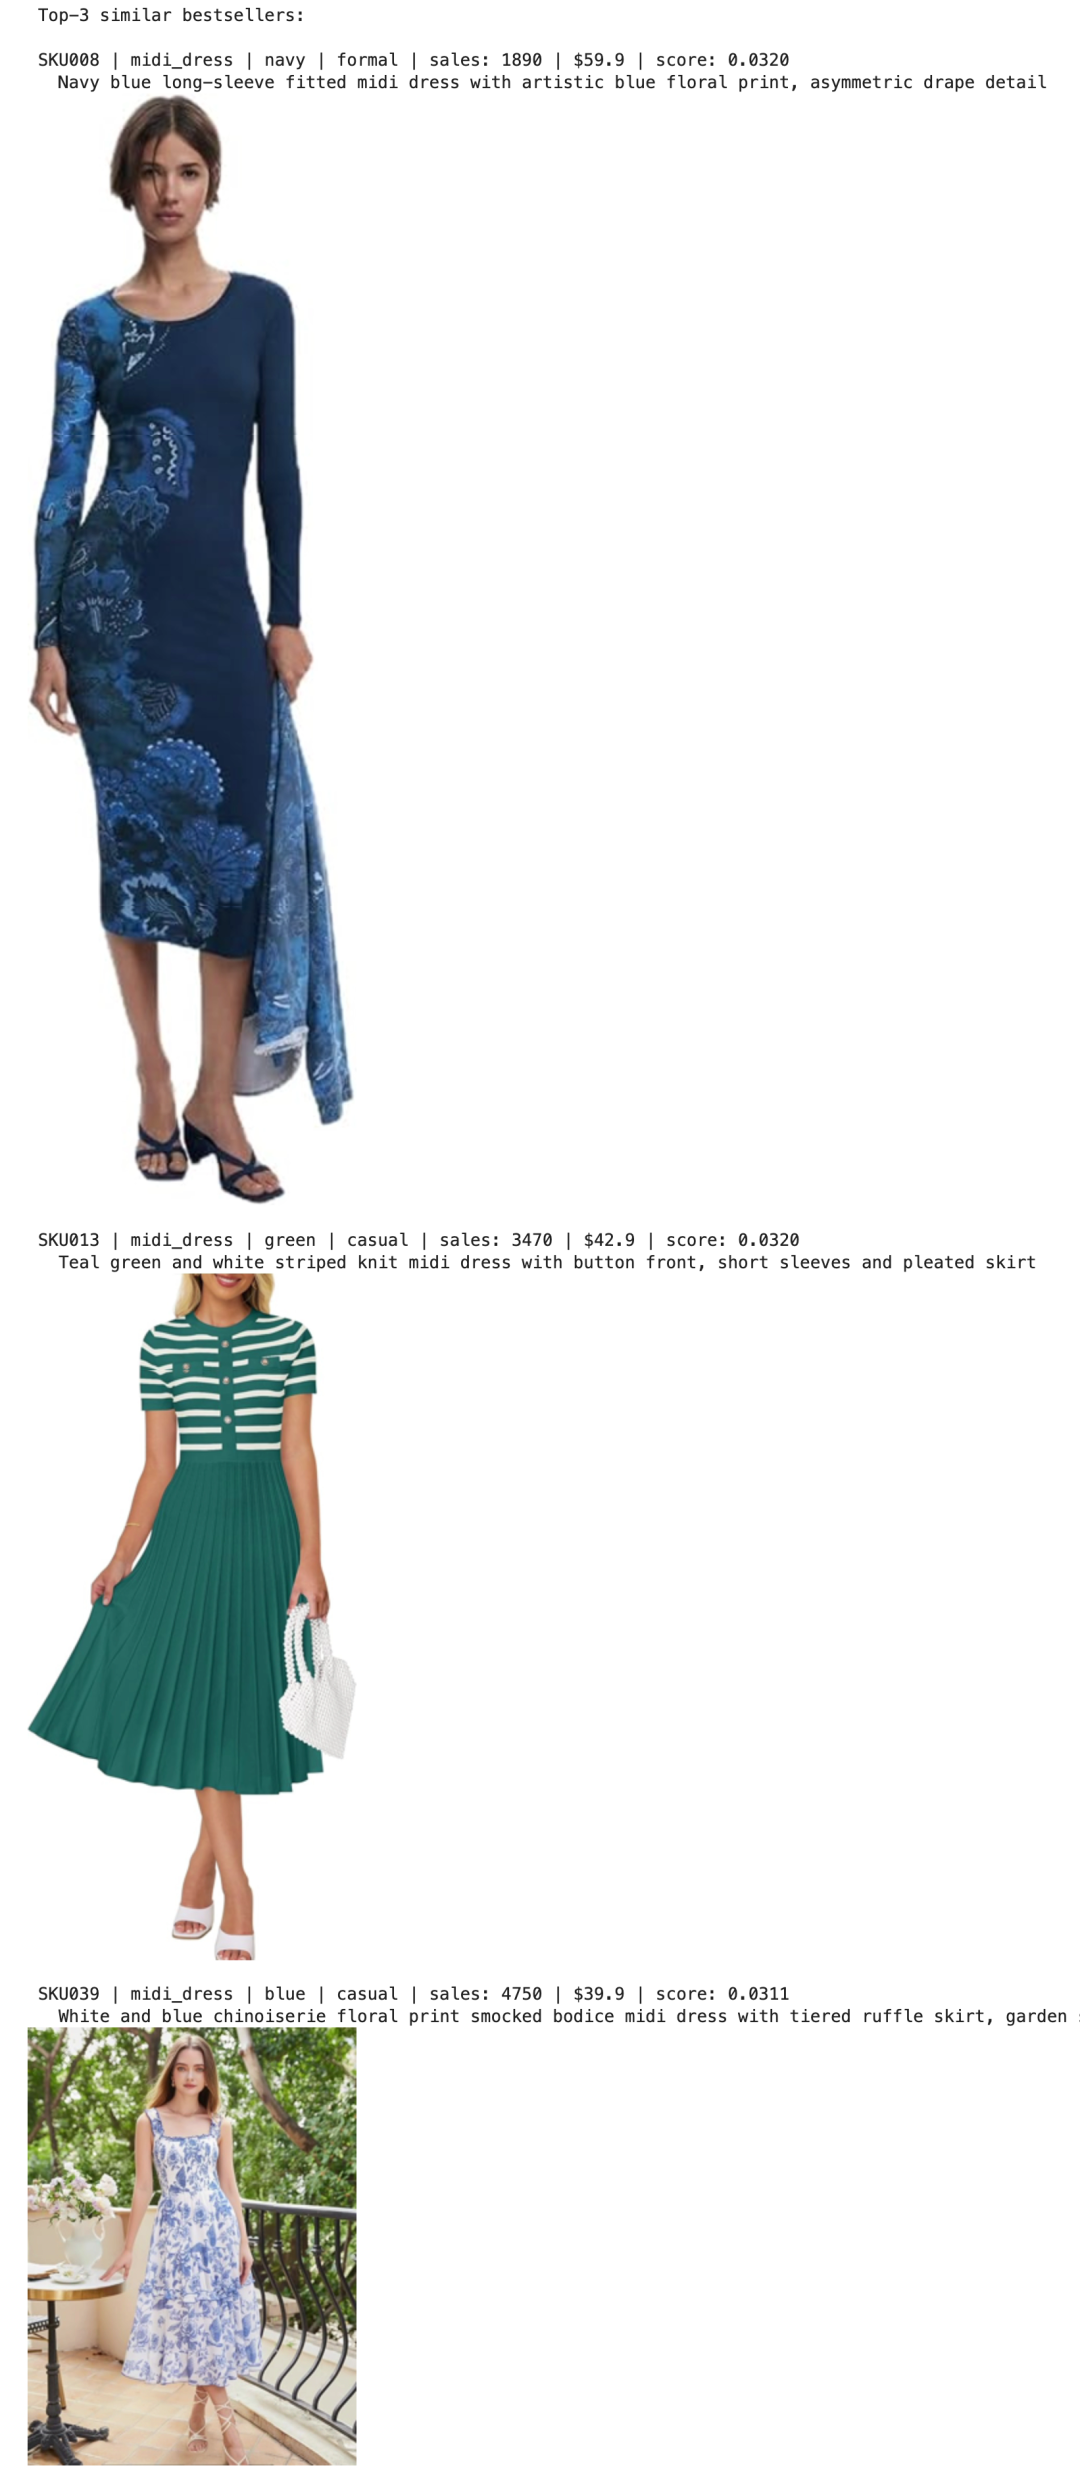
# Display retrieved bestsellersretrieved_products = []retrieved_images = []print(f"Top-{TOP_K} similar bestsellers:\n")for hit in results[0]:    entity = hit["entity"]    pid = entity["product_id"]    img = Image.open(os.path.join(IMAGE_DIR, f"{pid}.jpg")).convert("RGB")    retrieved_products.append(entity)    retrieved_images.append(img)    print(f"{pid} | {entity['category']} | {entity['color']} | {entity['style']} "          f"| sales: {entity['sales_count']} | ${entity['price']:.1f} | score: {hit['distance']:.4f}")    print(f"  {entity['description']}")    display(img.resize((250, int(250 * img.height / img.width))))    print()
输出:排名前三最相似的爆款
Step 7:用 Qwen3.5 分析爆款风格
将检索到的爆款宣传图发给 Qwen3.5 多模态 LLM,让它分析场景、灯光、姿势、氛围,并生成一段风格描述 prompt:
content = [    {"type": "image_url", "image_url": {"url": image_to_uri(img)}}    for img in retrieved_images]content.append({    "type": "text",    "text": (        "These are our top-selling fashion product photos.\n\n"        "Analyze their common visual style in these dimensions:\n"        "1. Scene / background setting\n"        "2. Lighting and color tone\n"        "3. Model pose and framing\n"        "4. Overall mood and aesthetic\n\n"        "Then, based on this analysis, write ONE concise image generation prompt "        "(under 100 words) that captures this style. The prompt should describe "        "a scene for a model wearing a new clothing item. "        "Output ONLY the prompt, nothing else."    ),})
response = llm.chat.completions.create(    model=LLM_MODEL,    messages=[{"role": "user", "content": content}],    max_tokens=512,    temperature=0.7,)style_prompt = response.choices[0].message.content.strip()print("Style prompt from Qwen3.5:\n")print(style_prompt)
Qwen3.5 输出示例:
Style prompt from Qwen3.5:
Professional full-body fashion photograph of a model wearing a stylish new dress.Bright, soft high-key lighting that illuminates the subject evenly. Clean,uncluttered background, either stark white or a softly blurred bright outdoorsetting. The model stands in a relaxed, natural pose to showcase the garment'ssilhouette and drape. Sharp focus, vibrant colors, fresh and elegant commercialaesthetic.
Step 8:用 Nano Banana 2 生成宣传图
将新品平铺图+爆款参考图+风格 prompt发给 Nano Banana 2,生成专业宣传图:
gen_prompt = (    f"I have a new clothing product (Image 1: flat-lay photo) and a reference "    f"promotional photo from our bestselling catalog (Image 2).\n\n"    f"Generate a professional e-commerce promotional photograph of a female model "    f"wearing the clothing from Image 1.\n\n"    f"Style guidance: {style_prompt}\n\n"    f"Scene hint: {new_prod['prompt_hint']}\n\n"    f"Requirements:\n"    f"- Full body shot, photorealistic, high quality\n"    f"- The clothing should match Image 1 exactly\n"    f"- The photo style and mood should match Image 2")
gen_content = [    {"type": "image_url", "image_url": {"url": image_to_uri(new_img)}},    {"type": "image_url", "image_url": {"url": image_to_uri(retrieved_images[0])}},    {"type": "text", "text": gen_prompt},]
print("Generating promotional photo with Nano Banana 2...")gen_response = llm.chat.completions.create(    model=IMAGE_GEN_MODEL,    messages=[{"role": "user", "content": gen_content}],    extra_body={        "modalities": ["text", "image"],        "image_config": {"aspect_ratio": "3:4", "image_size": "2K"},    },)print("Done!")
>Nano Banana 2 API 关键参数:
modalities: ["text", "image"]:必须声明输出包含图片
image_config.aspect_ratio:控制宽高比(3:4适合人像)
image_config.image_size:分辨率(支持512px到4K)
提取生成的图片
generated_images = extract_images(gen_response)
text_content = gen_response.choices[0].message.contentif text_content:    print(f"Model response: {text_content[:300]}\n")
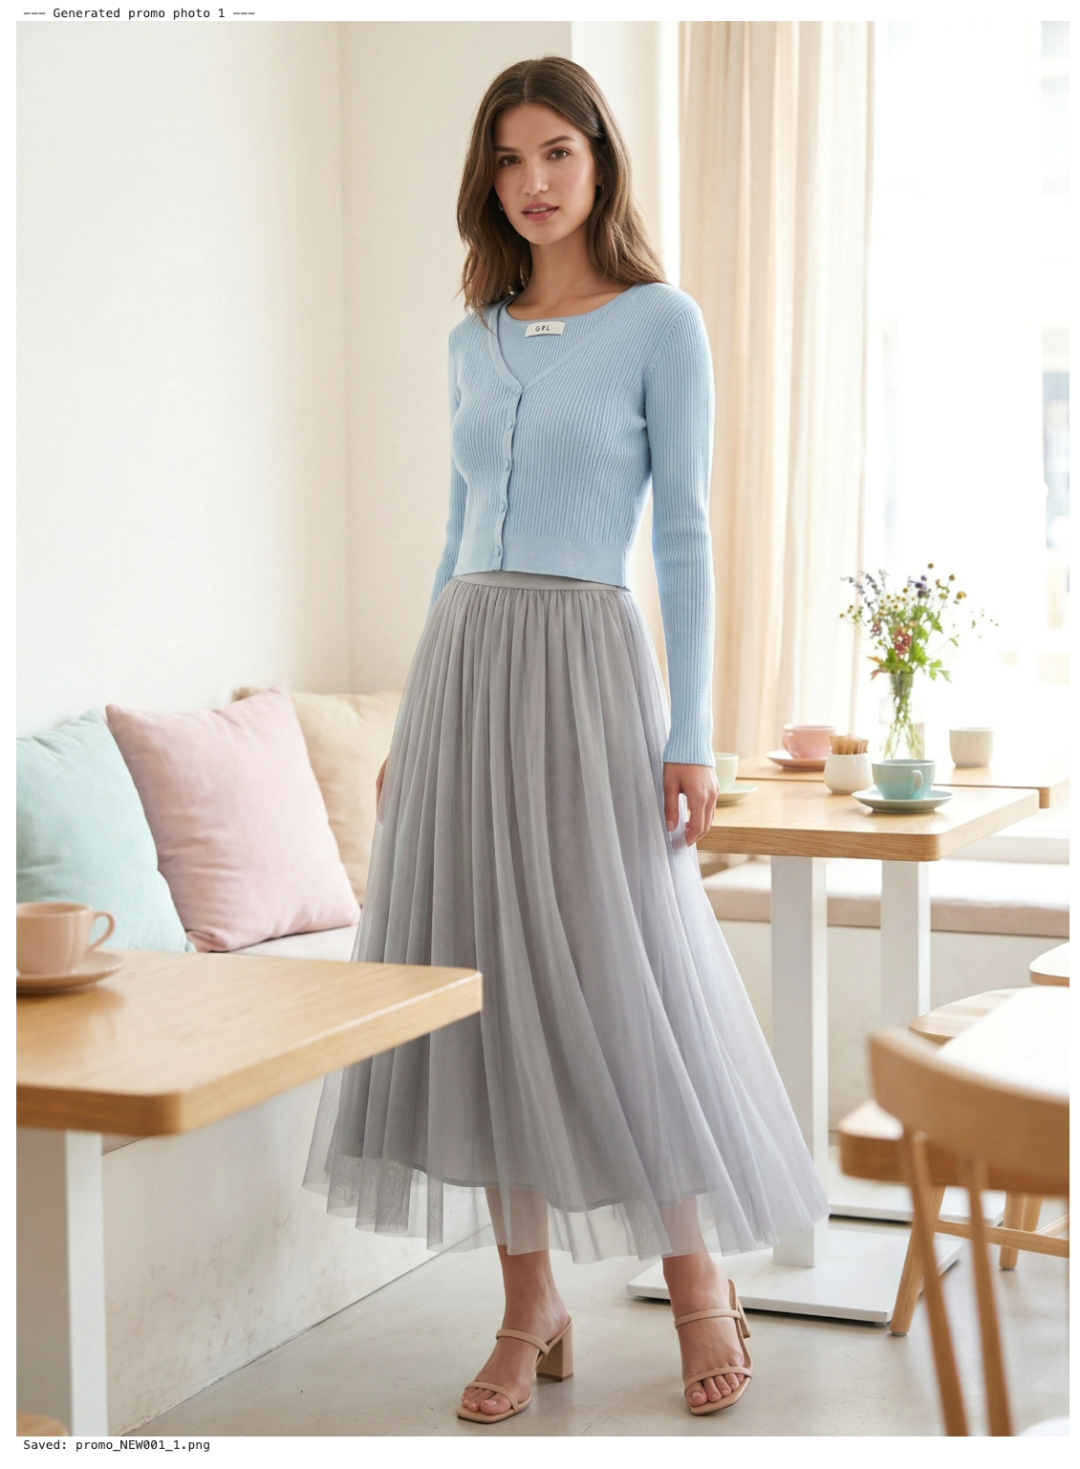
if generated_images:    for i, img in enumerate(generated_images):        print(f"--- Generated promo photo {i+1} ---")        display(img)        img.save(f"promo_{new_prod['new_id']}_{i+1}.png")        print(f"Saved: promo_{new_prod['new_id']}_{i+1}.png")else:    print("No image generated. Raw response:")    print(gen_response.model_dump())
输出:
Step 9:对比展示
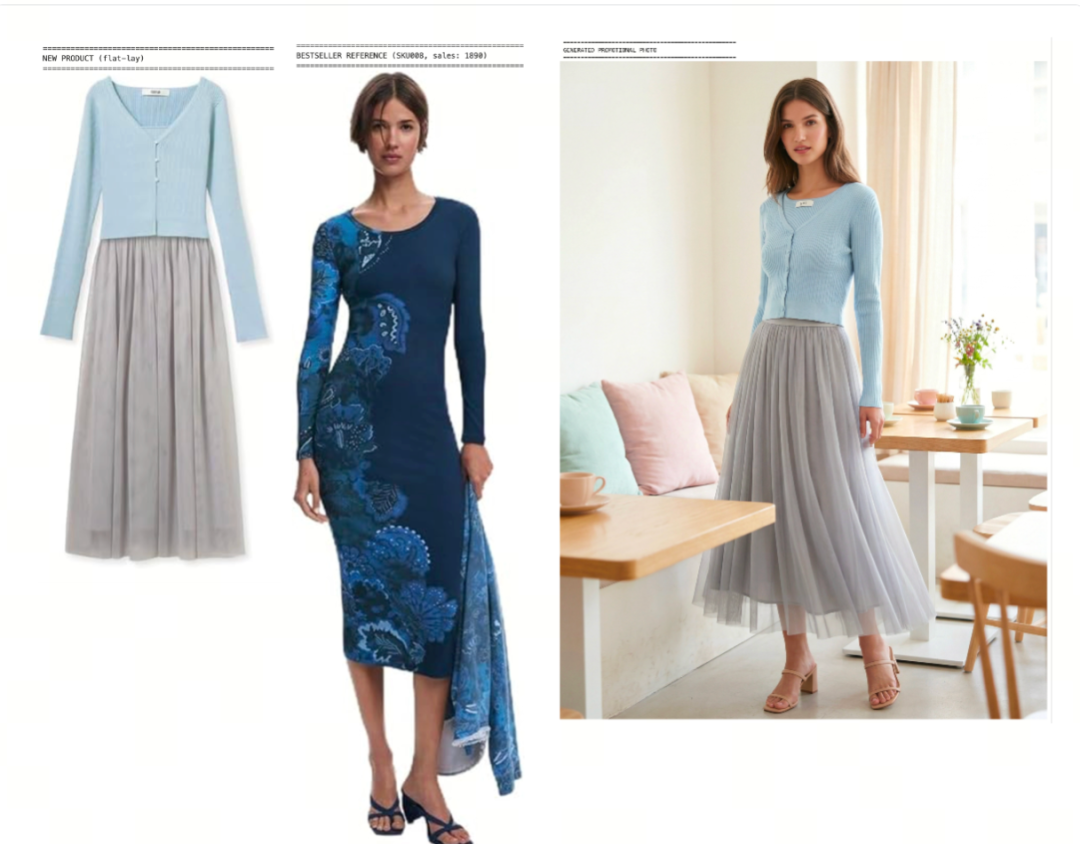
print("=" * 50)print("NEW PRODUCT (flat-lay)")print("=" * 50)display(new_img.resize((400, int(400 * new_img.height / new_img.width))))
print("\n" + "=" * 50)print(f"BESTSELLER REFERENCE ({retrieved_products[0]['product_id']}, sales: {retrieved_products[0]['sales_count']})")print("=" * 50)display(retrieved_images[0].resize((400, int(400 * retrieved_images[0].height / retrieved_images[0].width))))
if generated_images:    print("\n" + "=" * 50)    print("GENERATED PROMOTIONAL PHOTO")    print("=" * 50)    display(generated_images[0])
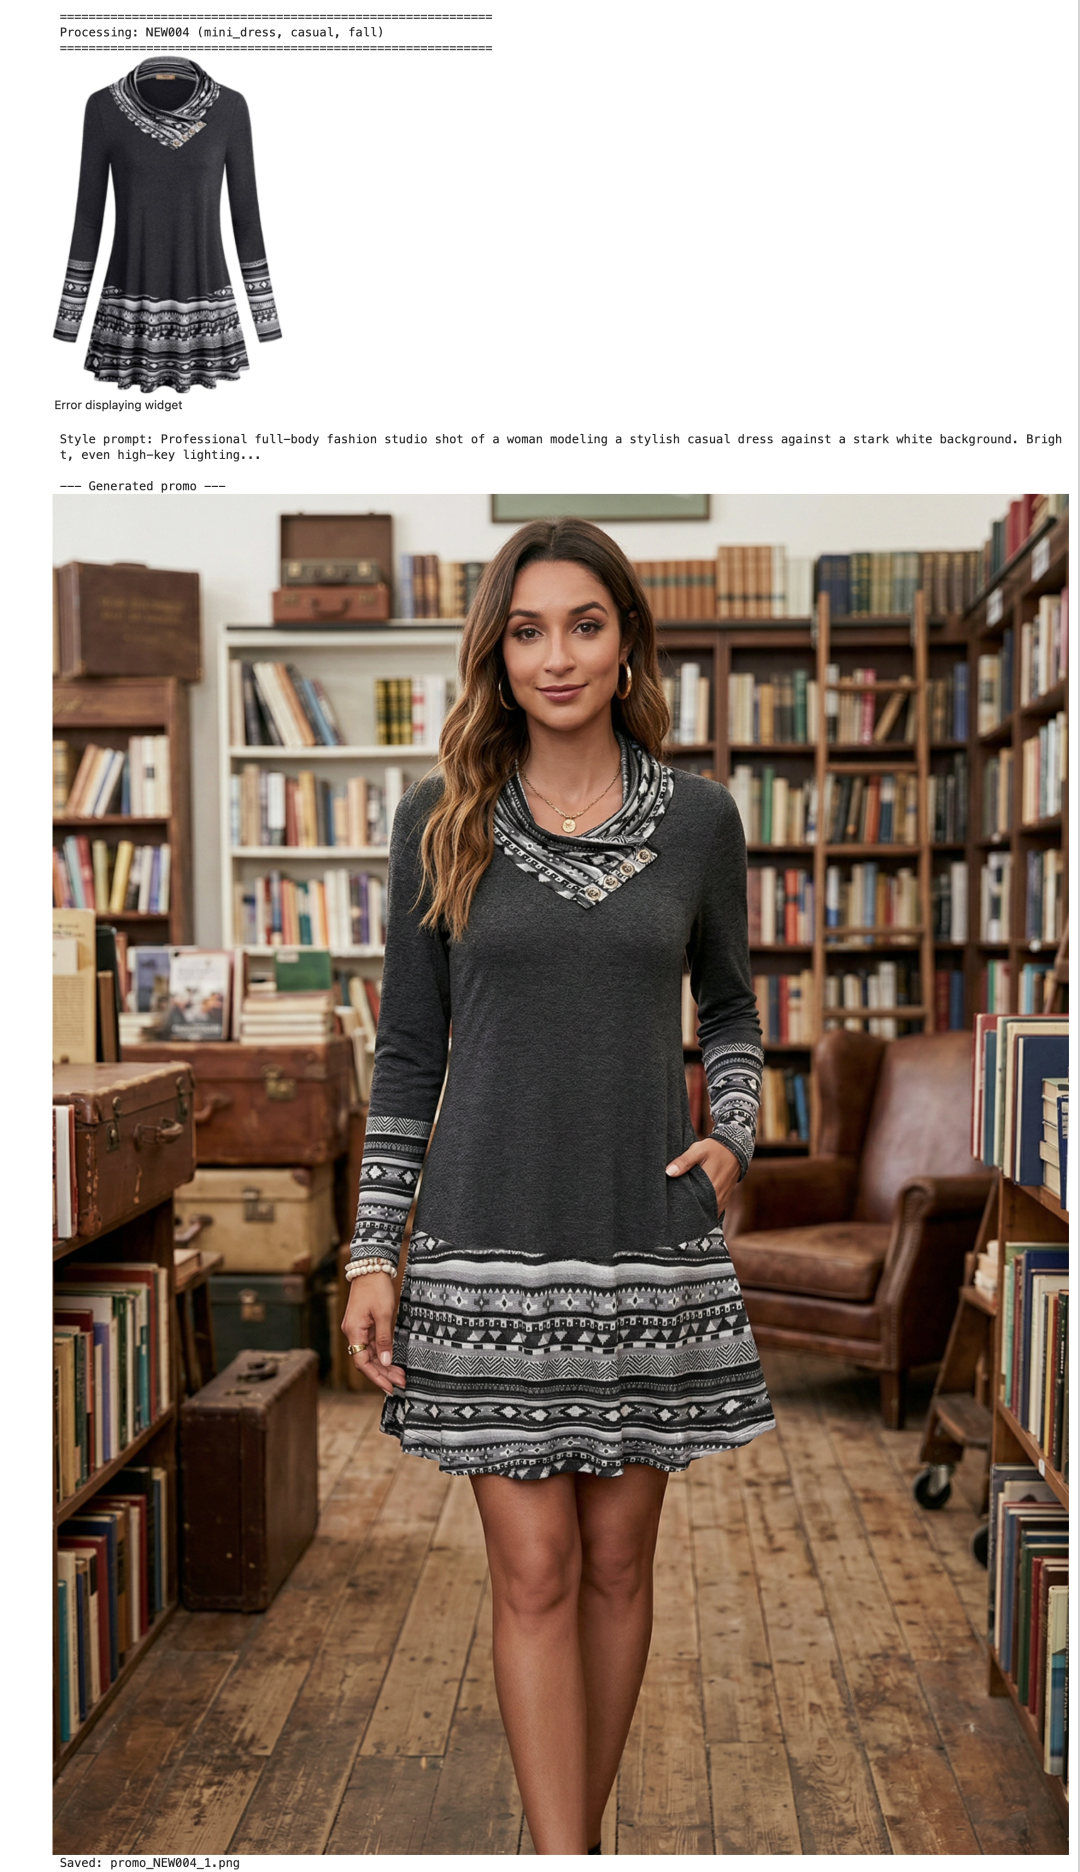
从下面的对比结果可以看出,Nano Banana 2 生成的新品宣传图,整体场景氛围很棒,光线柔和,模特姿态自然。
唯一瑕疵是开衫像是直接“贴”上去的,领口处的白色标签明显外露,破坏了真实感,说明模型在服装与人体的融合上还有提升空间。
Step 10:批量生成所有新品
将完整流程封装为函数,对所有新品执行:混合检索 → 风格分析 → 宣传图生成。(由于本文篇幅过长,此处省略代码。有需要的可以留言或者私信小编)
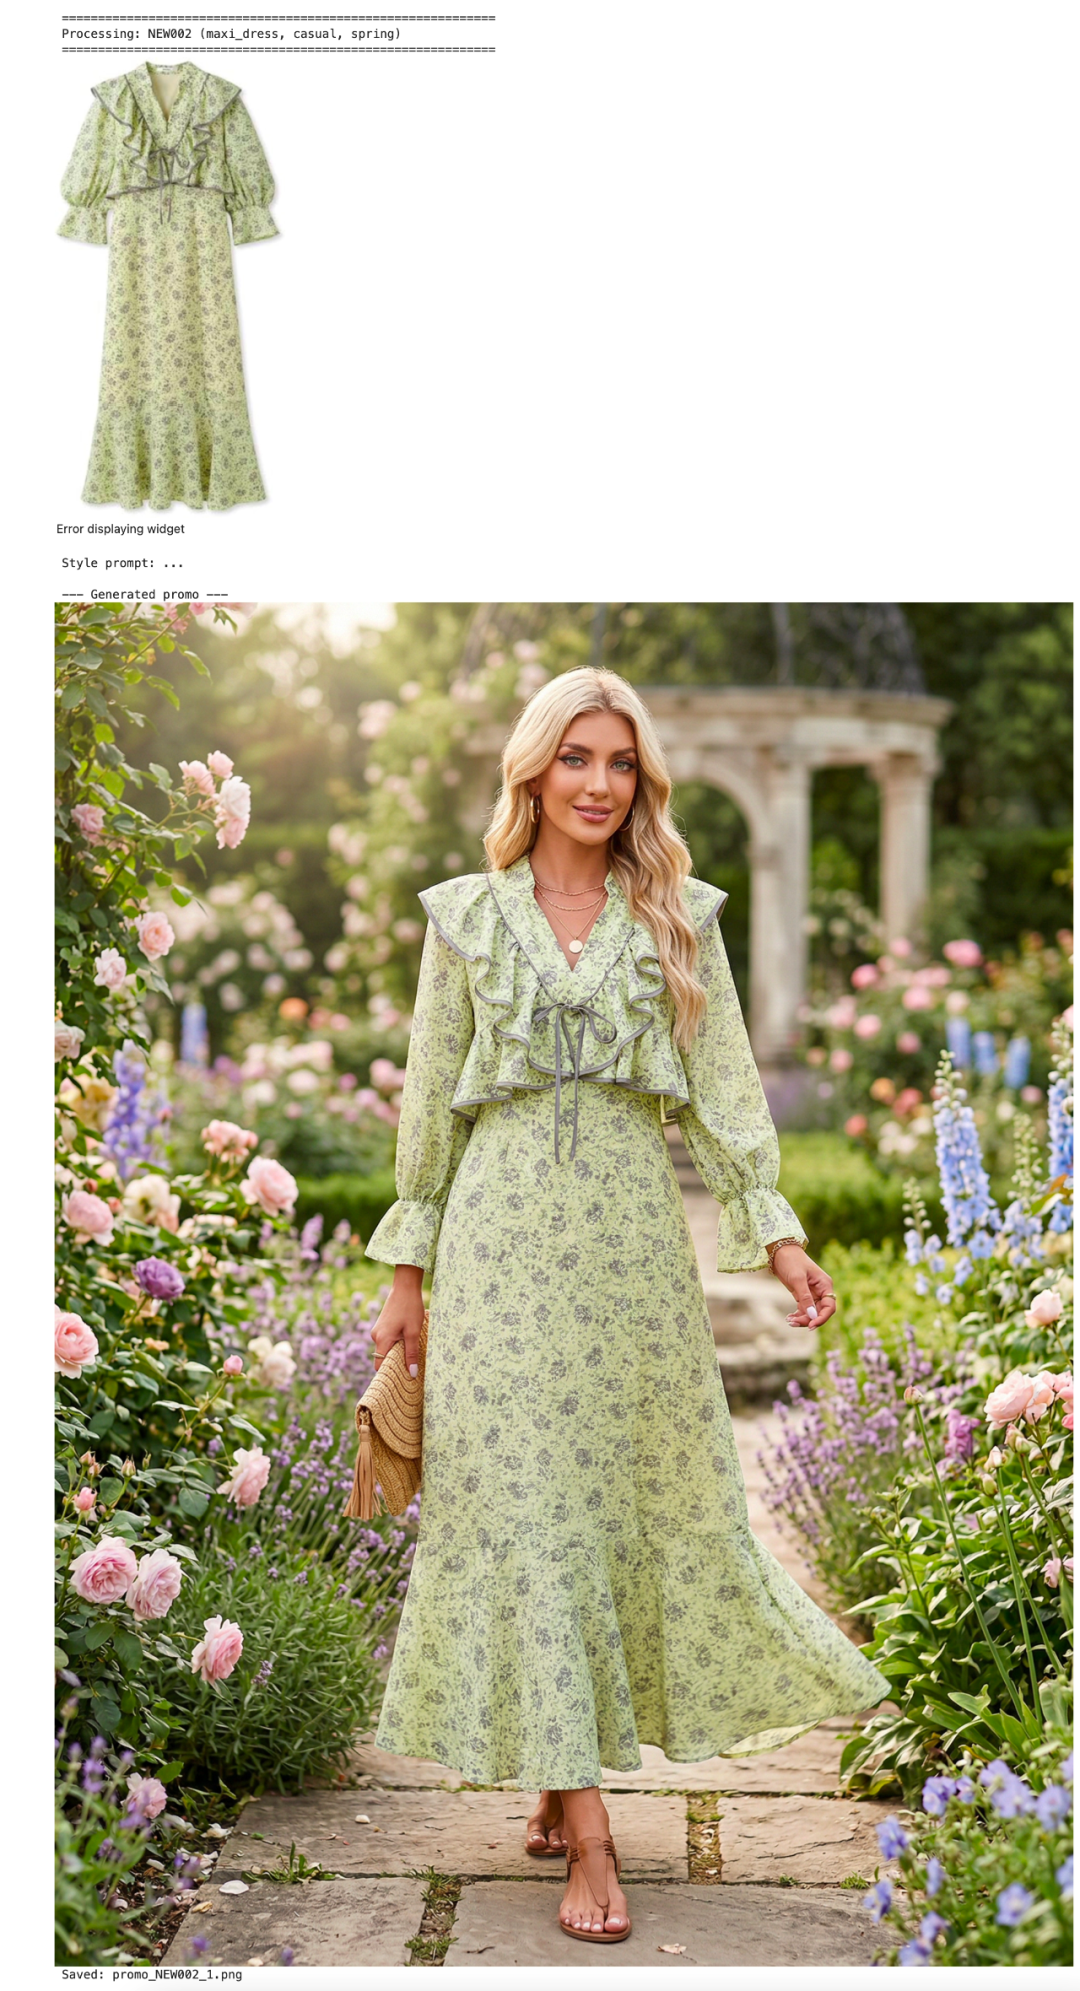
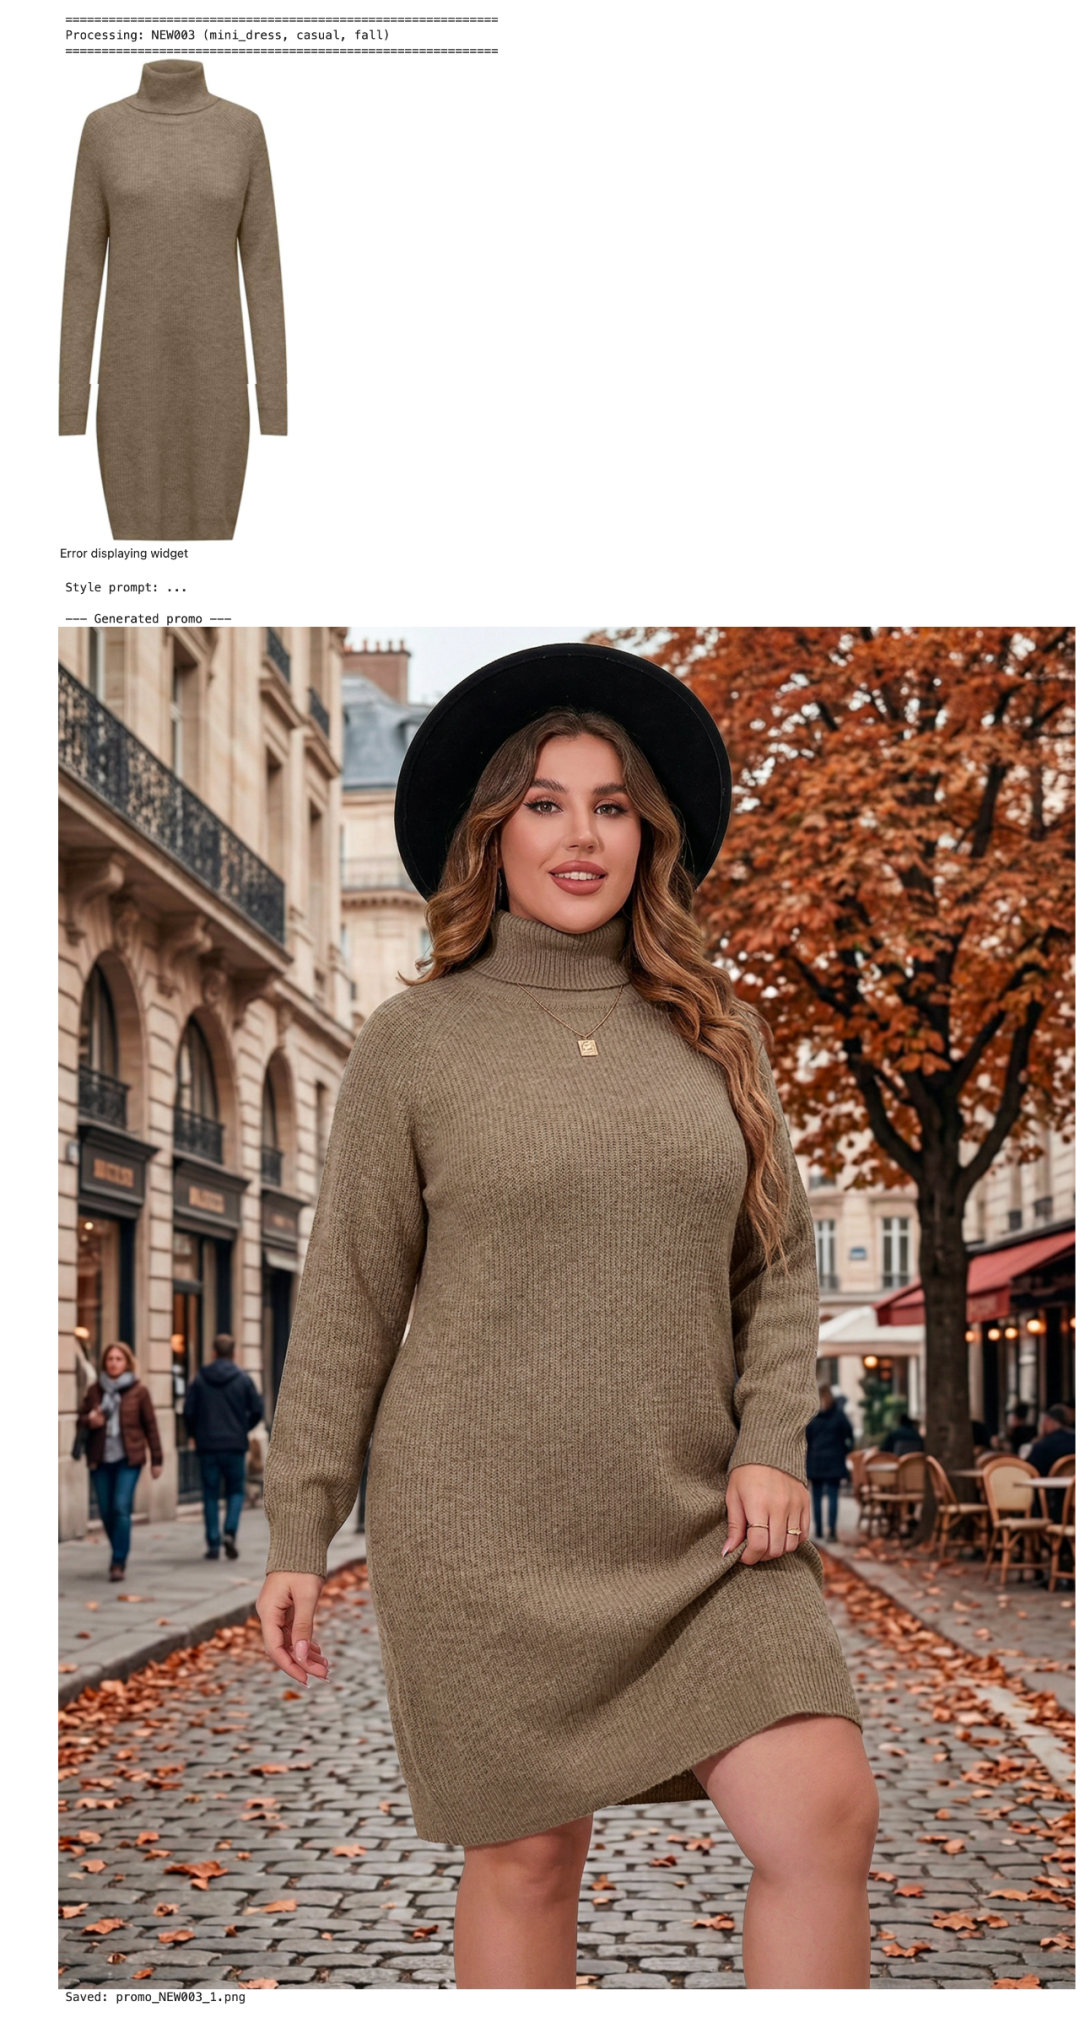
我们为剩下几个新品批量生成了宣传图。从下面的宣传图可以看出,,Qwen3.5对新品适配的季节、使用场景及搭配配饰等维度具备深度理解与精准把控;Nano Banana 2则可高质量渲染对应视觉画面,呈现效果逼真,达到以假乱真的水准。
总结
以上由AI 驱动的快时尚宣传图生成流水线,有四大优势:
零本地模型:所有 AI 模型通过 OpenRouter API 调用
Milvus 混合检索:Dense + Sparse + Scalar 三路融合,检索精度远超单一向量检索
端到端自动化:从新品平铺图到宣传图,全流程自动化
成本可控:Embedding 模型免费,Nano Banana 2 价格仅为 Pro 版本的一半
但也有一些不足,比如少量服装与人体融合不自然、小配饰细节模糊的问题,两个简单技巧即可解决:
首先,分步骤生图:先生成爆款同款场景背景,再生成模特图,最后将自家产品融图,大幅提升融合度;
此外,使用中需要精细化 prompt:在生图 prompt 中加入 服装与人体贴合自然,无外露标签、无多余元素,产品细节清晰,引导模型优化细节。如果还是不行,直接用Pro,这方面pro的稳定性比Nano Banana 2 高很多。
作者介绍


王舒虹
Zilliz Social Media Advocate
阅读推荐 一个春节烧掉3个$200 Claude Max plan,我终于明白了怎么用AI写infra代码 如何在记忆与检索环节,解决OpenClaw 的token消耗爆炸问题? AI互撕后code review表现会更好?Claude、Gemini、Codex、Qwen、MiniMax 最新模型测评 开源:我们复刻了OpenClaw的mem系统,为所有Agent打造透明、可控的记忆
拆解:OpenClaw就是agent记忆的最佳范式!其逻辑与RAG有何区别?



电商企业物流数字化转型必备!快递鸟 API 接口,72 小时快速完成物流系统集成。全流程实战1V1指导,营造开放的API技术生态圈。
更多推荐

 14
14 0
0- 0


 已为社区贡献1条内容

所有评论(0)