
千万级电商系统解决方案
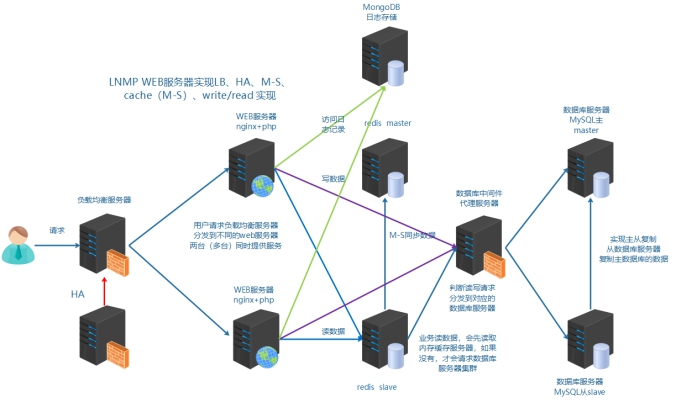
集群:多台服务器在一起作同样的事 。分布式 :多台服务器在一起作不同的事 。最终的架构图示,实现负载均衡LB、高可用HA、数据库主从复制M-S、读写分离R-W、缓存中间件[memcached、Redis] nosql[mongodb]······服务器基本环境部署:LNMP = Linux + Nginx + MySQL + PHP(独立软件,占用9000)Nginx:接收用户请求,请求处理后返回
1、企业服务器LNMP环境搭建
集群:多台服务器在一起作同样的事 。分布式 :多台服务器在一起作不同的事 。
最终的架构图示,实现负载均衡LB、高可用HA、数据库主从复制M-S、读写分离R-W、缓存中间件[memcached、Redis] nosql[mongodb]······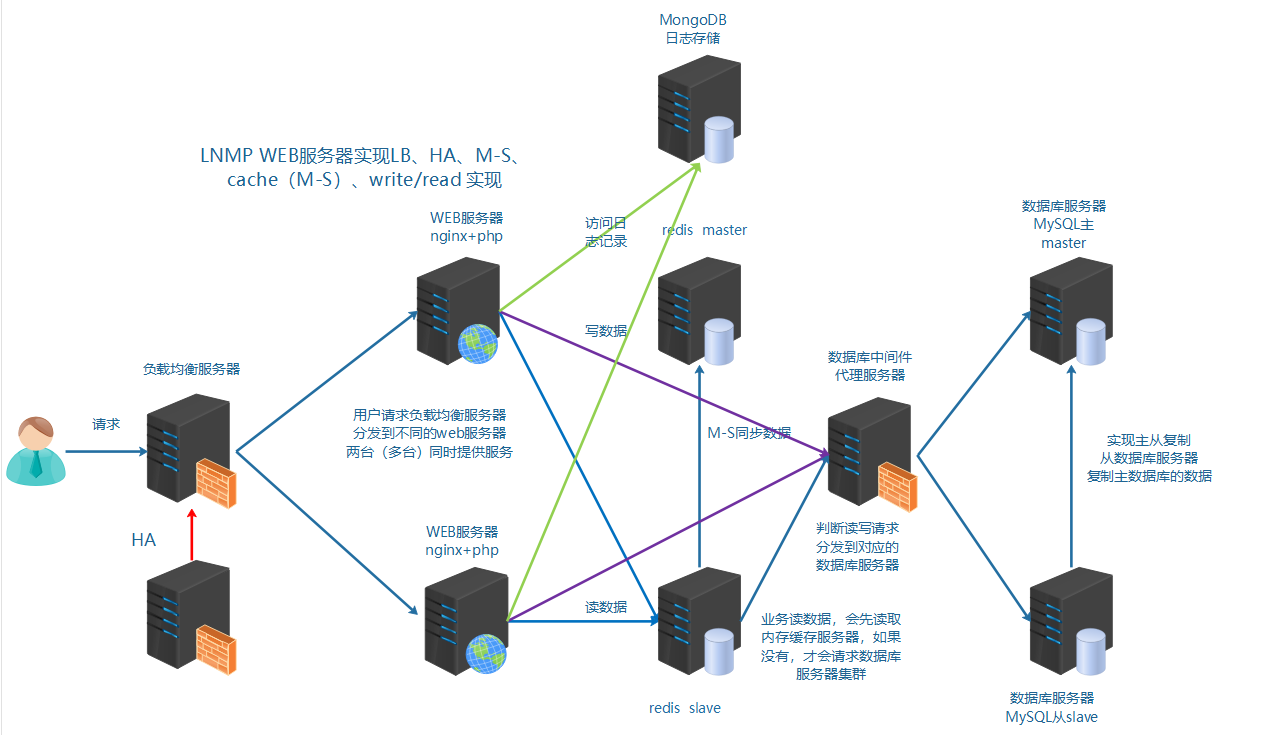
服务器基本环境部署:
1、设置静态ip(NAT模式网关为.2)
# cat /etc/sysconfig/network-scripts/ifcfg-ens33
TYPE="Ethernet"
BOOTPROTO="none"
IPADDR="10.1.1.10"
NETMASK="255.255.255.0"
GATEWAY="10.1.1.2"
DNS1="8.8.8.8"
NAME="ens33"
DEVICE="ens33"
ONBOOT="yes"

CentOS Stream 9 设置ip:
vi /etc/NetworkManager/system-connections/ens33.nmconnection
[ipv4]
method=manual
addresses=192.168.88.101/24
gateway=192.168.88.2
dns=8.8.8.8;

[ipv6]
method=ignore

systemctl restart NetworkManager
如果不想重启整个 NetworkManager 服务,可以只重新激活特定的网络连接:
sudo nmcli connection down <连接名称>
sudo nmcli connection up <连接名称>
sudo nmcli connection down ens33
sudo nmcli connection up ens33
如果想重启所有网络接口,可以使用以下命令:
sudo nmcli networking off
sudo nmcli networking on

2、关闭防火墙和selinux
systemctl stop firewalld   systemctl disable firewalld   centos7版本
service iptables stop      chkconfig iptables off   centos6版本
临时设置setenforce 0      查看getenforce
sed -i "s/SELINUX=enforcing/SELINUX=disabled/" /etc/selinux/config
3、设置主机名和DNS域名解析(FQDN完整域名如linux.lnmp.com,简短域名linux)
hostnamectl --static set-hostname linux
su 或 cat /etc/hostname 查看刚设置的主机名
# cat /etc/hosts
127.0.0.1   localhost localhost.localdomain localhost4 localhost4.localdomain4
::1         localhost localhost.localdomain localhost6 localhost6.localdomain6
10.1.1.10   linux linux.lnmp.com
4、宿主机不通外网,配置本地yum源(可选)
挂载本地光驱/dev/sr0到/mnt,mount /dev/sr0 /mnt
开机自动挂载光盘,echo "mount /dev/sr0 /mnt" >> /etc/rc.local  chmod +x /etc/rc.local
开机启动文件/etc/rc.local是os开机最后读取的一个文件,os启动后会自动执行文件/etc/rc.local
先备份默认源,cd /etc/yum.repos.d    mkdir bak   mv ./* ./bak
centos7版本本地yum源配置,# vim test.repo
[os]
name = os
baseurl = file:///mnt
gpgcheck = 0
yum clean all 清缓存,yum makecache 重新建立缓存,yum repolist all 列出所有repo
7版本在挂载点/mnt就有repodata和Packages目录(repodata引用Packages里面软件包)
8版本要进去挂载点/mnt的AppStream和BaseOS目录里面才有相应的repodata和Packages目录
centos8版本本地yum源配置:/dev/cdrom是/dev/sr0软链接,# mount /dev/cdrom /mnt
# vim test.repo
[os]
name = os
baseurl = file:///mnt/BaseOS
gpgcheck = 0

[app]
name = app
baseurl = file:///mnt/AppStream
gpgcheck = 0
yum clean all 清缓存,yum makecache 重新建立缓存,yum repolist all 列出所有repo

最好使用网络源:
也可以使用网络yum源,如腾讯源,wget -O /etc/yum.repos.d/CentOS-Base.repo http://mirrors.cloud.tencent.com/repo/centos7_base.repo
阿里云的wget -O /etc/yum.repos.d/CentOS-Base.repo https://mirrors.aliyun.com/repo/Centos-7.repo
CentOS-Base.repo是基础网络源,yum clean all && yum makecache
5、网络校时
服务器校时的原因:1因为计划任务要执行,提供准确的时间 2服务器间进行通信时,需要统一的一致时间
centos7版本,yum -y install ntp   systemctl start ntpd   systemctl enable ntpd
CentOS Stream 9版本,yum install chrony -y     systemctl start chronyd
centos6版本,开启ntpd服务 service ntpd start 开机自启ntpd chkconfig ntpd on
ntpd服务启用了会自动联网同步时间的,但需在/etc/ntp.conf中配置有效的NTP服务器
chronyd服务启用了会自动联网同步时间的,但需在/etc/chrony.conf中配置有效的NTP服务器

ntpdate -u  ntp1.aliyun.com    -u 参数来强制 ntpdate 命令使用 UDP 协议与 NTP 服务器进行通信
echo "* */1 * * * root ntpdate -u time.server.com" >> /etc/crontab    每小时同步一次
LNMP = Linux + Nginx + MySQL + PHP(独立软件,占用9000)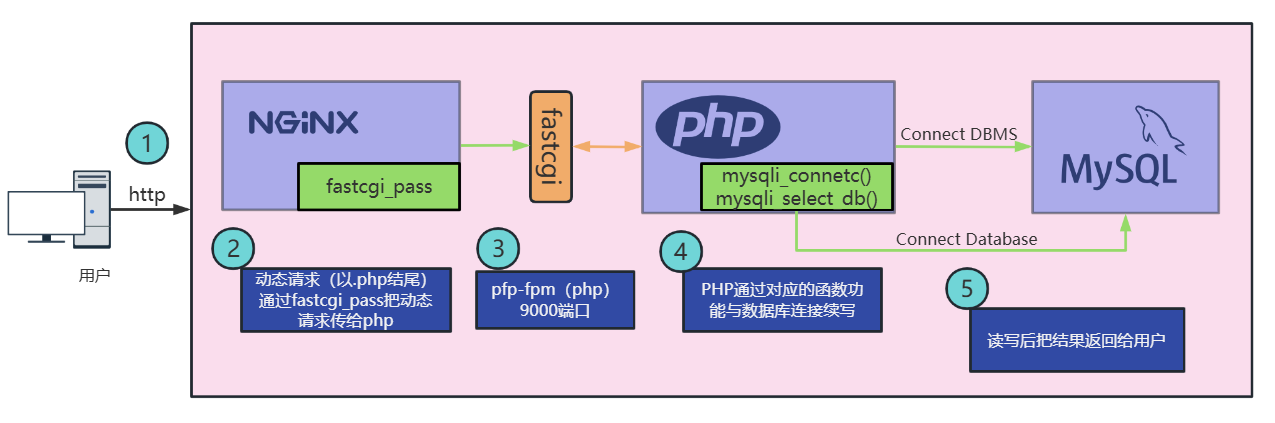
Nginx:接收用户请求,请求处理后返回结果给用户。
注意:Nginx本身只能处理静态文件(.htm/.html、css、javascript),无法处理动态文件(.php、.py、.java),动态文件Nginx会通过反向代理。
PHP程序(底层进程:PHP-FPM):专门用于处理.php动态文件。
MySQL:负责整个项目中数据的存储(用户数据、产品数据、订单数据、发货数据等等)
LNMP架构生产业务环境需要使用源码编译的方式进行安装。
MySQL编译参数和初始化参数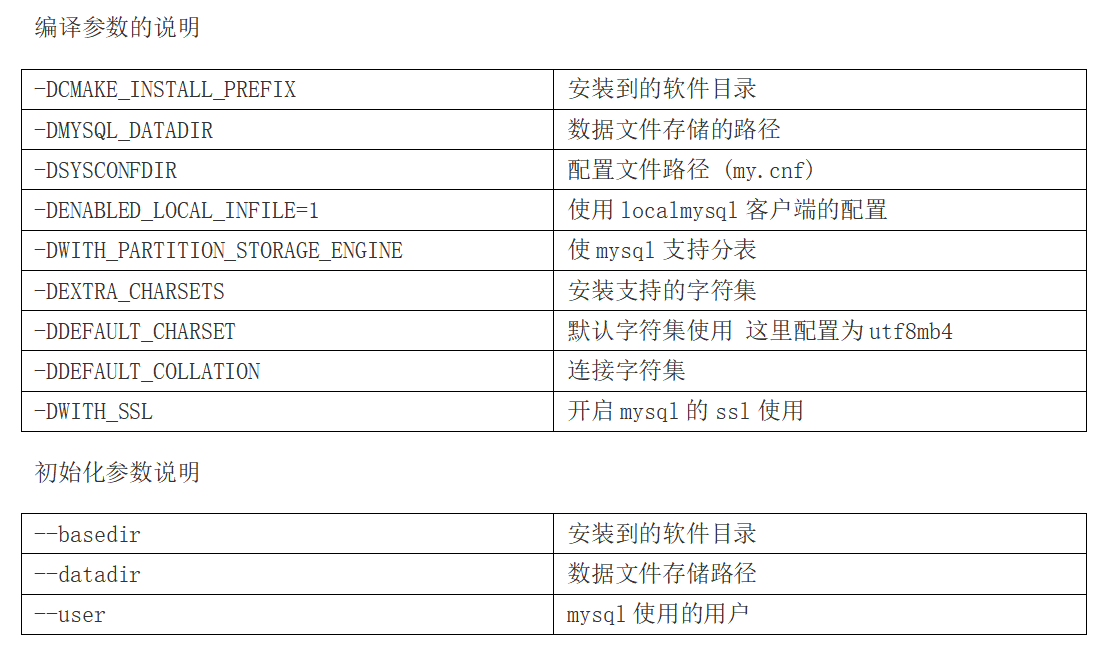
脚本实现MySQL安装及其初始化,vi mysql_install.sh,提前将安装包上传到/root/soft目录
#!/bin/bash
#源码编译安装MySQL,将MySQL安装过程封装成了mysql_install(){}函数
mysql_install() {
#1、创建用户,没有mysql用户就创建mysql用户
`id mysql` &>/dev/null
[ $? -ne 0 ] && useradd -s /sbin/nologin -M mysql
#2、解决依赖
yum install -y cmake
yum install -y ncurses-devel
#3、编译安装
cd /root/soft
tar zxvf mysql-5.6.33.tar.gz
cd mysql-5.6.33
cmake \
-DCMAKE_INSTALL_PREFIX=/usr/local/mysql \
-DMYSQL_DATADIR=/usr/local/mysql/data \
-DSYSCONFDIR=/etc \
-DENABLED_LOCAL_INFILE=1 \
-DWITH_PARTITION_STORAGE_ENGINE=1 \
-DEXTRA_CHARSETS=all \
-DDEFAULT_CHARSET=utf8mb4 \
-DDEFAULT_COLLATION=utf8mb4_general_ci \
-DWITH_SSL=bundled
make && make install
#配置文件
rm -rf /etc/my.cnf
cp /usr/local/mysql/support-files/my-default.cnf /etc/my.cnf
#授权并初始化数据库
chown -R mysql:mysql /usr/local/mysql
/usr/local/mysql/scripts/mysql_install_db --basedir=/usr/local/mysql --datadir=/usr/local/mysql/data --user=mysql
#配置服务、自启动和环境变量
cp /usr/local/mysql/support-files/mysql.server /etc/init.d/mysqld
systemctl  start mysqld
systemctl  enable mysqld
# centos6版本,chkconfig --add mysqld   chkconfig mysqld on  service mysqld start
#删除匿名用户
#设置root域名的密码
rpm -qa|grep expect
if [ $? -ne 0 ];then
   yum -y install expect
fi
#导入环境变量PATH
echo 'PATH=/usr/local/mysql/bin:$PATH' >> /etc/profile
source  /etc/profile
# export PATH=/usr/local/mysql/bin:$PATH
#初始化root密码 删除匿名用户
echo '#!/usr/bin/expect
set timeout 60
spawn mysql_secure_installation
expect {
"enter for none" { send "\r"; exp_continue}
"Y/n" { send "Y\r" ; exp_continue}
"password" { send "123456\r"; exp_continue}
"Cleaning up" { send "\r"}
}
interact ' > mysql_secure_installation.exp
chmod +x mysql_secure_installation.exp
./mysql_secure_installation.exp
}

#脚本开始时间
start_time=`date +%s`
#执行的脚本代码,调mysql_install(){}函数
mysql_install
#脚本结束时间
end_time=`date +%s`
#脚本执行花费时间
const_time=$((end_time-start_time))
echo 'Take time is: '$const_time's'

注意:脚本安装失败可能是yum源不可用导致expect安装失败

[root@linux ~]# mysql -uroot -p
Enter password:
mysql> show databases;
+--------------------+
| Database           |
+--------------------+
| information_schema |
| mysql              |
| performance_schema |
+--------------------+
3 rows in set (0.01 sec)
nginx官网:http://nginx.org/,nginx常见安装方式:
①yum安装配置,需使用Nginx官方源或者EPEL源
②源码编译,编译过程中出现的依赖问题,依赖解决yum -y install pcre-devel zlib-devel openssl-devel
Nginx编译参数说明
脚本实现Nginx安装及其初始化,vi nginx_install.sh,提前将安装包上传到/root/soft目录
#!/bin/bash
#源码编译安装Nginx,将Nginx安装过程封装成了nginx_install(){}函数
nginx_install(){
#创建软件运行用户,没有www用户就创建www用户
`id www` &>> /dev/null
if [ $? -ne 0 ];then
   useradd -s/sbin/nologin -M www
fi
#安装依赖
yum -y install pcre-devel zlib-devel openssl-devel
#编译安装
cd /root/soft
tar zxvf nginx-1.14.2.tar.gz
cd nginx-1.14.2
./configure --prefix=/usr/local/nginx --user=www --group=www --with-http_ssl_module --with-http_stub_status_module --with-http_realip_module && make && make install
}

#脚本开始时间
start_time=`date +%s`
#执行的脚本代码,调nginx_install(){}函数
nginx_install
#脚本结束时间
end_time=`date +%s`
#脚本执行花费时间
const_time=$((end_time-start_time))
echo 'Take time is: '$const_time's'
yum安装nginx
cd /opt
wget http://nginx.org/download/nginx-1.18.0.tar.gz
tar xf nginx-1.18.0.tar.gz
cd nginx-1.18.0
yum -y install gcc pcre-devel zlib-devel openssl openssl-devel
mkdir /apps/nginx -p
./configure --prefix=/apps/nginx
make && make install
添加软连接ln -s /apps/nginx/sbin/nginx /usr/sbin/nginx
启动nginx,/usr/sbin/nginx
测试,[root@centos7 ~]# ps -ef |grep nginx
root 25436 22742 0 12:20 pts/1 00:00:00 grep --color=auto nginx
[root@centos7 ~]# /usr/sbin/nginx
[root@centos7 ~]# ps -ef |grep nginx
root 25438 1 0 12:21 ? 00:00:00 nginx: master process /usr/sbin/nginx
nobody 25439 25438 0 12:21 ? 00:00:00 nginx: worker process
root 25441 22742 0 12:21 pts/1 00:00:00 grep --color=auto nginx
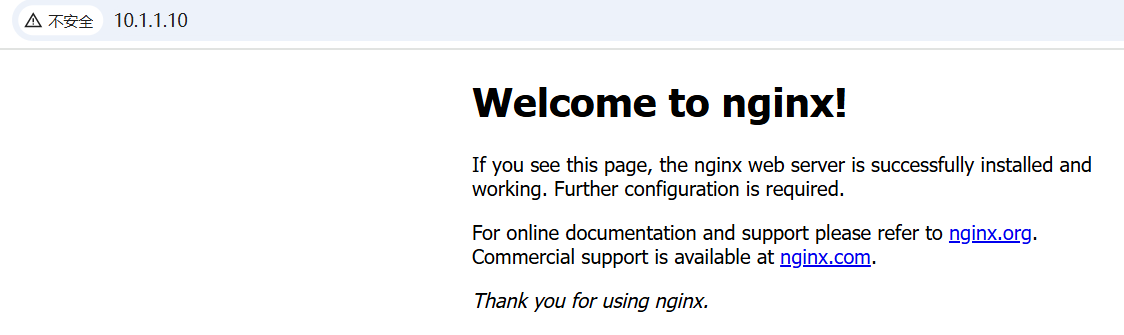
网页测试访问nginx,http://10.1.1.10/
查看安装目录/usr/local/nginx
查看nginx的二进制可执行文件的相关参数
cd /usr/local/nginx/sbin
求帮助,[root@linux sbin]# ./nginx -h
nginx version: nginx/1.14.2
Usage: nginx [-?hvVtTq] [-s signal] [-c filename] [-p prefix] [-g directives]

Options:
#查看帮助
  -?,-h         : this help
#查看版本并退出
  -v            : show version and exit
#查看版本和配置选项并退出
  -V            : show version and configure options then exit
#检测配置文件语法并退出
  -t            : test configuration and exit
#检测配置文件语法打印它并退出
  -T            : test configuration, dump it and exit
#在配置测试期间禁止显示非错误信息
  -q            : suppress non-error messages during configuration testing
#发送信号给主进程  stop强制退出  quit优雅的退出  reopen重开日志   reload重载配置
  -s signal     : send signal to a master process: stop, quit, reopen, reload
#设置nginx目录  $prefix路径
  -p prefix     : set prefix path (default: /usr/local/nginx/)
#指定启动使用的配置文件
  -c filename   : set configuration file (default: conf/nginx.conf)
#在配置文件之外设置全局指令
  -g directives : set global directives out of configuration file
一般主要使用:
-s参数控制管理nginx服务,停止nginx服务[root@linux sbin]# ./nginx -s stop
-V参数查看nginx开启的模块和编译参数
-t参数检测配置文件是否有错误
centos7版本,使用systemctl管理自搭建nginx,编译安装配置文件编写使得可以使用systemctl管理。
systemctl管理服务依靠的是/lib/systemd/system配置文件下有对应服务以.service结尾的文件,yum安装或者rpm安装服务时该文件已经写好了,但是编译安装没有此文件所以需要我们手写才可以通过systemctl来管理服务。
vim /lib/systemd/system/nginx.service
[Unit]
Description=nginx
After=network.target

[Service]
Type=forking
ExecStart=/usr/local/nginx/sbin/nginx -c /usr/local/nginx/conf/nginx.conf
ExecStop=/usr/local/nginx/sbin/nginx -s stop
ExecReload=/usr/local/nginx/sbin/nginx -s reload
PrivateTmp=true

[Install]
WantedBy=multi-user.target
ExecStart:nginx的启动命令
ExecReload:nginx的重载命令
ExecStop:nginx的停止命令
WantedBy=multi-user.target:安装字符界面
重新加载systemctl配置文件,systemctl daemon-reload
systemctl start nginx
systemctl enable nginx
systemctl status nginx
centos6版本,使用service管理自搭建nginx
社区的服务配置文件,文件名是nginx
#!/bin/sh
#
# nginx - this script starts and stops the nginx daemon
#
# chkconfig:   - 85 15
# description:  NGINX is an HTTP(S) server, HTTP(S) reverse \
#               proxy and IMAP/POP3 proxy server
# processname: nginx
# config:      /etc/nginx/nginx.conf
# config:      /etc/sysconfig/nginx
# pidfile:     /var/run/nginx.pid

# Source function library.
. /etc/rc.d/init.d/functions

# Source networking configuration.
. /etc/sysconfig/network

# Check that networking is up.
[ "$NETWORKING" = "no" ] && exit 0

nginx="/usr/local/nginx/sbin/nginx"
prog=$(basename $nginx)

NGINX_CONF_FILE="/usr/local/nginx/conf/nginx.conf"

[ -f /etc/sysconfig/nginx ] && . /etc/sysconfig/nginx

lockfile=/var/lock/subsys/nginx

make_dirs() {
   # make required directories
   user=`$nginx -V 2>&1 | grep "configure arguments:.*--user=" | sed 's/[^*]*--user=\([^ ]*\).*/\1/g' -`
   if [ -n "$user" ]; then
      if [ -z "`grep $user /etc/passwd`" ]; then
         useradd -M -s /bin/nologin $user
      fi
      options=`$nginx -V 2>&1 | grep 'configure arguments:'`
      for opt in $options; do
          if [ `echo $opt | grep '.*-temp-path'` ]; then
              value=`echo $opt | cut -d "=" -f 2`
              if [ ! -d "$value" ]; then
                  # echo "creating" $value
                  mkdir -p $value && chown -R $user $value
              fi
          fi
       done
    fi
}

start() {
    [ -x $nginx ] || exit 5
    [ -f $NGINX_CONF_FILE ] || exit 6
    make_dirs
    echo -n $"Starting $prog: "
    daemon $nginx -c $NGINX_CONF_FILE
    retval=$?
    echo
    [ $retval -eq 0 ] && touch $lockfile
    return $retval
}

stop() {
    echo -n $"Stopping $prog: "
    killproc $prog -QUIT
    retval=$?
    echo
    [ $retval -eq 0 ] && rm -f $lockfile
    return $retval
}

restart() {
    configtest || return $?
    stop
    sleep 1
    start
}

reload() {
    configtest || return $?
    echo -n $"Reloading $prog: "
    killproc $nginx -HUP
    RETVAL=$?
    echo
}

force_reload() {
    restart
}

configtest() {
  $nginx -t -c $NGINX_CONF_FILE
}

rh_status() {
    status $prog
}

rh_status_q() {
    rh_status >/dev/null 2>&1
}

case "$1" in
    start)
        rh_status_q && exit 0
        $1
        ;;
    stop)
        rh_status_q || exit 0
        $1
        ;;
    restart|configtest)
        $1
        ;;
    reload)
        rh_status_q || exit 7
        $1
        ;;
    force-reload)
        force_reload
        ;;
    status)
        rh_status
        ;;
    condrestart|try-restart)
        rh_status_q || exit 0
            ;;
    *)
        echo $"Usage: $0 {start|stop|status|restart|condrestart|try-restart|reload|force-reload|configtest}"
        exit 2
esac
自定义服务脚本,vim /etc/init.d/nginx
#!/bin/bash
#Nginx管理文件位置
EXEC=/usr/local/nginx/sbin/nginx
start(){
   $EXEC
   if [ $? -eq 0 ];then
      echo -e "\033[32m nginx is running \033[0m"
   fi
}

stop(){
  $EXEC -s quit
   if [ $? -eq 0 ];then
      echo -e "\033[31m nginx is not run \033[0m"
   fi
}
status(){    #nginx启用了有/usr/local/nginx/logs/nginx.pid文件
  if [ -f '/usr/local/nginx/logs/nginx.pid' ];then
     echo -e "\033[32m nginx is running \033[0m"
  else
     echo -e "\033[31m nginx is not run \033[0m"
  fi
}
restart(){
  stop
  start
}

reload(){
  $EXEC -s reload
}

configtest(){
  $EXEC -t
}

#调用执行
case "$1" in
   start)
      start;;
   stop)
      stop;;
   restart)
      restart;;
   status)
      status;;
   reload)
      reload;;
   configtest)
      configtest;;
   *)
   echo '请输入这些内容{start|stop|restart|reload|configtest}'
   ;;
esac
1、使用社区的服务配置文件,nginx编译包里默认没有服务启动脚本模板,可以通过社区获得,上传脚本到/etc/init.d目录下
修改软件和配置路径,vim /etc/init.d/nginx
#执行文件路径  第22行
nginx="/usr/local/nginx/sbin/nginx"
#配置文件路径  第25行
NGINIX_CONF_FILE="/usr/local/nginx/conf/nginx.conf"
2、添加自启动
chmod +x /etc/init.d/nginx
chkconfig --add nginx  添加服务
chkconfig --del nginx  删除服务
chkconfig nginx on  添加服务开机自启动
service nginx start   启动nginx服务
service nginx status  查看nginx运行状态

chkconfig  查看服务开启模式(init0-6)的情况  chkconfig |grep nginx
chkconfig --level 35 nginx on  开启服务运行模式3字符5图形模式
3、网页测试访问nginx,http://10.1.1.10/
源码安装php
1、解压进入目录
tar zxf php-7.2.12.tar.gz
cd php-7.2.12
2、编译参数配置
./configure --prefix=/usr/local/php --with-config-file-path=/usr/local/php/etc --enable-fpm --with-fpm-user=www --with-fpm-group=www --with-mysqli=mysqlnd --with-pdo-mysql=mysqlnd --with-iconv-dir --with-freetype-dir --with-jpeg-dir --with-png-dir --with-zlib --with-libxml-dir --enable-xml --disable-rpath --enable-bcmath --enable-shmop --enable-sysvsem --enable-inline-optimization --with-curl --enable-mbregex --enable-mbstring --enable-ftp --with-gd --with-openssl --with-mhash --enable-pcntl --enable-sockets --with-xmlrpc --with-libzip --enable-soap --without-pear --with-gettext --disable-fileinfo --enable-maintainer-zts
--with 代表需要手动开启  可能需要加载第三方模块  第三方模块没有,就会error
--enable 代表开启php的默认功能
--without  关闭默认加载的模块
3、解决软件依赖问题
yum -y install libxml2-devel libjpeg-devel libpng-devel freetype-devel curl-devel openssl-devel
解决完依赖问题再次执行编译参数配置
4、编译并安装到目录
make && make install

查看PHP的安装目录,cd /usr/local/php
使用php-fpm进行管理php服务,有两个配置文件:
php.ini           #默认php配置文件
php-fpm.conf      #php-fpm相关的配置
1、复制配置文件
cp /usr/local/php/etc/php-fpm.conf.default /usr/local/php/etc/php-fpm.conf
cp /usr/local/php/etc/php-fpm.d/www.conf.default /usr/local/php/etc/php-fpm.d/www.conf
cp /root/soft/php-7.2.12/php.ini-development /usr/local/php/etc/php.ini
2、添加启动服务
centos6版本的服务运行脚本init.d.php-fpm,复制到/etc/init.d/php-fpm
cp /root/soft/php-7.2.12/sapi/fpm/init.d.php-fpm /etc/init.d/php-fpm
chmod +x /etc/init.d/php-fpm
chkconfig --add php-fpm
chkconfig php-fpm on
service php-fpm start
centos7版本的服务运行脚本php-fpm.service,复制到/lib/systemd/system/php-fpm.service
cp /root/soft/php-7.2.12/sapi/fpm/php-fpm.service /lib/systemd/system/php-fpm.service
chmod +x /lib/systemd/system/php-fpm.service
systemctl start php-fpm
systemctl enable php-fpm
systemctl status php-fpm
3、添加环境变量(方便php、phpize、phpconfig查找使用)
echo 'PATH=/usr/local/php/bin:$PATH' >> /etc/profile
source /etc/profile
[root@linux ~]# php -v
PHP 7.2.12 (cli) (built: Feb  6 2024 15:00:06) ( ZTS )
Copyright (c) 1997-2018 The PHP Group
Zend Engine v3.2.0, Copyright (c) 1998-2018 Zend Technologies
脚本安装php及其初始化配置,vi php_install.sh,提前将安装包上传到/root/soft目录
#!/bin/bash
php_install(){
#php编译安装
#和nginx使用相同的用户www,如果没有就创建
`id www` &> /dev/null
[ $? -ne 0 ] && useradd -s /sbin/nologin -M www
#解决依赖
yum -y install libxml2-devel libjpeg-devel libpng-devel freetype-devel curl-devel openssl-devel
#解压
cd /root/soft
tar xvf php-7.2.12.tar.gz
cd php-7.2.12
#编译安装php
./configure --prefix=/usr/local/php --with-config-file-path=/usr/local/php/etc --enable-fpm --with-fpm-user=www --with-fpm-group=www --with-mysqli=mysqlnd --with-pdo-mysql=mysqlnd --with-iconv-dir --with-freetype-dir --with-jpeg-dir --with-png-dir --with-zlib --with-libxml-dir --enable-xml --disable-rpath --enable-bcmath --enable-shmop --enable-sysvsem --enable-inline-optimization --with-curl --enable-mbregex --enable-mbstring --enable-ftp --with-gd --with-openssl --with-mhash --enable-pcntl --enable-sockets --with-xmlrpc --with-libzip --enable-soap --without-pear --with-gettext --disable-fileinfo --enable-maintainer-zts && make && make install
#配置文件初始化
cp php.ini-development /usr/local/php/etc/php.ini
#php-fpm服务配置文件
cp /usr/local/php/etc/php-fpm.conf.default /usr/local/php/etc/php-fpm.conf
#php-fpm服务子配置文件
cp /usr/local/php/etc/php-fpm.d/www.conf.default /usr/local/php/etc/php-fpm.d/www.conf
#配置服务及其环境变量
cp /root/soft/php-7.2.12/sapi/fpm/init.d.php-fpm /etc/init.d/php-fpm
chmod +x /etc/init.d/php-fpm
chkconfig --add php-fpm
chkconfig php-fpm on
service php-fpm start
echo 'PATH=/usr/local/php/bin:$PATH' >> /etc/profile
source /etc/profile
}

#脚本开始时间
start_time=`date +%s`
#执行的脚本代码
php_install
#脚本结束时间
end_time=`date +%s`
#脚本执行花费时间
const_time=$((end_time-start_time))
echo 'Take time is: '$const_time's'
Nginx+php-fpm配置
1、编写测试文件
vim /usr/local/nginx/html/index.php
<?php
	phpinfo();
2、在nginx.conf中配置
修改配置文件,告知nginx如果接收到.php结尾的请求,交由给php-fpm进行处理
vim /usr/local/nginx/conf/nginx.conf
打开 location ~ \.php$那段注释,并把/scripts修改为$document_root,$document_root加载的就是root目录

# pass the PHP scripts to FastCGI server listening on 127.0.0.1:9000
        #
        location ~ \.php$ {
            root           html;
            fastcgi_pass   127.0.0.1:9000;
            fastcgi_index  index.php;
            fastcgi_param  SCRIPT_FILENAME  $document_root$fastcgi_script_name;
            include        fastcgi_params;
        }
[root@linux ~]# netstat -ntlp |grep nginx  或者  ss -ntlp |grep nginx
tcp        0      0 0.0.0.0:80              0.0.0.0:*               LISTEN      41338/nginx: master
[root@linux ~]# netstat -ntlp |grep php
tcp        0      0 127.0.0.1:9000          0.0.0.0:*               LISTEN      47944/php-fpm: mast
2、Nginx使用
平滑升级Nginx
Kill命令传输信号给Nginx的主进程,下面这几个信息命令都是发送给nginx的master主进程的pid
TERM, INT(快速退出,当前的请求不执行完成就退出) -s stop
QUIT (优雅退出,执行完当前的请求后退出)  -s quit
HUP (重新加载配置文件,用新的配置文件启动新worker进程,并优雅的关闭旧的worker进程) -s reload
USR1 (重新打开日志文件)  -s reopen
USR2 (平滑的升级nginx二进制文件  拉起一个新的主进程master  旧主进程不停止)
WINCH (优雅的关闭worker子进程)
以上几个信息命令都是发送给master主进程的

Kill 选项参数  pid      nginx的master主进程的pid
kill -INT pid          快速关闭
kill -QUIT pid         优雅关闭
重新安装Nginx
1停止掉服务,删除编译的安装的软件包和源码包
2重新解压编译安装即可,有需要就备份配置文件和网站目录里的资源文件

平滑升级Nginx
升级软件版本之后,需要启动新的版本,启动不了,端口已经被旧版本占用。
如果直接把旧版本的服务停止掉,会影响线上业务的使用。
最佳解决办法:
1旧的不先停掉
2新的又可以起来
3旧的和新的同时提供服务,旧的请求完成之后,就停掉旧进程
tar xvf nginx-1.16.0.tar.gz
cd nginx-1.16.0
./configure --prefix=/usr/local/nginx --user=www --group=www --with-http_ssl_module --with-http_stub_status_module --with-http_realip_module
make && make install
升级新版本,需要把软件的安装路径,指定到旧版本安装路径上。
以上操作完成之后,会把原来的旧版本备份为nginx.old(/usr/local/nginx/sbin/nginx.old)
[root@linux sbin]# ls /usr/local/nginx/sbin/
nginx  nginx.old
[root@linux sbin]# ./nginx    新版本起不来,旧版本占用了80端口
nginx: [emerg] bind() to 0.0.0.0:80 failed (98: Address already in use)
nginx: [emerg] bind() to 0.0.0.0:80 failed (98: Address already in use)
[root@linux sbin]# ./nginx -v        查看新版本
nginx version: nginx/1.16.0
[root@linux sbin]# ./nginx.old -v    查看旧版本
nginx version: nginx/1.14.2
[root@linux sbin]# ps -aux |grep nginx
root      37209  0.0  0.0  45956  1148 ?        Ss   22:38   0:00 nginx: master process /usr/local/nginx/sbin/nginx -c /usr/local/nginx/conf/nginx.conf
www       37210  0.0  0.0  46412  1924 ?        S    22:38   0:00 nginx: worker process
root      39974  0.0  0.0 112708   972 pts/0    S+   22:59   0:00 grep --color=auto nginx
[root@linux sbin]# cat /usr/local/nginx/logs/nginx.pid
37209
新旧版本同时运行,kill -USR2 主进程号
[root@linux sbin]# kill -USR2 37209
[root@linux sbin]# ps -ef |grep nginx
root      37209  0.0  0.0  45956  1332 ?        Ss   22:38   0:00 nginx: master process /usr/local/nginx/sbin/nginx -c /usr/local/nginx/conf/nginx.conf
www       37210  0.0  0.0  46412  1924 ?        S    22:38   0:00 nginx: worker process
root      40001  0.0  0.0  45980  3388 ?        S    23:01   0:00 nginx: master process /usr/local/nginx/sbin/nginx -c /usr/local/nginx/conf/nginx.conf
www       40002  0.0  0.0  46444  1924 ?        S    23:01   0:00 nginx: worker process
root      40004  0.0  0.0 112708   976 pts/0    S+   23:01   0:00 grep --color=auto nginx
旧的和新的同时提供服务,旧的请求完成之后,就停掉旧进程
kill -USR2 旧的主进程号   平滑启动一个新主进程(平滑升级)
kill -WINCH 旧的主进程号  优雅关闭旧子进程
kill -QUIT 旧的主进程号   优雅关闭旧主进程
也可以直接 kill -USR2 旧的主进程号 再kill -QUIT 旧的主进程号
在nginx中,默认提供了平滑升级的操作,只需要执行以下命令
在nginx源码包先执行./configure
make install && make upgrade   或者 make && make install && make upgrade
原理是执行这个文件/root/soft/nginx-1.16.0/Makefile里面upgrade内容包含kill命令
Nginx配置文件/usr/local/nginx/conf/nginx.conf,http=>server=>location 递进关系
#nginx子进程启动用户
#user  nobody;
#子进程数量  一般调整为cpu核数或者倍数
worker_processes  1;
#错误日志定义
#error_log  logs/error.log;
#error_log  logs/error.log  notice;
#error_log  logs/error.log  info;

#进程pid 存储文件
#pid        logs/nginx.pid;

#事件
events {
    #每个子进程的连接数      nginx当前并发量  worker_processes * worker_connections
    worker_connections  1024;
}

#http协议段
http {
    #引入  文件扩展名和与文件类型映射表
    include       mime.types;
    #默认文件类型
    default_type  application/octet-stream;
    #访问日志access.log的格式
    #log_format  main  '$remote_addr - $remote_user [$time_local] "$request" '
    #                  '$status $body_bytes_sent "$http_referer" '
    #                  '"$http_user_agent" "$http_x_forwarded_for"';
    #访问日志存储路径
    #access_log  logs/access.log  main;
    #linux内核  提供文件读写的机制
    sendfile        on;
    #tcp_nopush     on;

    #keepalive_timeout  0;
    #长连接超时时间  单位为s
    keepalive_timeout  65;
    #gzip压缩
    #gzip  on;
    #server虚拟主机的配置
    server {
        #监听端口
        listen       80;
        #域名  可以有多个 用空格分隔
        server_name  localhost;
        #默认编码
        #charset koi8-r;

        #access_log  logs/host.access.log  main;
        #location 用来匹配url
        location / {
            #默认访问的网站路径
            root   html;
            #默认访问页面 从前往后的顺序查找
            index  index.html index.htm;
        }

        #error_page  404              /404.html;

        # redirect server error pages to the static page /50x.html
        #
        error_page   500 502 503 504  /50x.html;
        location = /50x.html {
            root   html;
        }

        # proxy the PHP scripts to Apache listening on 127.0.0.1:80
        #
        #location ~ \.php$ {
        #    proxy_pass   http://127.0.0.1;
        #}

        # pass the PHP scripts to FastCGI server listening on 127.0.0.1:9000
        #
        #location ~ \.php$ {
        #    root           html;
        #    fastcgi_pass   127.0.0.1:9000;
        #    fastcgi_index  index.php;
        #    fastcgi_param  SCRIPT_FILENAME  /scripts$fastcgi_script_name;
        #    include        fastcgi_params;
        #}

        # deny access to .htaccess files, if Apache's document root
        # concurs with nginx's one
        #
        #location ~ /\.ht {
        #    deny  all;
        #}
    }


    # another virtual host using mix of IP-, name-, and port-based configuration
    #
    #server {
    #    listen       8000;
    #    listen       somename:8080;
    #    server_name  somename  alias  another.alias;

    #    location / {
    #        root   html;
    #        index  index.html index.htm;
    #    }
    #}


    # HTTPS server
    #
    #server {
    #    listen       443 ssl;
    #    server_name  localhost;

    #    ssl_certificate      cert.pem;
    #    ssl_certificate_key  cert.key;

    #    ssl_session_cache    shared:SSL:1m;
    #    ssl_session_timeout  5m;

    #    ssl_ciphers  HIGH:!aNULL:!MD5;
    #    ssl_prefer_server_ciphers  on;

    #    location / {
    #        root   html;
    #        index  index.html index.htm;
    #    }
    #}

}
server虚拟主机配置
在实际生产业务环境中,一台web服务器,需要使用多个网站部署。搭建server虚拟主机实现不同域名,解析绑定到不同的目录。
一般server虚拟主机配置有三类:
①基于域名,将域名配置到server_name上
②基于IP,将IP配置到server_name上
③基于端口,将端口配置到listen
基于域名的虚拟主机
1、建立网站访问目录
cd /usr/local/nginx/html
mkdir mpp
cd mpp
创建测试文件
echo "www.mpp123.com" >> index.html
echo "php" >> index.php
2、解析域名并绑定
当前客户端是通过windows的浏览器,需要在win下的hosts文件(C:\Windows\System32\drivers\etc\hosts)进行解析域名
3、nginx配置文件绑定域名
server {
      #监听端口
      listen 80;
      #绑定域名
      server_name www.mpp123.com;
      #网站目录
      root html/mpp;
      #默认访问页面
      index index.html;
      #这段是解析php文件的
      location ~ \.php$ {
        fastcgi_pass   127.0.0.1:9000;
        fastcgi_index  index.php;
        fastcgi_param  SCRIPT_FILENAME  $document_root$fastcgi_script_name;
        include        fastcgi_params;
    }
 }
基于端口的虚拟主机,修改listen配置
server {
      #监听端口
      listen 800;
      #绑定域名
      server_name www.mpp123.com;
      #网站目录
      root html/mpp;
      #默认访问页面
      index index.html;
      #这段是解析php文件的
      location ~ \.php$ {
        fastcgi_pass   127.0.0.1:9000;
        fastcgi_index  index.php;
        fastcgi_param  SCRIPT_FILENAME  $document_root$fastcgi_script_name;
        include        fastcgi_params;
    }
 }
基于IP的虚拟主机
1、添加IP
ifconfig ens33:1 10.1.1.20     临时绑定IP
ip a    查看IP是否绑定成功
2、nginx配置文件添加
server {
    listen 80;
    server_name 10.1.1.20;
    root html/ip;
}
3、建立一个IP测试目录
cd /usr/local/nginx/html
mkdir ip
cd ip
echo "ip" >> index.html
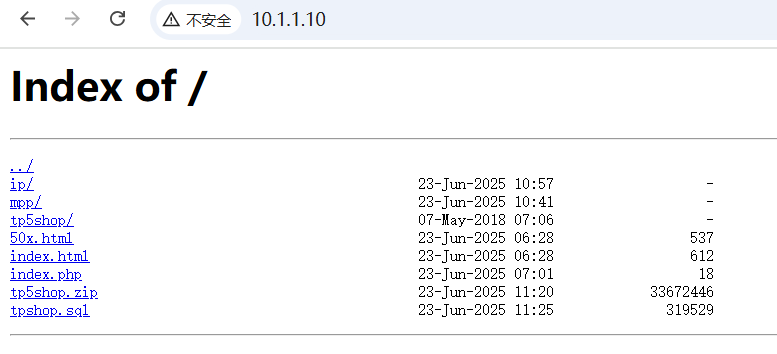
案例:上线商城项目
1、上传项目文件到服务器,把项目压缩包解压
cd /usr/local/nginx/html
unzip tp5shop.zip
2、配置server虚拟机,客户端配置host解析
编辑配置文件,vim /usr/local/nginx/conf/nginx.conf
#在配置文件中配置server虚拟主机段
 server {
        listen 80;
        server_name www.mpp123.com;
        #tp5shop商城项目基于thinkphp5框架开发,需要绑定默认网站目录为public
        root html/tp5shop/public;
        index index.php index.html;
        location ~ \.php$ {
        #    root           html;
            fastcgi_pass   127.0.0.1:9000;
            fastcgi_index  index.php;
            fastcgi_param  SCRIPT_FILENAME  $document_root$fastcgi_script_name;
            include        fastcgi_params;
        }
}
解析域名进行访问,如果是在windows下,就在c:\Windows\System32\drivers\etc\hosts解析
3、创建数据库,导入数据迁移文件
#创建数据库
mysql > create database tp5shop;
#使用数据库
mysql > use tp5shop;
#通过sql文件导入恢复数据
mysql > source /usr/local/nginx/html/tpshop.sql
4、配置项目连接数据库,修改项目的连接数据库配置文件
 vim /usr/local/nginx/html/tp5shop/application/database.php
 需要修改的内容说明
//注意主要连接地址、数据库名称、用户名称、用户密码、连接端口号等参数
//hostname,database,username,password,hostport等参数,根据实际请求修改即可
return [
    // 数据库类型
    'type'            => 'mysql',
    // 服务器地址
    'hostname'        => '127.0.0.1',
    // 数据库名
    'database'        => 'tp5shop',
    // 用户名
    'username'        => 'root',
    // 密码
    'password'        => '123456',
    // 端口
    'hostport'        => '3306',
测试访问,http://www.mpp123.com/
遇到问题:项目需要在runtime文件夹中写入缓存信息(需要写权限)
分析:
①nginx 读取静态文件   用户www
②php-fpm  读取、写入、解析php文件  用户www
应该把runtime目录的所属关系赋予www
cd /usr/local/nginx/html/tp5shop
chown -R www:www ./runtime
默认官方模块
Gzip压缩
压缩文件,使文件变小,传输更快了。目前市场上大部分浏览器是支持GZIP的。IE6以下支持不好,会出现乱码情况。官方文档:http://nginx.org/en/docs/http/ngx_http_gzip_module.html
#配置到http段里,使整个http服务都启用gzip压缩
#开启gzip压缩
gzip on;
#http协议版本
gzip_http_version 1.0;
#IE浏览器不开启gzip  IE6以下会乱码
gzip_disable 'MSIE [1-6].';
#开启gzip 文件的格式
gzip_types image/jpeg image/jpg image/png text/plain text/css;
验证文件是否开启gzip
客户端缓存
B/S架构里 browser浏览器 就是客户端,告知浏览器获取的信息是在某个区间时间段是有效的。官方文档:http://nginx.org/en/docs/http/ngx_http_headers_module.html#expires
# 配置到server段里面
location ~ \.(js|css)$ {
    #单位参数 d day 天|h hour 小时
    expires 1h;
}

#在整个http中生效  配置到http段里
expires 1h;


基于IP的访问控制
基于ngx_http_access_module模块,默认可使用。官方文档:http://nginx.org/en/docs/http/ngx_http_access_module.html
写在server段里,作用范围是某个应用,写在http段里,作用范围是整个服务
deny ip   禁止ip访问
allow ip  允许ip访问
基于用户的访问控制
基于ngx_http_auth_basic_module模块,默认可用。官方文档:http://nginx.org/en/docs/http/ngx_http_auth_basic_module.html
auth_basic "提示信息";
auth_basic_user_file  /etc/nginx/htpasswd;
1、创建用户名和密码存储文件
cd /usr/local/nginx/conf
#htpasswd 如果不存在就通过  yum -y install httpd-tools安装
#生成用户名mpp的密码文件passwd.db
htpasswd -c ./passwd.db mpp
#输入密码并再次确认密码
#查看passwd.db文件是否创建成功 cat passwd.db
2、在配置文件中进行配置,vim /usr/local/nginx/conf/nginx.conf
#根据业务需求,配置到server段里
#登录框显示的标题提示
auth_basic "test login";
#加载用户名称和密码校验文件
auth_basic_user_file  /usr/local/nginx/conf/passwd.db;
目录列表显示
显示文件列表,或者需要做一个下载列表。官方文档:http://nginx.org/en/docs/http/ngx_http_autoindex_module.html#autoindex
#开启目录列表显示
#根据业务需求,配置到server段里
autoindex on;
#index  当aa默认找不到时,才会使用目录列表
index aa;

/usr/local/nginx/conf/nginx.conf中server部分示例配置:
server {
        listen       80;
        server_name  localhost;
        autoindex on;
        root   html;
        index  aa;
首页(欢迎页)会加载html目录下的aa文件,没有找到aa文件才会显示/usr/local/nginx/html目录列表
注意:如果目录中没有配置的默认index访问项如aa文件,而autoindex又没有开启,不能够查看访问目录列表,就会报出403错误。
反向代理
正向代理,用户知道自己使用了代理,需要填写代理服务器的IP等相关连接信息,常见于代理客户端浏览器上网等操作。
反向代理,用户是无感知的,不知道使用了代理服务器。反向代理服务器是和真实访问的服务器是在一起的,有关联的。作用:可以根据实际业务需求,分发代理页面到不同的解释器。可以隐藏真实服务器的路径,常见于代理后端服务器。官方文档:http://nginx.org/en/docs/http/ngx_http_proxy_module.html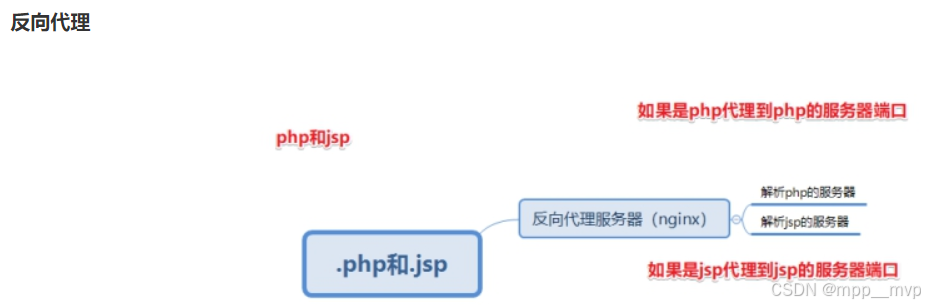
配置反向代理LNMPA
1、安装httpd,需改端口8080
#安装apache
yum install -y httpd
#修改apache的配置文件
vim /etc/httpd/conf/httpd.conf
修改配置项
listen 8080
2、配置nginx的server并进行转发
location / {
    proxy_pass http://127.0.0.1:8080;
    # proxy_pass https://www.baidu.com;代理到百度测试
}
日志管理
日志类型:
①access.log 访问日志 查看统计用户的访问信息 流量
②error.log 错误日志 错误信息 重写信息
访问日志,官方文档:http://nginx.org/en/docs/http/ngx_http_log_module.html
1、查看access.log,访问日志,可以统计分析用户的流量的相关情况。客情分析。
cd /usr/local/nginx/logs
cat access.log
access.log日志文件内容示例
10.1.1.1 - - [13/Feb/2024:12:32:19 +0800] "GET / HTTP/1.1" 304 0 "-" "Mozilla/5.0 (Windows NT 10.0; Win64; x64) AppleWebKit/537.36 (KHTML, like Gecko) Chrome/121.0.0.0 Safari/537.36"
2、查看配置解析参数说明
vim /usr/local/nginx/conf/nginx.conf   查看访问日志相关参数
#定义日志格式  格式命名    详细格式参数
#log_format  main  '$remote_addr - $remote_user [$time_local] "$request" '
#                  '$status $body_bytes_sent "$http_referer" '
#                  '"$http_user_agent" "$http_x_forwarded_for"';
#开启访问日志  访问日志的存储路径配置  调用的日志格式
#access_log  logs/access.log  main;

错误日志,记录一些启动和运行过程中的错误信息。官方文档:http://nginx.org/en/docs/ngx_core_module.html#error_log
# 定义开启错误日志  日志位置    日志级别
#error_log  logs/error.log;
#error_log  logs/error.log  notice;
#error_log  logs/error.log  info;
cat /usr/local/nginx/logs/error.log
格式示例:
2024/02/15 15:16:38 [error] 10349#0: *8 open() "/usr/local/nginx/html/ip/favicon.ico" failed (2: No such file or directory), client: 10.1.1.1, server: 10.1.1.20, request: "GET /favicon.ico HTTP/1.1", host: "10.1.1.10", referrer: "http://10.1.1.10/"
基于域名日志分割
1、开启日志的定义规则
#定义日志格式  定义http段里
log_format  mylogs  '$remote_addr - $remote_user [$time_local] "$request" '
                      '$status $body_bytes_sent "$http_referer" '
                      '"$http_user_agent" "$http_x_forwarded_for"';
2、重启nginx测试查看
#在server段里面配置  也就是在当前server里的访问日志,会被写入定义的这里
#开启访问日志   访问日志的存储路径配置        调用的日志格式(上面配置的mylogs)
access_log  logs/www.mpp123.com_access.log  mylogs;
日志切割的方式有很多种:
①基于域名分开存储
②日志轮转,根据时间段分开存储
③自定义脚本,定时检测大小,根据文件大小进行切割
第三方模块使用
Nginx官方没有的功能,开源开发者定制开发一些功能,把代码公布出来,可以通过编译加载第三方模块的方式,使用新的功能。第三方模块网址:https://www.nginx.com/resources/wiki/modules
编译安装Nginx的第三方模块
上传第三方模块压缩包
[root@linux soft]# tar -xvf ngx-fancyindex-0.4.3.tar.gz
[root@linux soft]# tar xvf echo-nginx-module-0.61.tar.gz
[root@linux soft]# cd /root/soft/nginx-1.16.0
重新编译要带上之前的配置,查看之前编译的配置
[root@linux nginx-1.16.0]# /usr/local/nginx/sbin/nginx -V
求帮助,编译时添加安装第三方模块并带上之前编译的配置
[root@linux nginx-1.16.0]# ./configure --help |grep add
[root@linux nginx-1.16.0]# ./configure  --prefix=/usr/local/nginx --user=www --group=www --with-http_ssl_module --with-http_stub_status_module --with-http_realip_module --add-module=/root/soft/ngx-fancyindex-0.4.3/ --add-module=/root/soft/echo-nginx-module-0.61
编译安装并升级,[root@linux nginx-1.16.0]# make && make install && make upgrade
fancy-index模块有列表显示功能
fancy-index模块有列表显示功能,https://www.nginx.com/resources/wiki/modules/fancy_index/
查看确认编译模块参数,确认是否包含ngx-fancyindex模块,/usr/local/nginx/sbin/nginx -V
#可以配置到http、server、location等下。推荐配置到server下
#开启fancyindex列表显示功能
fancyindex on;
#显示更为可读的文件大小
fancyindex_exact_size off;
/usr/local/nginx/conf/nginx.conf中server部分示例配置:
server {
        listen       80;
        server_name  localhost;
        fancyindex on;
        fancyindex_exact_size off;
        root   html;
        index  aa;
首页(欢迎页)会加载html目录下的aa文件,没有找到aa文件才会显示/usr/local/nginx/html目录列表
fancy-index模块美化列表效果
echo模块常用来进行调试使用
echo模块常用来进行调试使用,比如输出打印Nginx默认系统变量
/usr/local/nginx/conf/nginx.conf中server部分示例配置:
server {
        listen       80;
        server_name  localhost;
        root   html/mpp;
        index  aa;
    location / {
        #输出为文本类型
        default_type text/plain;
        #default_type text/html; 输出为html类型
        #打印输出查看变量信息,打印出server中定义的root变量,root html/mpp;
        echo $document_root;
            }

Nginx发行版本
Nginx社区免费版,https://nginx.org/ ,NGINX+商业版,https://www.nginx.com/,
淘宝的tengine,http://tengine.taobao.org/,openresty ,http://openresty.org/cn/
tengine是alibaba公司,在Nginx的基础上,开发定制,更加服务自己业务的服务器软件。后来进行了开源。
#解压编译安装
shell > tar xvf tengine-2.3.0.tar.gz
shell > cd tengine-2.3.0
#tengine从2.3.0版本之后,tengine的模块被分离到modules,需要自己手动编译安装
shell > ./configure --prefix=/usr/local/tengine --add-module=/root/soft/tengine-2.3.0/modules/ngx_http_footer_filter_module
shell > make && make install
#查看默认加载的模块和参数信息
shell > /usr/local/tengine/sbin/nginx -V
#tengine 默认提供-m参数  查看已经编译加载的模块
案例:通过tengine内置模块 自动添加页脚信息 标识服务器信息
使用ngx_http_footer_filter_module包含的语法,注意确认是否已经加载此模块
①修改配置文件并重载服务
shell > vim /usr/local/tengine/conf/nginx.conf
语法规则:
#可定义在http、server、location中,建议在server中
#定义需要插入footer的响应类型(Response Content-Type)。
footer_types "text/plain" "text/css" "application/x-javascript";
#在上面定义的HTTP响应的正文结尾插入指定的format内容。如果format中含有变量,会被替换为变量当前的值。
footer "$host_comment";
示例配置:
server {
  listen 80;
  server_name localhost;
  root html;
  #开启加载注释页脚信息
  footer_types "text/plain" "text/css" "application/x-javascript";
  footer "$host_comment";
}
②访问页面查看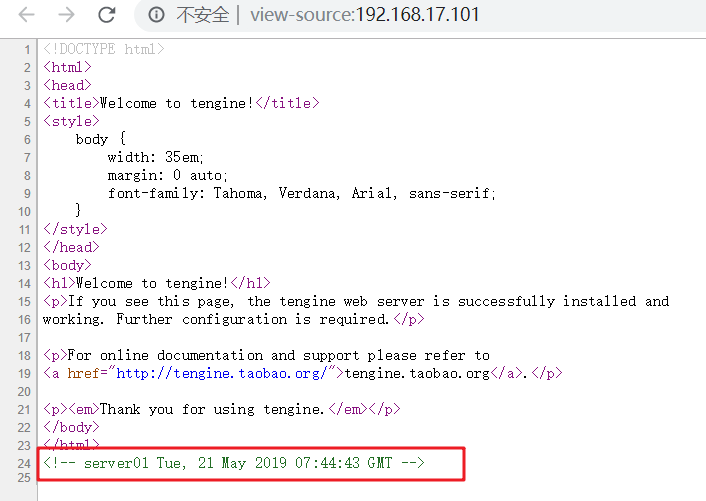
openresty 在Nginx的基础上,结合lua脚本实现高并发的web平台。WAF nginx+lua+redis 实现应用型防火墙 动态把IP加入黑名单。官方网址:http://openresty.org/cn/
编译安装步骤:
#解压编译并安装
shell > tar xvf openresty-1.15.8.1.tar.gz
shell > cd openresty-1.15.8.1
shell > ./configure --prefix=/usr/local/openresty
shell > make && make install
#查看默认编译参数及其模块
shell > /usr/local/openresty/sbin/openresty -V
案例:使用lua模块语法
①修改配置文件
shell > vim /usr/local/openresty/nginx/conf/nginx.conf
示例配置:
location / {
    root html;
    index index.html index.htm;
    #默认返回类型
    default_type text/html;
    #调用lua模块的语法
    content_by_lua 'ngx.say("hello openresty")';
}
②访问页面查看
URL匹配之location
Location 配置语法,http://nginx.org/en/docs/http/ngx_http_core_module.html#location
1、location匹配规则
① = 精确匹配
location = / {
    #规则
}
则匹配到 http://www.example.com/ 这种请求
② ~ 大小写敏感,区分大小写
location ~ /Example/ {
    #规则
}
请求示例
http://www.example.com/Example/  [成功]
http://www.example.com/example/  [失败]
③ ~* 大小写忽略
location ~* /Example/ {
    #规则
}
请求示例
http://www.example.com/Example/  [成功]
http://www.example.com/example/  [成功]
④ ^~ 只匹配以 url 开头
location ^~ /img/ {
    #规则
}
请求示例
以 /img/ 开头的请求,都会匹配上
http://www.example.com/img/a.jpg   [成功]
http://www.example.com/img/b.mp4 [成功]
http://www.example.com/bimg/b.mp4 [失败]
http://www.example.com/Img/b.mp4 [失败]
⑤ / 其他匹配都不成功 就匹配此项
location / {
   #规则
}
如果路径是资源文件是存在的,会优先获取资源文件
location匹配优先级
(location =) > (location 完整路径) > (location ^~ 路径) > (location ,* 正则顺序) > (location 部分起始路径) > (/)
2、location匹配跳转
location /img/ {
    #如果状态码是404  就指定404的页面
    error_page 404 = @img_err;
}

location @img_err {
    # 规则
    return  503;
}

以 /img/ 开头的请求,如果链接的状态为 404。则会匹配到 @img_err 这条规则上
URL重写
ngx_http_rewrite_module模块用于使用PCRE正则表达式更改请求URL,返回重定向,以及有条件地选择配置,官方文档地址:http://nginx.org/en/docs/http/ngx_http_rewrite_module.html
1、return
该指令用于结束规则的执行并返回状态码给客户端。请求状态码:https://developer.mozilla.org/zh-CN/docs/Web/HTTP/Status
示例语法:
#可以匹配到server location if中,推荐配置到location中
return 403;
403 Forbidden.服务器已经理解请求,但是拒绝执行它
404 Not Found.请求失败,请求所希望得到的资源未在服务器上发现.404这个状态码被⼴泛应⽤于当服务器不想揭示为何请求被拒绝,或者没有其他适合的响应可⽤的情况下.
500 Internal Server Error.服务器遇到⼀个未曾预料的状况,导致它无法完成对请求的处理.⼀般来说,这个问题都会在服务器的程序码出错时出现.
502 Bad Gateway.作为网关或代理工作的服务器尝试执行请求时,从上游服务器接收到无效的响应.
503 Service Unavailable.由于临时的服务器维护或过载,服务器当前无法处理请求.这个状况是临时的,并且将在一段时间以后恢复.503状态码的存在并不意味着服务器在过载的时候必须使⽤它.某些服务器只不过是希望拒绝客户端的连接.
504 Gateway Timeout作为网关或代理工作的服务器尝试执行请求时,未能及时从上游服务器(URI标识出的服务器,例如HTTP,FTP,LDAP)或辅助服务器(例如DNS)收到响应。
2、rewrite
rewrite 匹配到请求URL,重写到新的URL,官方文档地址:http://nginx.org/en/docs/http/ngx_http_rewrite_module.html#rewrite
rewrite语法 匹配到,替换为其他内容
匹配顺序:多条rewrite,从上到下匹配,匹配到之后就不在匹配其他rewrite规则。
语法:  rewrite 匹配内容 替代内容  标记
flag标记说明:
last  #本条规则匹配完成后,继续向下匹配新的location URL规则,客户端URL地址不会发生跳转
break  #本条规则匹配完成即终止,不再匹配后面的任何规则,客户端URL地址不会发生跳转
redirect  #返回302临时重定向,浏览器地址会显示跳转后的URL地址
permanent  #返回301永久重定向,浏览器地址栏会显示跳转后的URL地址
URL相关案例实现
1、案例:资源重定向实现
业务需求描述:
实际业务不存在index.html,需要重写访问index.php
URL为index.html,而实际访问的是index.php,对外被认为是html静态页面
以上方案就是seo优化伪静态的使用,把真实的后端的页面,伪装为静态html页面。
修改配置,shell > vim /usr/local/nginx/conf/nginx.conf
                location / {
                  rewrite /index.html /index.php last;
                }
重载配置测试访问
2、案例:域名重定向实现
网站的域名升级了,需要启用新的域名使用。
但是用户却不知道,还可能使用旧的域名访问网站。
需要把通过旧域名访问的来源,重定向到新的域名。
把shop.lnmp.com的请求全部重定向到新域名www.shop.com
rewrite / http://www.shop.com permanent;
示例配置:
#shop.lnmp.com的请求全部重定向到www.shop.com中
server {
               listen 80;
               server_name shop.lnmp.com;
               rewrite / http://www.shop.com permanent;
        }
        server {
                listen 80;
                #绑定新域名即可
                server_name www.shop.com;
                root html/tp5shop/public;
                index index.php index.html;
                #deny 192.168.17.1;
                #auth_basic "shop login";
                #auth_basic_user_file  /usr/local/nginx/conf/passwd.db;
                #access_log  logs/shop.lnmp.com_access.log  mylogs;
                location / {
                  rewrite /index.html /index.php last;
                }
                location ~ \.php$ {
                        fastcgi_pass   127.0.0.1:9000;
                        fastcgi_index  index.php;
                        fastcgi_param  SCRIPT_FILENAME  $document_root$fastcgi_script_name;
                        include        fastcgi_params;
                }
                #location ~ \.(js|css) {
                #     expires 2h;
                #}
        }
注意新域名www.shop.com 记得在客户端的hosts文件中解析。
3、案例:防盗链原理和实现
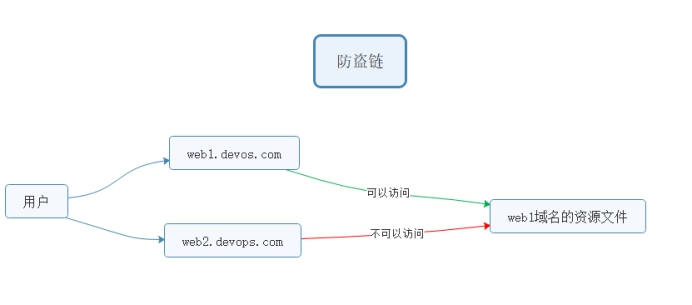
业务需求描述:
域名A的资源文件,经常被域名B直接调用访问。
而用户经常访问域名B,看到的资源(图片等)以为是域名B的,实际则是域名A的。
但是域名A没有从中获得任何收益,却要给域名B来源的访问耗费服务器资源和带宽。
所以,禁止域名B直接访问和调用域名A的资源的方式,就被称为"防止盗链"
语法:
定义允许访问的域名来源
valid_referers none blocked servername
none blocked  没有referer的情况,直接访问资源的情况
if ($invalid_referer) {}
1、在ip的虚拟主机,静态文件调用图片
2、shop的虚拟主机,禁止ip的虚拟主机调用图片
1、ip虚拟主机目录建立静态文件访问shop虚拟主机的图片资源
shell > cd /usr/local/nginx/html
shell > echo '<img src="http://www.shop.com/static/home/img/2.jpg" />' >> img.html
2、在shop虚拟主机配置中,防止其他虚拟机主机盗链
#定义在server里  shop的server
#图片请求防盗链
location ~* \.(jpg|png|jpeg|gif|bmp) {
    valid_referers www.shop.com;
	if ($invalid_referer) {
  	    return 404;
	}
}
安全
1、反向代理
实现隐藏真实服务的操作,起到一定安全作用
2、隐藏版本号
Nginx对外提供服务,为了避免被针对某个版本的漏洞进行攻击。经常做法是隐藏掉软件的版本信息。提供一定的安全性。
#将以下配置加入到http段配置中
server_tokens off
3、Https和CA
   server {
        listen       443 ssl;
        #绑定好域名
        server_name  web1.heimadevops.top;
        #指定证书相关位置
        ssl_certificate      /usr/local/nginx/conf/1_web1.heimadevops.top_bundle.crt;
        ssl_certificate_key  /usr/local/nginx/conf/2_web1.heimadevops.top.key;

        ssl_session_cache    shared:SSL:1m;
        ssl_session_timeout  5m;

        ssl_ciphers  HIGH:!aNULL:!MD5;
        ssl_prefer_server_ciphers  on;

        location / {
            root   html;
            index  index.html index.htm;
        }
    }
#http跳转到https
server {
    listen 80;
    server_name web1.heimadevops.top;
    rewrite / https://web1.heimadevops.top permanent;
}

客户端注意解析域名
Nginx支持pathinfo路径 重写方式
http://www.shop.com/home/goods/index/cate_id/187.html  默认不支持访问
重写成为 http://www.shop.com/index.php?s=home/goods/index/cate_id/187.html
语法规则示例:
location / {
   rewrite /index.html /index.php last;
   #判断请求的路径 不存在
   if (!-e $request_filename) {
      # 捕获到所有路径信息   重写为index.php的s参数   last需要匹配之后的location规则
      rewrite ^(.*)$   /index.php?s=$1 last;
   }
}
3、企业架构双点服务器HA高可用
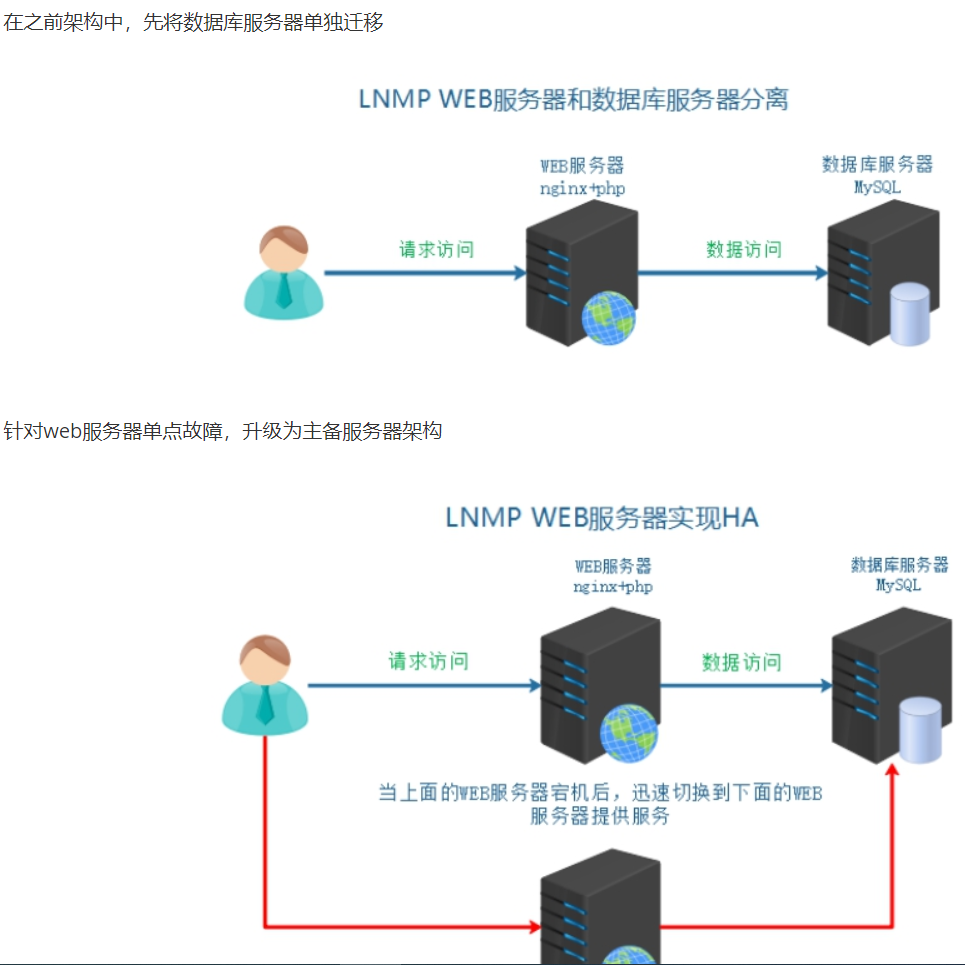
数据库服务器迁移
1、克隆复制虚拟机
server01 WEB服务器  master   10.1.1.10
server02 数据库服务器   10.1.1.20
server03 WEB服务器  backup   10.1.1.30
2、服务器基本配置,改IP和/etc/hosts文件
3、数据备份和迁移
一、源数据库服务器导出数据
#源数据库是server01 在server01上操作
shell > mysqldump -uroot -p --database tp5shop > /root/tp5shop.sql
二、导入数据到新数据库服务器server02
#因为数据库服务器克隆来的,所有本身具有数据 可以删除了库,模拟新机器,重新导入
mysql > drop database tp5shop;
#导入数据
mysql > source /root/tp5shop.sql;
三、在server02 MySQL服务器中建立远程连接用户并授予权限
mysql > grant all on tp5shop.* to 'tp5shop'@'10.1.1.%' identified by '123456';
四、修改项目数据库配置文件,在server01上操作
vim /usr/local/nginx/html/tp5shop/application/database.php
修改参考示例:
return [
    // 数据库类型
    'type'            => 'mysql',
    // 服务器地址
    'hostname'        => '10.1.1.20',
    // 数据库名
    'database'        => 'tp5shop',
    // 用户名
    'username'        => 'tp5shop',
    // 密码
    'password'        => '123456',
    // 端口
    'hostport'        => '3306',
五、访问页面,查看业务使用情况
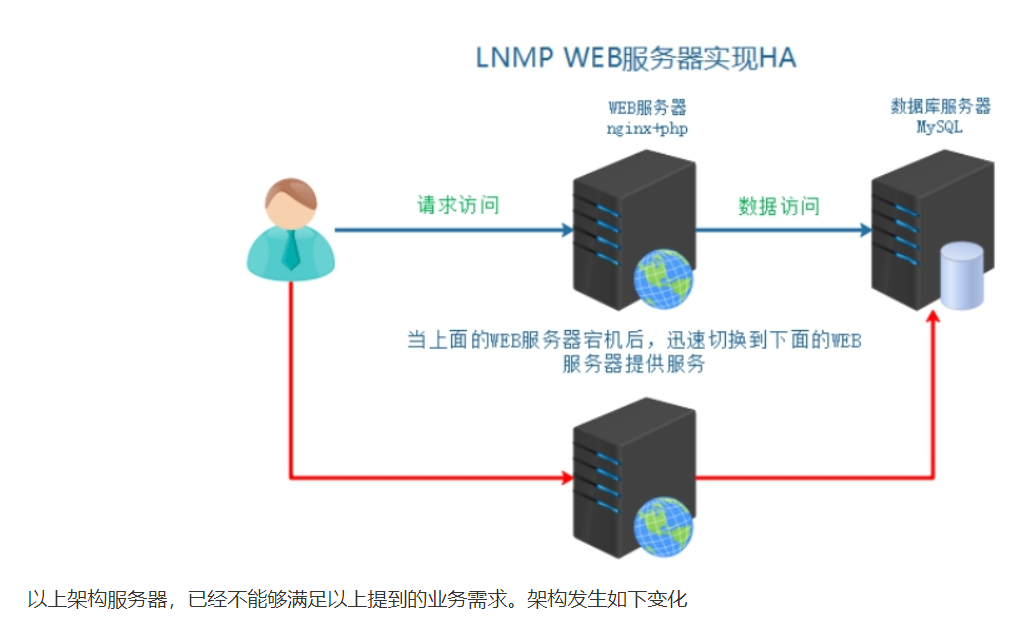
高可用服务搭建
1、HA高可用
高可用HA(High Availability)是分布式系统架构设计中必须考虑的因素之一,它通常是指通过设计,减少系统服务不可用的时间。假设系统一直能够提供服务,我们说系统的可用性是100%。如果系统每运行100个时间单位,会有1个时间单位无法提供服务,我们说系统的可用性是99%。很多公司的高可用目标是4个9,也就是99.99%,这就意味着,系统的年停机时间为0.876个小时。
实现高可用的核心点:
①冗余(多台服务器)
②自动切换
备份服务器:
冷备 服务器不启用(域名不解析),使用的时候再开启,需要手动切换
热备 服务器在等待状态(监控主服务器状态),一旦主宕机,备就接管,自动切换
实现热备,引入VIP的切换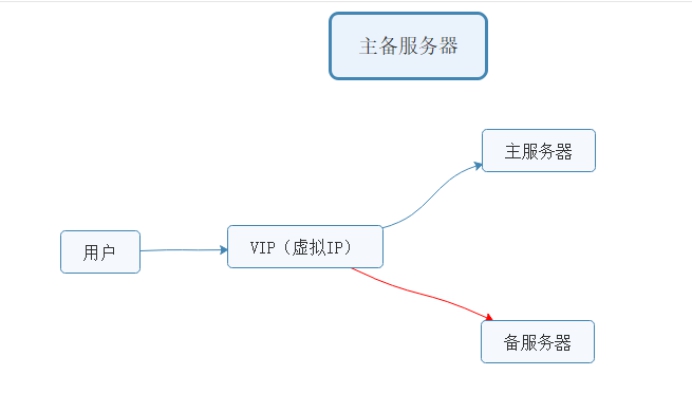
通过VIP的方式,切换主备服务器
①默认VIP绑定在主服务器(master)
②master不可用,就切换VIP到备份服务器(backup)
③用户可以使用到连续性更好的服务,通过VIP访问服务器
常用来单独实现高可用的软件:
①keepalived
②heartbeat 较早 属于redhat HA工程的一部分
2、keepalived介绍
Keepalived软件起初是专为LVS负载均衡软件设计的,用来管理并监控LVS集群系统中各个服务节点的状态,后来又加入了可以实现高可用的VRRP功能。因此,Keepalived除了能够管理LVS软件外,还可以作为其他服务(例如:Nginx、Haproxy、MySQL等)的高可用解决方案软件。
3、keepalived组成和原理
Keepalived软件主要是通过VRRP协议实现高可用功能的。VRRP是Virtual Router RedundancyProtocol(虚拟路由器冗余协议)的缩写,VRRP出现的目的就是为了解决静态路由单点故障问题的,它能够保证当个别节点宕机时,整个网络可以不间断地运行。虚拟路由冗余协议,可以认为是实现路由器高可用的协议,即将N台提供相同功能的路由器组成一个路由器组,这个组里面有一个master和多个backup,master上面有一个对外提供服务的vip(该路由器所在局域网内其他机器的默认路由为该vip),master会发组播,当backup收不到vrrp包时就认为master宕掉了,这时就需要根据VRRP的优先级来选举一个backup当master。这样的话就可以保证路由器的高可用了。
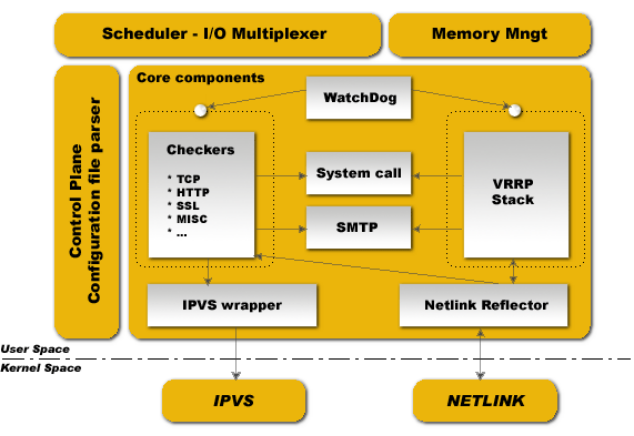
Keepalived的功能体系结构,大致分两层:用户空间(user space)和内核空间(kernel space)。
内核空间:
主要包括IPVS(IP虚拟服务器,用于实现网络服务的负载均衡)和NETLINK(提供高级路由及其他相关的网络功能)两个部份。
用户空间:
WatchDog:负载监控checkers和VRRP进程的状况
VRRP Stack:负载均衡器之间的失败切换FailOver,如果只用一个负载均衡器,则VRRP不是必须的。
Checkers:负责真实服务器的健康检查healthchecking,是keepalived最主要的功能。换言之,可以没有VRRP Stack,但健康检查healthchecking是一定要有的。
IPVS wrapper:用户发送设定的规则到内核ipvs代码
Netlink Reflector:用来设定vrrp的vip地址等。
keepalived主要使用三个模块,分别是core、check和vrrp。
core模块为keepalived的核心,负责主进程的启动、维护以及全局配置文件的加载和解析。
check负责健康检查,包括常见的各种检查方式。
vrrp模块是来实现VRRP协议的。
4、安装配置启动keepalived
master和backup都需要进行安装,也就是server01和server03机器
server01,10.1.1.10,master
server03,10.1.1.30,backup
安装keepalived,yum -y install keepalived
keepalived需要使用的目录和文件: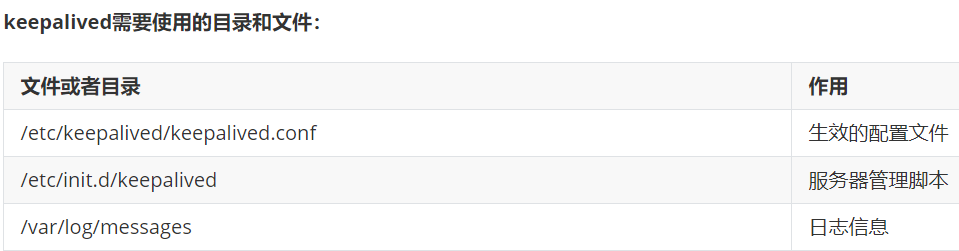
配置keepalived
①备份主备服务器的配置文件
cd /etc/keepalived
cp keepalived.conf keepalived.conf_bak
②分别修改主备服务器配置文件
vim keepalived.conf
示例配置文件说明:
! Configuration File for keepalived
#发送邮件的配置
global_defs {
   notification_email {
     acassen@firewall.loc
     failover@firewall.loc
     sysadmin@firewall.loc
   }
   notification_email_from Alexandre.Cassen@firewall.loc
   smtp_server 192.168.200.1
   smtp_connect_timeout 30
   router_id LVS_DEVEL
}
#vrrp协议的配置
vrrp_instance VI_1 {
    #工作模式
    state MASTER
    #监听的网卡
    interface ens33
    #虚拟路由id 需要和备服务器一致
    virtual_router_id 51
    #权重 优先级
    priority 100
    #vrrp包的发送周期  1s
    advert_int 1
    #权限验证
    authentication {
        auth_type PASS
        auth_pass 1111
    }
    #需要绑定切换的VIP
    virtual_ipaddress {
        192.168.200.16
        192.168.200.17
        192.168.200.18
    }
}
主服务器
! Configuration File for keepalived
global_defs {
   notification_email {
     acassen@firewall.loc
     failover@firewall.loc
     sysadmin@firewall.loc
   }
   notification_email_from Alexandre.Cassen@firewall.loc
   smtp_server 192.168.200.1
   smtp_connect_timeout 30
   router_id LVS_DEVEL
}
vrrp_instance VI_1 {
    state MASTER
    interface ens33
    virtual_router_id 51
    priority 100
    advert_int 1
    authentication {
        auth_type PASS
        auth_pass 1111
    }
    #master默认只需要修改使用VIP即可
    virtual_ipaddress {
        10.1.1.100
    }
}
备服务器
! Configuration File for keepalived
global_defs {
   notification_email {
     acassen@firewall.loc
     failover@firewall.loc
     sysadmin@firewall.loc
   }
   notification_email_from Alexandre.Cassen@firewall.loc
   smtp_server 192.168.200.1
   smtp_connect_timeout 30
   router_id LVS_DEVEL
}
vrrp_instance VI_1 {
    #修改工作模式为备
    state BACKUP
    interface ens33
    virtual_router_id 51
    priority 100
    advert_int 1
    authentication {
        auth_type PASS
        auth_pass 1111
    }
    #注意修改VIP
    virtual_ipaddress {
        10.1.1.100
    }
}
③分别按照顺序启动主服务器和备服务器的keepalived
systemctl restart keepalived
④查看主备服务器的网卡信息
需要通过ip a命令查看 分别在server01和server03查看
5、模拟服务器不可用VIP切换
服务器整机不可用,常见于服务器断网,或者断电关机等。
方法一:模拟主服务器断电关闭
关闭主服务器 VIP所在服务器,poweroff
方法二:模拟主服务器断网
关闭VIP所在服务器的网卡 使其不能够联网,systemctl stop network
通过以上实验检测,发现当主服务器整机不可用时,VIP会切换到备用服务器
重点:ping不通vip的话,就修改 keepalived.conf,在 global_defs 段注释掉 vrrp_strict 行,再重启systemctl restart keepalived
keepalived的配置补充
脑裂(裂脑):vip出现在了多台机器上。网络不通畅,禁用了数据包,主备服务器没法通讯,造成备服务器认为主服务器不可用就绑定了VIP,主服务器VIP不会释放。
解决方案:
①双备或者多备模式 BACKUP 通过priority权重来区分谁的优先级更高
②单播(定向广播)的方式 (一些特定环境禁用了组播方式)
③时间不同步 服务器时间校时
1、非抢占模式
①nopreempt
在主备服务器的配置文件,vrrp_instance段中
②设置state工作模式为BACKUP
两个keepalived节点都启动后,默认都是BACKUP状态,双方在发送组播信息后,会根据优先级来选举一个MASTER出来。由于两者都配置了nopreempt,所以MASTER从故障中恢复后,不会抢占vip。这样会避免VIP切换可能造成的服务延迟。
2、单播模式
一些特定环境下不允许发送组播,造成备服务器无法收到vrrp包,可能会造成脑裂现象。可以通过单播的方式解决。
单播示例配置:注意此语法在keepalived1.2.11版本以上支持
unicast_src_ip 10.1.1.10##(本地IP地址)
unicast_peer {
		10.1.1.30##(对端IP地址)此地址一定不能忘记

}
主服务器server01配置
#在vrrp_instace段中加入
#本地IP
unicast_src_ip 10.1.1.10
unicast_peer {
    #对象IP  发送vrrp包给备服务器
    10.1.1.30
}
备服务器server03配置
#在vrrp_instace段中加入
#本地IP
unicast_src_ip 10.1.1.30
unicast_peer {
    #对象IP  发送vrrp包给备服务器
    10.1.1.10
}
tcpdump抓vrrp包的方式:
tcpdump vrrp -n
实现服务HA
通过keepalived可以直接实现主服务器整机不可用,实现VIP的切换。保证用户可以通过VIP进行访问服务。但是实际情况下,往往并不是服务器整机不可用,只是对应的服务或者软件不可用。比如说:nginx提供的web服务,nginx进程关闭。就需要检测当nginx不可用时,就切换VIP。
实现过程分析:
VIP实际是由keepalived进行绑定的,所以当nginx服务不可用时,就关闭当前机器的keepalived即可,释放VIP。进而绑定到其他备用服务器。
①编写服务检测脚本,实现检测nginx是否可用,不可用则关闭当前所在主机的keepalived
②在keepalived配置中调用检测服务脚本
1、Nginx服务可用检测脚本
主备服务器都要实现此脚本
①编写测试脚本 赋予执行权限
cd /etc/keepalived
vim check_nginx.sh
脚本内容:
#!/bin/bash
nginx_status=`ps -C nginx --no-header | wc -l`
if [ $nginx_status -eq 0 ];then
   # service keepalived stop
   systemctl stop keepalived
fi
赋予脚本执行权限 方便之后其他软件调用执行,chmod +x check_nginx.sh
②测试脚本可用性
启动nginx和keepalived
关闭nginx 执行脚本 查看keepalived是否也关闭
2、模拟宕机实现服务切换
在多台服务器中配置keepalived定时触发检测nginx的脚本模块
#在vrrp_instance外上面定义
vrrp_script check_nginx {
   #调用脚本地址
   script  /etc/keepalived/check_nginx.sh
   #检测间隔时间  秒
   interval 3
}
#在vrrp_instance里调用
track_script {
    #上线定义的名称
    check_nginx
}

注意:check_nginx {    track_script {   方法名和花括号之间要有空格隔开的
3、实现web服务器高可用
以上案例已经实现了,服务不可用VIP切换到可用服务器。
现在需求用户的服务是连续不间断的,故用户需要通过VIP进行访问。
①解析域名到VIP
②模拟用户访问
注意:check_nginx {,track_script { 方法名和花括号之间要有空格隔开的,否则监测失败,导致nginx停了keepalived还是运行的。
4、企业架构LNMP高可用负载均衡服务器之Nginx
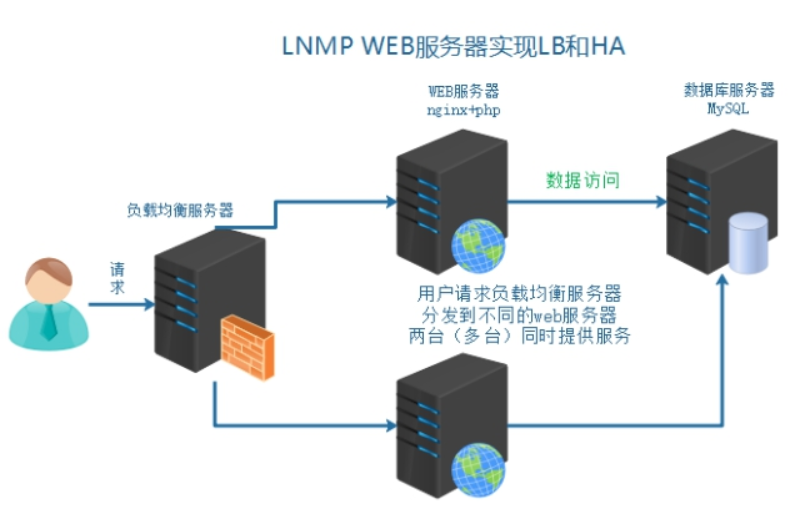
服务器基本环境部署
server01  web1   10.1.1.10
server02  mysql   10.1.1.20
server03  web2   10.1.1.30
server04  lb load balance  10.1.1.40
配置网卡IP、主机名称、hosts解析等
负载均衡服务器搭建
1、引入负载均衡技术
负载均衡技术 (load blance)是一种概念,把资源的使用进行平均分配。
负载均衡:分发流量、请求到不同的服务器。使流量平均分配(理想的状态的)
作用:
服务器容灾,流量分发
主要作用:
①流量分发 请求平均 降低单例压力
其他作用:
②安全 隐藏后端真实服务
③屏蔽非法请求(七层负载均衡)
2、负载均衡分类
1)二层负载均衡(mac)
根据OSI模型分的二层进行负载,一般是用虚拟mac地址方式,外部对虚拟MAC地址请求,负载均衡接收后,再分配后端实际的MAC地址响应
2)三层负载均衡(ip)
一般采用虚拟IP地址方式,外部对虚拟的ip地址请求,负载均衡接收后,再分配后端实际的IP地址响应
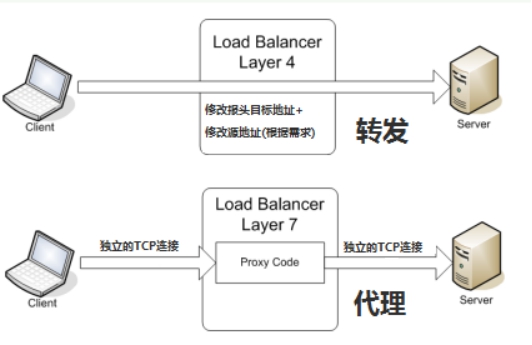
3)四层负载均衡(tcp) 网络运输层面的负载均衡
在三层负载均衡的基础上,用ip+port接收请求,再转发到对应的机器
4)七层负载均衡(http) 智能型负载均衡
根据虚拟的url或IP,主机接收请求,再转向(反向代理)相应的处理服务器
3、常见实现方式
实现方式分类:
①软件级别 性价比高 可控性强
②硬件级别 性能好 价格高 几万到几十万不等
四层和七层对比: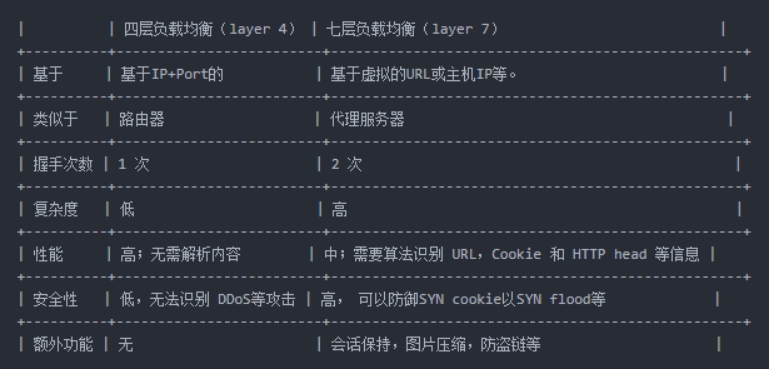
4、Nginx负载均衡配置
官方文档:http://nginx.org/en/docs/http/ngx_http_upstream_module.html
架构分析:
①用户访问请求Nginx负载均衡服务器
②Nginx负载均衡服务器再分发请求到web服务器
实际配置负载均衡,只需修改作为负载均衡服务器的Nginx即可。当前架构中的server04
①在客户端解析域名到负载均衡服务器
②在负载均衡的Nginx配置
#注意本次架构中  server04的Nginx服务器是负载均衡服务器,server04只做转发不做响应请求
#把server04的项目文件删除,cd /usr/local/nginx/html, mv tp5shop tp5shopbak
shell > vi /usr/local/nginx/conf/nginx.conf
#在http段进行配置,可配置在http里面server上面
#分发请求到后端服务器
upstream shop {
    #web1 server01
    server 10.1.1.10;
    #web2 server03
    server 10.1.1.30;
}
#修改之前的shop的server段配置,多余的内容删除像php解析那段也删除,只留下面这些内容
server {
    listen 80;
    server_name www.shop.com;
    location / {
        #代理转发到shop段  匹配到上面的upstream
        proxy_pass http://shop;
        #以下两条配置,实质是设置了传输的header头信息
        #传输域名给后端服务器  进行识别  方便匹配对应server虚拟主机
        proxy_set_header Host $host;
        #发送客户端IP  给后端服务器  用来方便后端服务器识别用户真实IP
        proxy_set_header X-Real-IP $remote_addr;
    }
}
③重载负载均衡服务器Nginx配置测试查看效果
可以停掉其中一台web服务器进行测试,再两台web服务器都停了测试
5、查看确认负载均衡
如何确认服务器是否实现了负载均衡?
①在不同的web服务器同路由访问的文件中,写入不同的信息,以示区别。
②通过查看后端web服务器的访问日志进行确定。
方法一:在不同服务器写入不同信息
①分别修改web服务器(server01和server03)的信息
vim /usr/local/nginx/html/tp5shop/application/home/controller/Base.php
写入一个动态参数,根据php语法自动调用当前主机名称
echo gethostname();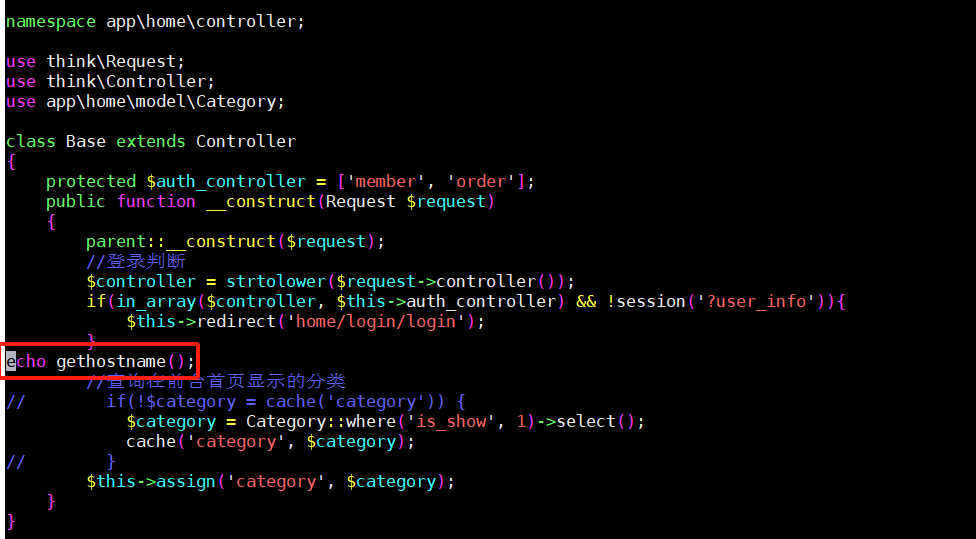
②访问查看负载均衡效果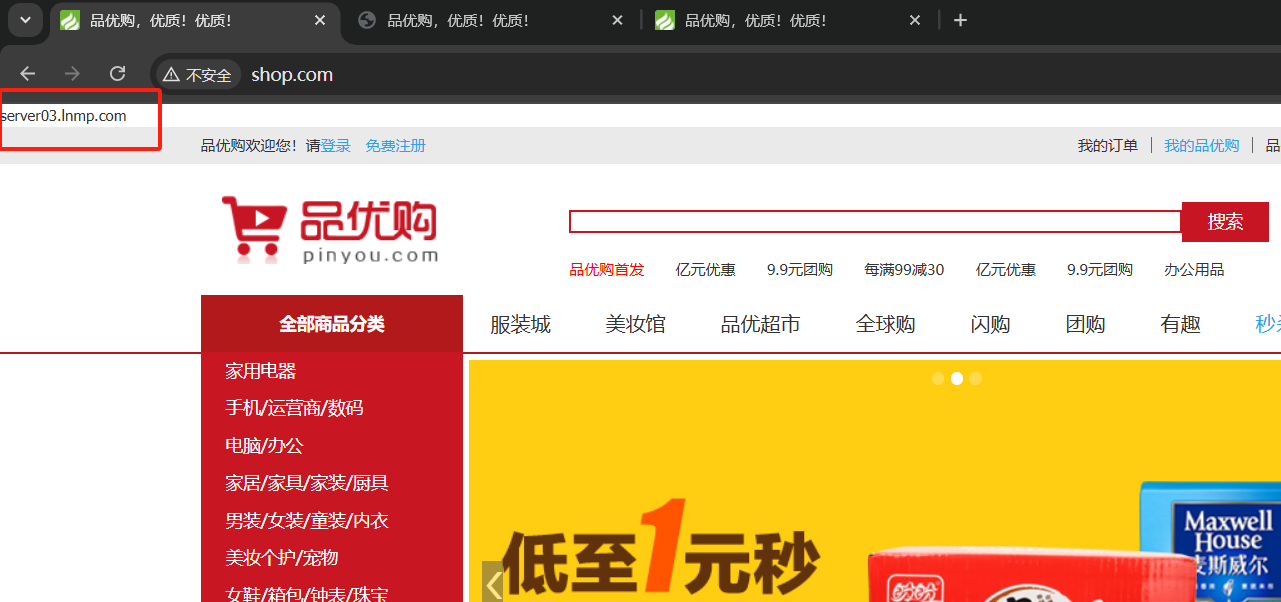
方法二:查看后端web服务器的访问日志
cat /usr/local/nginx/logs/access.log,在web服务器的访问日志里看到的ip是负载均衡的ip不是实际用户客户端ip
6、负载均衡后获取客户端IP
负载均衡之后,在后端的web服务器获取到的是负载均衡服务器的IP,而不能够获取到客户端的真实IP。
需要进行以下特殊配置:
①首先在负载均衡服务器中配置,转发客户端IP给后端web服务器
②后端web服务器需要配置,识别从负载均衡服务器传输过来的客户端真实IP
官方网址:http://nginx.org/en/docs/http/ngx_http_realip_module.html
使用ngx_http_realip_module模块提供的set_real_ip_from语法,默认此模块没有安装,需要编译时添加编译参数
web服务器上配置set_real_ip_from 代表从哪儿来源的IP,需要识别真实客户端IP
示例配置:
#此配置在web服务器上的nginx
#可配置到http、server、location中,推荐配置到server中
#配置需要识别的IP来源   负载均衡的IP
set_real_ip_from  10.1.1.40;

cat /usr/local/nginx/logs/access.log,在web服务器的访问日志里看到的ip是实际用户客户端ip了
7、upstream中server的关键字
upstream中的分发之后的几个关键字:
backup 备 其他的没有backup标识的都无响应,才分发到backup
down 此条配置,不会被分发到
在负载均衡server04的nginx修改
upstream shop {
    server 10.1.1.10 down;
    server 10.1.1.30 backup;
}
8、session一致性问题
访问管理后端页面,登录发现验证码不通过。
输入http://www.shop.com/admin,要是没出来后台管理页面(用户名admin密码123456),就在业务服务器nginx加下重写配置
location / {
   rewrite /index.html /index.php last;
   #判断请求的路径 不存在
   if (!-e $request_filename) {
      # 捕获到所有路径信息   重写为index.php的s参数   last需要匹配之后的location规则
      rewrite ^(.*)$   /index.php?s=$1 last;
   }
}
分析原因:
①比如分发到web1服务器,生成验证码,存储到session中(session文件默认在/tmp下),默认在服务器本地
②再次校验的时候,请求分发到web2服务器了,所以验证码一直校验不通过
解决方案思路:
①生成和验证session都请求同一台服务器
②共享session nfs mysql 内存缓存软件(memcached、redis)
9、Nginx的负载均衡算法
Nginx 官方默认3种负载均衡的算法
①Round-Robin RR轮询(默认)一次一个的来(理论上的,实际实验可能会有间隔)
②weight 权重权重高多分发一些 服务器硬件更好的设置权重更高一些
③ip_hash同一个IP,所有的访问都分发到同一个web服务器
第三方模块实现的调度算法 需要编译安装第三方模块
④fair 根据后端服务器的繁忙程度 将请求发到非繁忙的后端服务器
⑤url_hash 如果客户端访问的url是同一个,将转发到同一台后端服务器
验证一:验证加权轮询算法
在负载均衡server04的nginx配置如下:
upstream shop {
    server 10.1.1.10 weight=5;
    server 10.1.1.30 weight=3;
}
验证二:ip一致性算法
upstream shop {
    #ip hash 一致性算法配置  设置此项  weight就失效了
    ip_hash;
    server 10.1.1.10 weight=5;
    server 10.1.1.30 weight=3;
}
10、实现负载均衡高可用HA
所有的请求流量,都要经过负载均衡服务器,负载均衡服务器压力很大,防止它宕机,导致后端服务所有都不可用,需要对负载均衡服务器,做高可用HA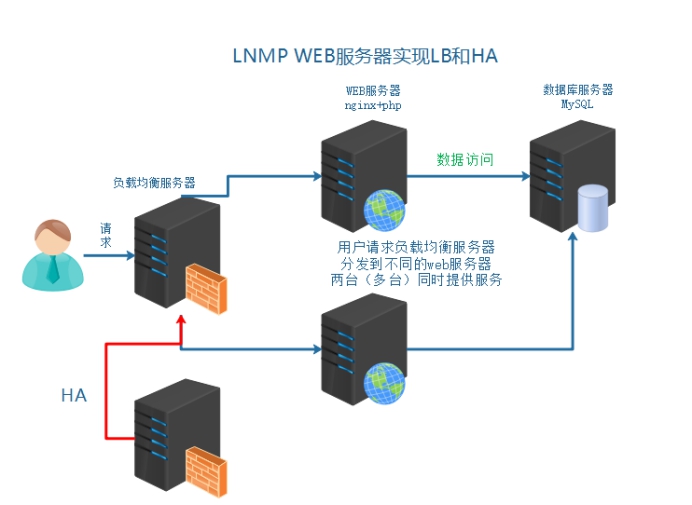
给负载均衡服务器server04做一台备用服务器server05(server04关机克隆),通过keepalived实现高可用。
通过keepalived实现VIP在负载均衡服务器组的切换。
server04 master LB 10.1.1.40
server05 backup LB 10.1.1.50
用非抢占模式
①nopreempt
在主备服务器的配置文件,vrrp_instance段中
②设置state工作模式为BACKUP
两个keepalived节点都启动后,默认都是BACKUP状态,双方在发送组播信息后,会根据优先级来选举一个MASTER出来。由于两者都配置了nopreempt,所以MASTER从故障中恢复后,不会抢占vip。这样会避免VIP切换可能造成的服务延迟。
主负载均衡的keepalived配置:
vrrp_instance VI_1 {
    state BACKUP
    interface ens33
    #虚拟路由ID 新ID 不要之前的冲突
    virtual_router_id 52
    priority 100
    nopreempt
    advert_int 1
    authentication {
        auth_type PASS
        auth_pass 1111
    }
    virtual_ipaddress {
        #添加新VIP
        10.1.1.200
    }
    track_script {
        check_nginx
    }
}
备负载均衡的keepalived配置:
vrrp_instance VI_1 {
    state BACKUP
    interface ens33
    #修改route_id
    virtual_router_id 52
    priority 99
    nopreempt
    advert_int 1
    authentication {
        auth_type PASS
        auth_pass 1111
    }

    virtual_ipaddress {
        #添加新VIP
        10.1.1.200
    }
    track_script {
        check_nginx
    }
}
5、企业架构MySQL读写分离
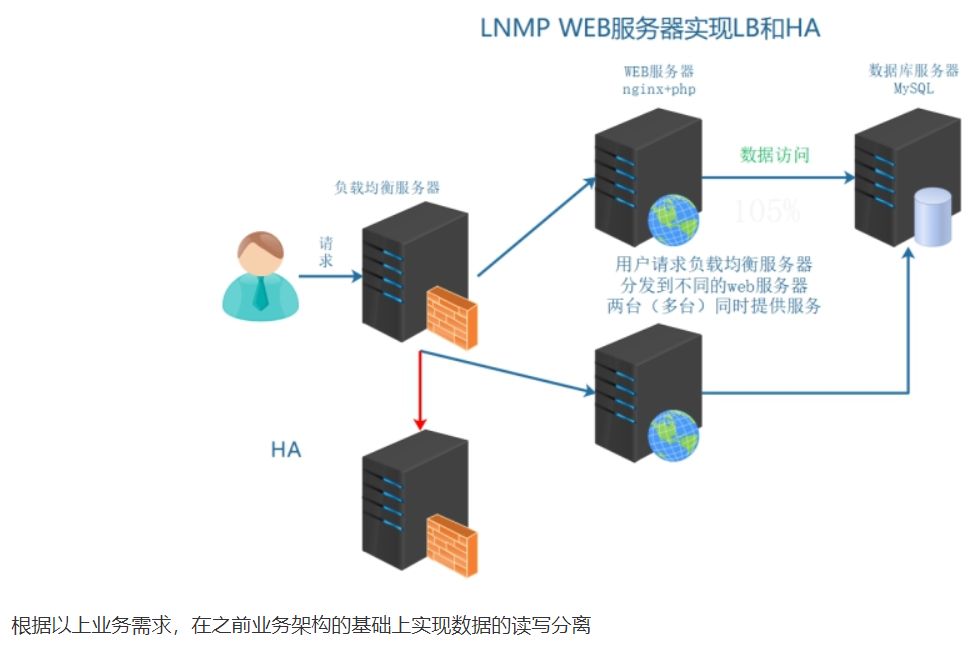
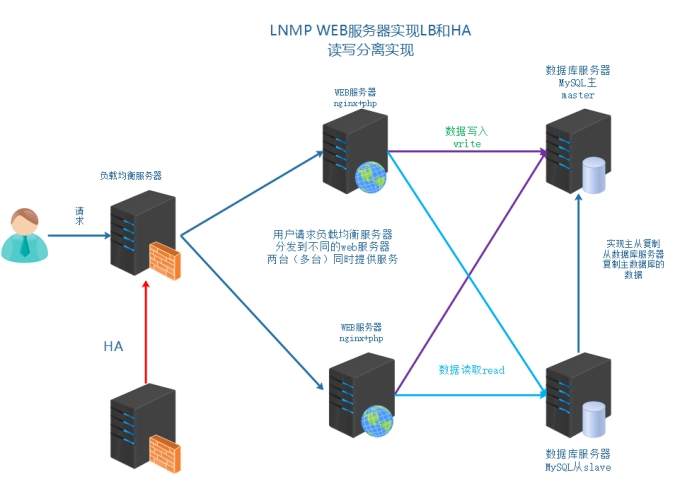
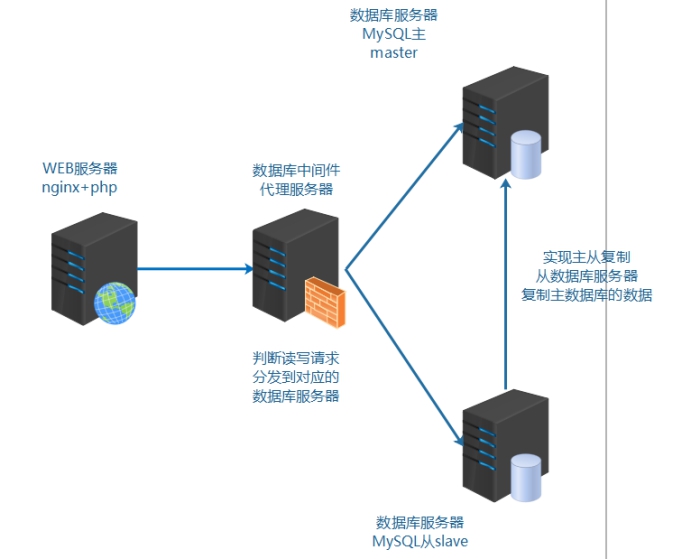
1、MySQL读写分离介绍
1、读写分离的目的
数据库负载均衡:
当数据库请求增多时,单例数据库不能够满足业务需求。需要进行数据库实例的扩容。多台数据库同时响应请求。也就是说需要对数据库的请求,进行负载均衡。
但是由于数据库服务特殊原因,数据库扩容基本要求为:数据的一致性和完整性。所以要保证多台数据库实例的数据一致性和完整性,以MySQL为例来说,官方提供了主从复制机制。
读写分离:
数据库的负载均衡不同于其他服务的负载均衡,数据要求一致性。基于主从复制的基础上,常见的数据库负载均衡使用的是读写分离方式。写入主数据库,读取到从数据库。可以认为数据库读写分离,是一种特殊的负载均衡实现。
实际业务中,读写分离存在的一个问题,不够实时性。
对于要求实时性高的业务
①缓存 写主库 写缓存 读缓存
②可以读主
③添加完数据之后,有一个跳转等待的时间(5s),数据正在审核中
2、读写分离常见的实现方式
①业务代码的读写分离
需要在业务代码中,判断数据操作是读还是写,读连接从数据服务器操作,写连接主数据库服务器操作
以当前LNMP为例,需要通过PHP代码实现读写分离
②中间件代理方式的读写分离
在业务代码中,数据库的操作,不直接连接数据库,而是先请求到中间件服务器(代理)
由代理服务器,判断是读操作去从数据服务器,写操作去主数据服务器
也就是如下图示架构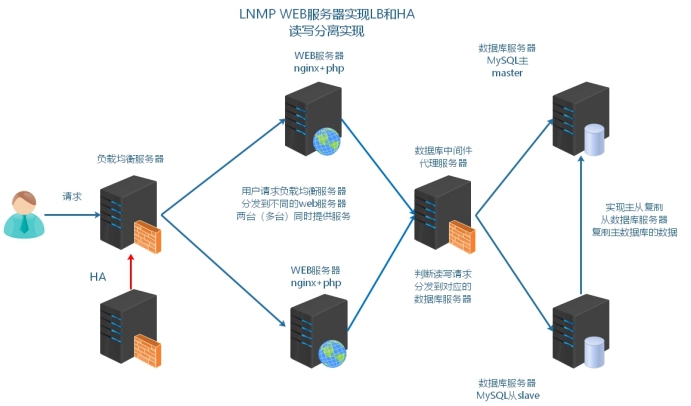
问:如何选择?
①业务实现读写分离,操作方便,成本低,当前的开发框架基本支持读写分离
②中间件代理服务器,除了能够实现读写分离,还可以作为数据库集群的管理平台
2、MySQL读写分离案列实现
1、搭建M-S复制
主从复制的原理 :主服务器开启bin-log(记录了写操作) 从服务器获取到主服务器的bin-log 记录到relay-log中。从服务器在通过异步的线程方式,对于relay-log进行重放操作。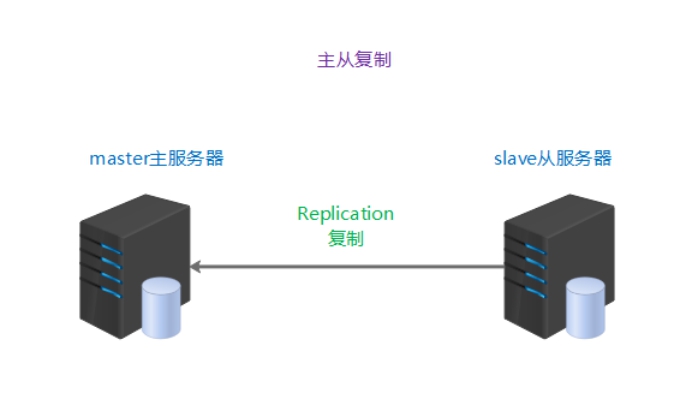
server01 mysql master 10.1.1.10
server02 mysql slave 10.1.1.20
1、master配置
①在master服务器授权,slave服务器replication slave权限.
slave是通过MySQL连接登录到master上来读取二进制日志的,因此需要在master上给slave配置权限
mysql > grant replication slave on *.* to 'slave'@'10.1.1.%' identified by '123456'; 可能此命令创建失败了
CREATE USER 'slave'@'10.1.1.%' IDENTIFIED BY '123456';
GRANT REPLICATION SLAVE ON *.* TO 'slave'@'10.1.1.%';
FLUSH PRIVILEGES;
刷新后在从服务器检查下
telnet 10.1.1.10 3306
mysql -uslave -h 10.1.1.10 -p
②master服务器打开bin-log日志,并标识server-id
vi /usr/local/mysql/my.cnf
配置文件内容:
[mysqld]
log-bin = /usr/local/mysql/data/binlog
server-id = 10
注意重启mysql使配置生效,systemctl restart mysqld,重启后会生成二进制日志
③制作一个完整的备份
如果确认主从的数据库,默认开始数据是一致的,可以不做备份
shell > mysqldump -uroot -p'123456' --all-databases > /root/mysql.sql
④查看master上的bin-log及其position位置
mysql > show master status;
查看并记录File的值,Position的值。之后需要在从服务器上,指向这些信息
File,记录到的bin-log日志文件名称
Position,bin-log日志文件所记录的位置
2、slave配置
①恢复备份文件
如果slave和master的数据本身就是相同的,可以不选择备份和导入
主10.1.1.10,shell > scp mysql.sql root@10.1.1.20:/root
从10.1.1.20,mysql> source /root/mysql.sql 或 shell > mysql -p </root/mysql.sql
②配置server-id,标识服务器
vi /usr/local/mysql/my.cnf
配置文件内容:
[mysqld]
server-id = 20

rm -rf /usr/local/mysql/data/auto.cnf,删除完再重启mysqld服务systemctl restart mysqld
由于是克隆获取的MySQL实例,所以auto.cnf里记录的UUID一样,需要删除/usr/local/mysql/data/auto.cnf文件,否则主从无法识别互相身份,重启mysqld服务自动生成新的即可。
③配置slave replication
mysql > stop slave;
mysql> change master to master_host='10.1.1.10',master_user='slave',master_password='123456',master_log_file='binlog.000001',master_log_pos=120;
mysql > start slave;

参数说明
master_host  主master的IP
master_user  主master允许登录,拥有replication slave权限
master_password 用户的密码
需要通过mysql > show master status; 在master执行
master_log_file  主master记录的bin-log日志文件名称
master_log_pos  主master记录的bin-log日志文件对应的位置
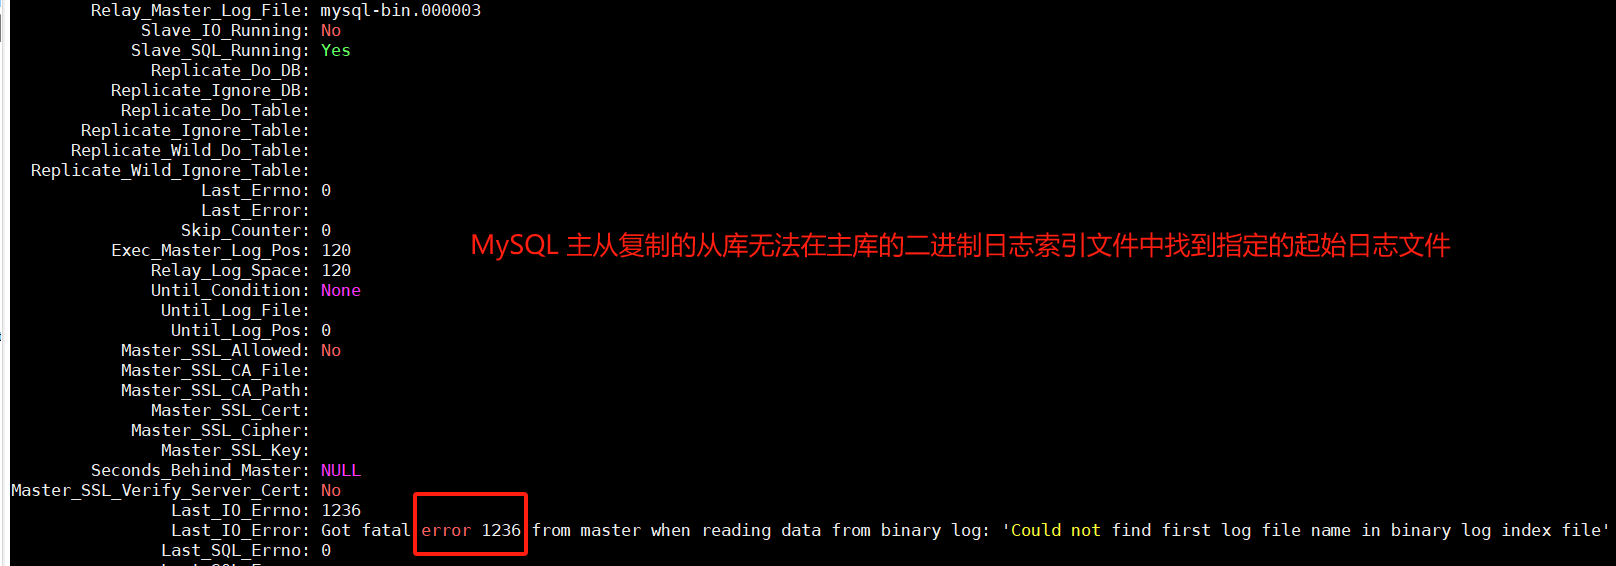
④启动replication,并检查结果
mysql > show slave status\G;
查看到两个yes,主从复制成功。否则,查看显示最下面信息,通过error信息进行排查问题。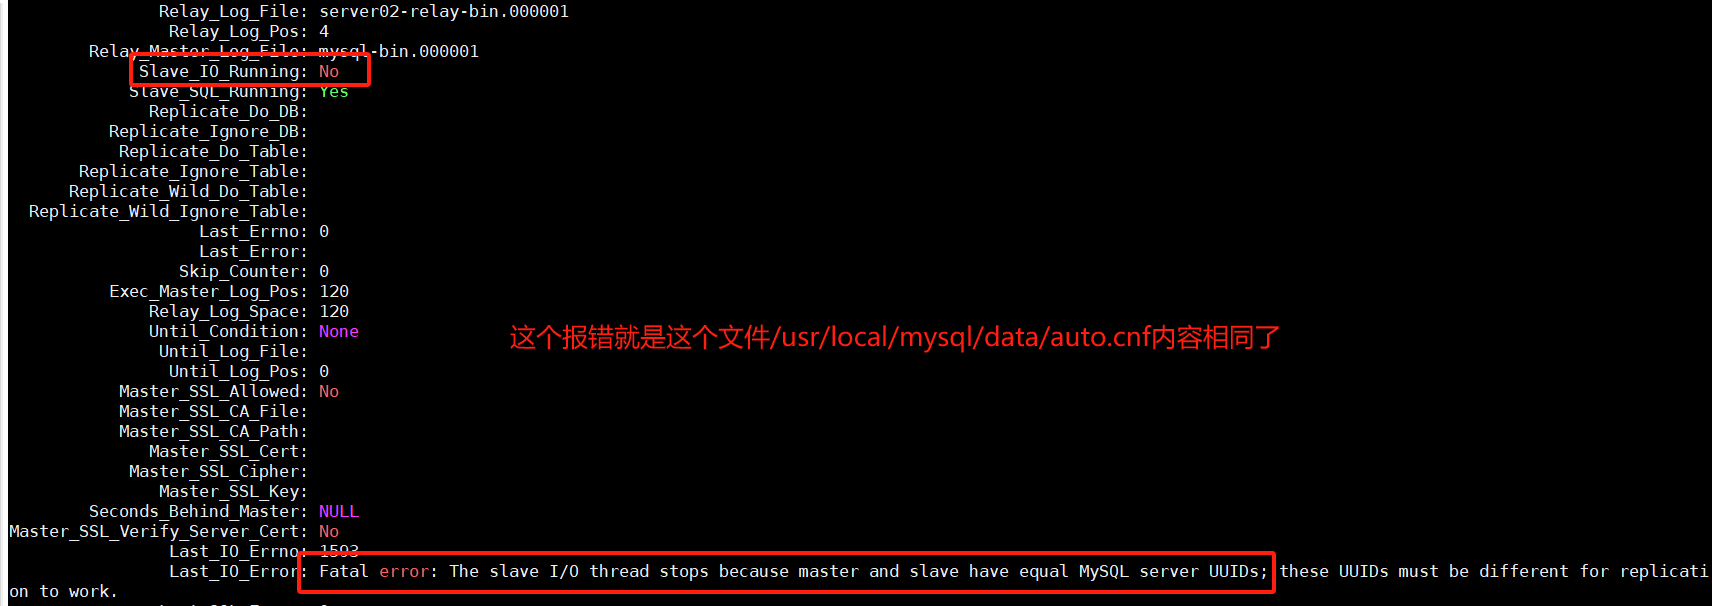
从库同步报错就停止重置
mysql> stop slave;
mysql> reset slave;
去主库刷新日志并获取最新状态
mysql> FLUSH LOGS;
Query OK, 0 rows affected (0.00 sec)

mysql> show master status;
+---------------+----------+--------------+------------------+-------------------+
| File          | Position | Binlog_Do_DB | Binlog_Ignore_DB | Executed_Gtid_Set |
+---------------+----------+--------------+------------------+-------------------+
| binlog.000002 |      120 |              |                  |                   |
+---------------+----------+--------------+------------------+-------------------+
1 row in set (0.00 sec)
从库开始同步
mysql> change master to master_host='10.1.1.10',master_user='slave',master_password='123456',master_log_file='binlog.000002',master_log_pos=120;
mysql > start slave;
mysql > show slave status\G;
查看到两个yes,主从复制成功。否则,查看显示最下面信息,通过error信息进行排查问题。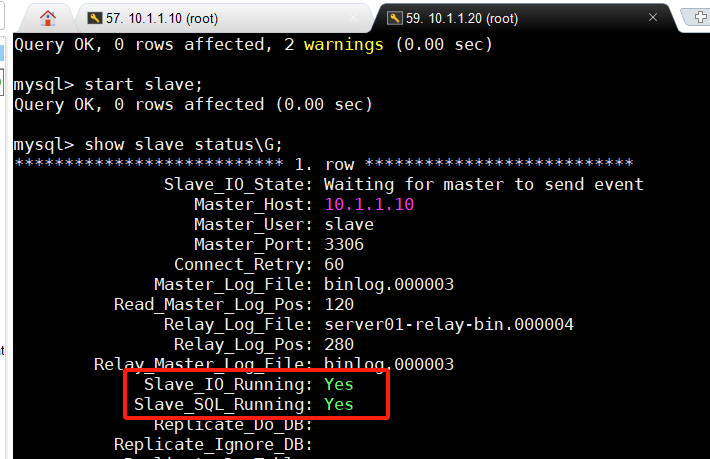
在主库创建测试库test,mysql> create database test;,发现从库同步了,mysql> show databases;
2、MyCat实现读写分离
server01 master 10.1.1.10
server02 slave 10.1.1.20
server03 web1  10.1.1.30
server04 mycat 10.1.1.40,作为数据库的中间件服务器,配置基本环境,FQDN
10.1.1.10   server01.lnmp.com server01
10.1.1.20   server02.lnmp.com server02
10.1.1.30   server03.lnmp.com server03
10.1.1.40   server04.lnmp.com server04
MyCat 数据库中间件,国内最活跃的、性能最好的开源数据库中间件!
官方网址:http://www.mycat.io/,https://github.com/MyCATApache/MyCAT-Server/
因为mycat是由java语言开发,必须使用java的运行环境才能进行启动和操作。
1、mycat安装和测试启动
下载安装jdk,https://www.oracle.com/java/technologies/downloads/#java8,选择下载x64架构.tar.gz包
上传mycat和jdk到soft目录下
cd /root/soft
tar xvf jdk-8u192-linux-x64.tar.gz
mv jdk1.8.0_192 /usr/local/java
配置环境变量
echo "PATH=/usr/local/java/bin:$PATH" >> /etc/profile
source /etc/profile
检测java环境变量  如果看到版本信息即为成功
java -version
mycat安装和测试启动
解压安装mycat
cd /root/soft
tar xvf Mycat-server-1.6.5-release-20180122220033-linux.tar.gz -C /usr/local
实际解压到目录即可,无需安装
启动mycat,默认情况下启动mycat是可以启动的
#通过控制台  进行前端启动   可以看到执行过程
/usr/local/mycat/bin/mycat console
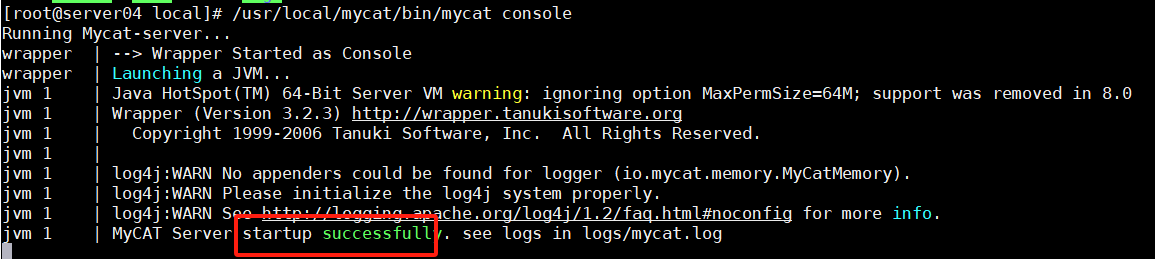
注意如果启动不成功,可能是由于没有解析主机名称。需要在hosts文件中进行解析。
2、配置读写分离
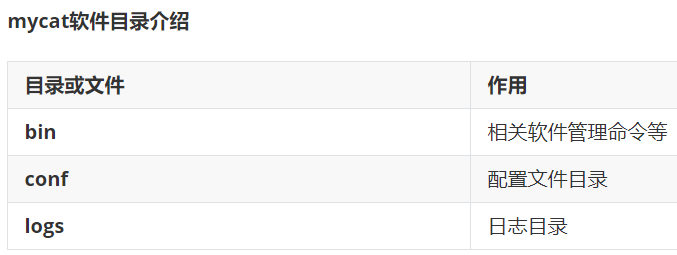
mycat配置文件路径,/usr/local/mycat/conf
读写分离的配置文件:
server.xml   配置mycat的对外的用户、密码、映射数据库名称等信息
schema.xml   配置后端真实数据库的用户、密码、真实数据库名称等信息
Mycat是由java开发,java开发的软件大部分配置文件是xml格式。注意它的基本格式。
xml格式注意点:
1、xml声明信息
2、具有一个根标签
3、双标签和单标签格式
4、注意闭合标签
5、注释格式为  <!--  这里是注释内容 -->
查看server.xml
默认server.xml可以不用修改
cd /usr/local/mycat/conf
vim server.xml
配置mycat对外的使用用户信息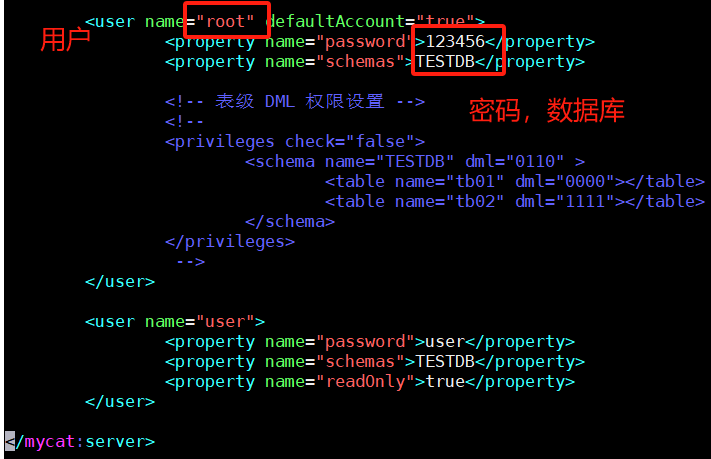
修改schema.xml
schema标签里配置name的server.xml里的虚拟数据库名称,dataNode 填写后面使用的dataNode名称
dataNode标签和dataHost指定配置使用
dataHost标签里配置writeHost和readHost(密码,地址,用户名称)
schema=>dataNode=>dataHost=>writeHost=>readHost
可以把源文件配置内容删除,使用下面这个精简过的配置文件如下。注意修改第7行,真实数据库的名称
<?xml version="1.0"?>
<!DOCTYPE mycat:schema SYSTEM "schema.dtd">
<mycat:schema xmlns:mycat="http://io.mycat/">
    <!-- 1、TESTDB和server.xml配置文件中的映射的数据库名称要一致   dataNone填写下面的dataNode名称 -->
	<schema name="TESTDB" checkSQLschema="false" sqlMaxLimit="100" dataNode="dn3"></schema>
	<!-- 2、dataNode name和上面的一致  dataHost填写下面的dataHost的name名称  database填写后端真实数据库名称-->
    <dataNode name="dn3" dataHost="localhost1" database="tp5shop" />
    <!-- 3、可以配置负载均衡、读写分离算法   暂时可以不用动-->
	<dataHost name="localhost1" maxCon="1000" minCon="10" balance="0" writeType="0" dbType="mysql" dbDriver="native" switchType="1"  slaveThreshold="100">
        <!-- 对后端数据库服务器 发送的心跳检测 -->
		<heartbeat>select user()</heartbeat>
		<!-- can have multi write hosts -->
        <!-- 4、配置后端真实数据库的相关登录信息 -->
		<writeHost host="hostM1" url="10.1.1.10:3306" user="tp5shop" password="123456">
			<!-- can have multi read hosts -->
			<readHost host="hostS2" url="10.1.1.20:3306" user="tp5shop" password="123456" />
		</writeHost>
		<!-- <writeHost host="hostS1" url="localhost:3316" user="root" password="123456" />-->
		<!-- <writeHost host="hostM2" url="localhost:3316" user="root" password="123456"/> -->
	</dataHost>
</mycat:schema>
启动mycat服务
/usr/local/mycat/bin/mycat start
#确认mycat是否真的启动,查看它的端口 9066 8066
netstat -lntp|grep 9066
netstat -lntp|grep 8066
如果配置之后,启动mycat,不能够启动。通过查看/usr/local/mycat/logs/wrapper.log
3、mycat客户端与mycat管理端
连接mycat客户端
mysql -h10.1.1.40 -uroot -p123456 -P8066
执行查询命令测试结果
mysql > show databases;
mysql > use TESTDB;
mysql > show tables;
连接mycat管理端
mysql -h10.1.1.40 -uroot -p123456 -P9066
执行管理命令查看
mysql > show @@help;  //查看管理监控端的所有帮助命令
mysql > show @@heartbeat;  //查看服务器状态
4、业务代码配置
使用数据库中间件服务器实现读写分离和后端真实数据库的管理。对于前端业务来说,数据操作需要连接的是数据库中间件服务器。操作连接的是数据库中间件服务器,而不直接连接多实例的真实服务器了。
在web服务器10.1.1.30,修改项目数据库配置文件,配置文件示例:
vim /usr/local/nginx/html/tp5shop/application/database.php
return [
    // 数据库类型
    'type'            => 'mysql',
    // 服务器地址
    // 1、连接mycat数据库中间件服务器
    'hostname'        => '10.1.1.40',
    // 2、mycat对外映射的数据库名称
    // 数据库名
    'database'        => 'TESTDB',
    // 3、mycat对外映射的用户
    // 用户名
    'username'        => 'root',
    // 4、mycat对外映射的密码和端口
    // 密码
    'password'        => '123456',
    // 端口
    'hostport'        => '8066',
    // 连接dsn
    'dsn'             => '',
    // 数据库连接参数
    'params'          => [],
    // 数据库编码默认采用utf8
    'charset'         => 'utf8',
    // 数据库表前缀
    'prefix'          => 'tpshop_',
    // 数据库调试模式
    'debug'           => true,
    // 5、使用数据库中间件,对于前端业务服务器来说,属于使用集中式单一服务器  配置为0
    // 数据库部署方式:0 集中式(单一服务器),1 分布式(主从服务器)
    'deploy'          => 0,
    // 6、集中式单一服务器  不在业务代码进行读写分离,交由数据库中间件去做  配置为false
    // 数据库读写是否分离 主从式有效
    'rw_separate'     => false,
    // 读写分离后 主服务器数量
    'master_num'      => 1,
    // 指定从服务器序号
    'slave_no'        => '',
    // 是否严格检查字段是否存在
注意确保数据库存在用户,grant all on tp5shop.* to ‘tp5shop’@‘10.1.1.%’ identified by ‘123456’;
测试访问
mycat默认writeHost和readHost,如果writeHost不可用,则readHost也不可用。schema.xml中用两个writeHost标签,从的writeHost变成可写的了,但要在slave服务器数据库配置文件上设置readonly
5、balance属性和writeType属性(在dataHost标签中配置)
balance 属性
负载均衡类型,目前的取值有 3 种:
1、balance=“0”, 不开启读写分离机制,所有读操作都发送到当前可用的 writeHost 上。
2、balance=“1”, 全部的 readHost 与 stand by writeHost 参与 select 语句的负载均衡,简单的说,当双主双从模式(M1->S1,M2->S2,并且 M1 与 M2 互为主备),正常情况下,M2,S1,S2 都参与 select 语句的负载均衡。
3、balance=“2”, 所有读操作都随机的在 writeHost、readhost 上分发。
4、balance=“3”, 所有读请求随机的分发到 writerHost 对应的 readhost 执行,writerHost 不负担读压力,注意 balance=3 只在 1.4 及其以后版本有,1.3 没有。
writeType 属性
负载均衡类型,目前的取值有 3 种:
1、writeType=“0”, 所有写操作发送到配置的第一个 writeHost,第一个挂了切到还生存的第二个writeHost,重新启动后已切换后的为准.
2、writeType=“1”,所有写操作都随机的发送到配置的 writeHost,1.5 以后废弃不推荐
switchType 属性
-1 表示不自动切换
1 默认值,自动切换
2 基于 MySQL 主从同步的状态决定是否切换
6、企业架构缓存中间件分布式memcached
1、大型网站优化
随着网站迭代开发,访问会变慢。
LNMP架构中网站应用访问流程:浏览器(app)=>web服务器=>后端服务(php)=>数据库(mysql)
访问流程越多,访问速度和出现问题的几率也越大。优化访问速度,就需要减少访问步骤或者提高单步骤的速度。
根据网页的访问流程,可以进行以下优化:
①提高web服务器并发 负载均衡(多台服务器架构) nginx
②页面静态化 把经常访问,但是数据不经常发生变动的动态页面,制作为静态页面
③内存缓存优化 把经常访问的数据,加载到内存中使用
④数据库优化 很多时候,还需要取数据库信息,所以优化数据库本身
随着业务量增加,访问量越来越大,用户在访问某些页面数据时,通过慢查询日志发现慢查询SQL,经过优化之后效果还是不够明显。而此类数据发生变动的频率又较小,故提出使用缓存中间件(一般会将数据存储到内存中)的方式,降低MySQL的读压力,提高整个业务架构集群的稳定和快速响应能力。
根据以上业务需求,准备加入缓存中间件服务器:
根据以上业务需求和方案,服务器架构升级为如下示意图: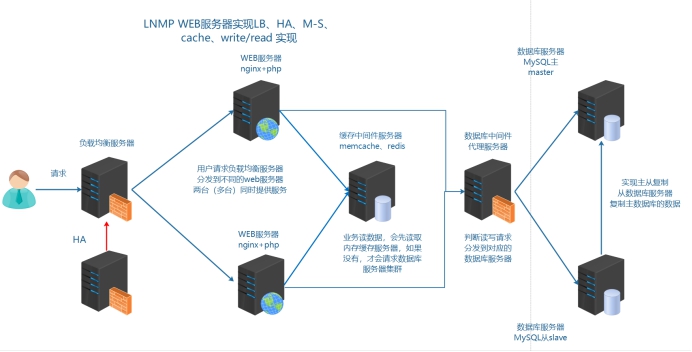
在本次业务架构中,使用缓存中间件解决以下两个问题:
①session共享
②缓存热点数据,首页面的分类信息
2、memcached介绍和安装启动
memory cache cache in memory 缓存放入内存中
Memcached 是国外 社区 网站 LiveJournal 的开发团队开发的 高性能的分布式内存缓存服务器。一般的使用目的是,通过缓存数据库查询结果,减少数据库访问次数,以提高动态 Web 应用的速度、提高可扩展性。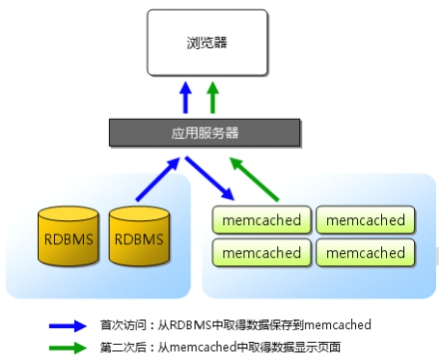
关于缓存的过期,有效期问题,由业务编程代码实现。
安装启动软件
官方网址:http://memcached.org/
①上传软件到服务器
软件包名称memcached-1.5.8.tar.gz
②解压并编译安装
#memcache依赖libevent  安装libevent-devel解决
yum -y install libevent-devel
#编译安装memcached
tar xvf memcached-1.5.8.tar.gz
cd memcached-1.5.8
./configure --prefix=/usr/local/memcached
make && make install
③查看软件启动参数,并启动
cd /usr/local/memcached/bin
./memcached -h  求帮助
-p是设置Memcache监听的端口,最好是1024以上的端口;
-d是启动一个守护进程;
-m是分配给Memcache使用的内存数量,单位是MB;
-u是运行Memcache的用户;
-l是监听的服务器IP地址,可以有多个地址;
-c是最大运行的并发连接数,默认是1024;
-P是设置保存Memcache的pid文件
启动memcached
#进入memcached文件目录
cd /usr/local/memcached/bin
#后台启动memcached  可以创建一个普通用户(memcached)  用来启动管理memcached软件
./memcached -uroot -d
#进程查看是否启动成功
ps aux |grep memcached
3、memcached使用
1、命令行连接和操作
1、telnet连接使用
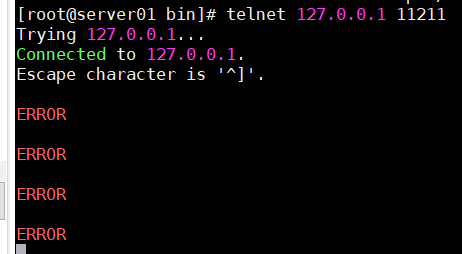
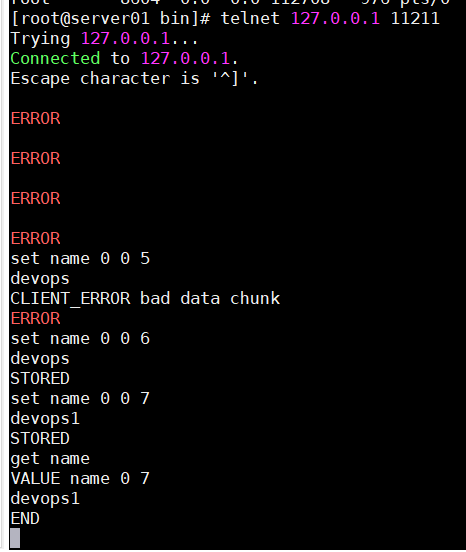
memcached默认使用启动服务占用tcp 11211端口。可以通过telnet进行连接使用。
#安装telnet客户端
yum -y install telnet
#通过telnet连接11211端口
telnet 127.0.0.1 11211
#连接之后回车多次,如果看到error,即为连接成功
#显示error的原因是,没有输入命令,所以memcached服务器回复error
2、存储命令
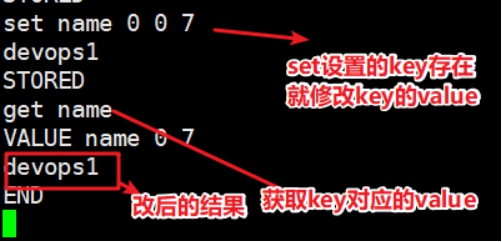
语法:set
set 命令用于将 value(数据值) 存储在指定的 key(键) 中
如果set的key已经存在,该命令可以更新该key所对应的原来的数据,也就是实现更新的作用
set key flag exptime bytes
value
flag 服务端提供的一个标识,默认没什么意义,默认可以传个0,这个标识是为了编程语言一个状态,例如:flag(0,1) 代表是否采用压缩机制 0代表不压缩,1代表压缩
bytes 字节 计算机存储的最小单位 KB MB GB TB BB YB ZB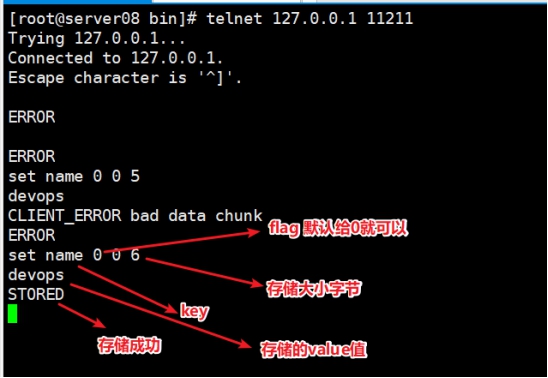
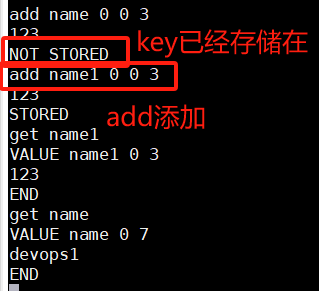
语法:add
add 命令用于将 value(数据值) 存储在指定的 key(键) 中
如果 add 的 key 已经存在,则不会更新数据(过期的 key 会更新),之前的值仍然保存着,会响应 NOT_STORED不存储
add key flag exptime bytes
value
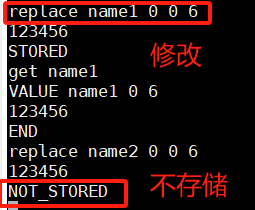
语法:replace
replace 命令用于替换已存在的 key(键) 的 value(数据值)
如果 key 不存在,则替换失败,会响应 NOT_STORED不存储
replace key flag exptime bytes
value
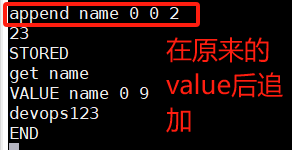
语法:append
append 命令用于向已存在 key(键) 的 value(数据值) 后面追加数据
append key flag exptime bytes
value
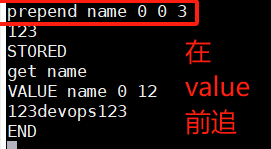
语法:prepend
prepend 命令用于向已存在 key(键) 的 value(数据值) 前面追加数据
prepend key exptime bytes value
2、删除命令
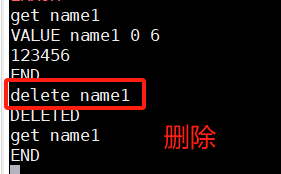
语法:delete
delete 命令用于删除已存在的 key(键)
delete key
语法:flush_all
注意此命令,在业务线上环境禁止执行。如果执行,可能会造成所有缓存清空不存在,所有的数据请求都直接到了数据库服务器。造成数据库压力瞬间变大。数据库宕机。
flush_all 命令用于清理缓存中的所有 key=>value(键=>值) 对
该命令提供了一个可选参数 time,用于在指定的时间后执行清理缓存操作。
flush_all [time]
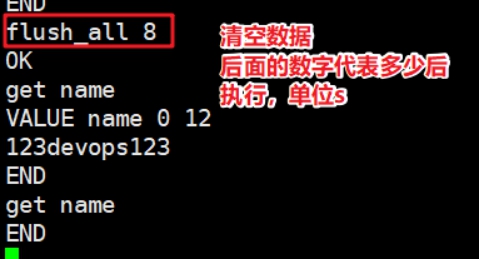
3、查找和计算命令
语法:get
get 命令获取存储在 key(键) 中的 value(数据值) ,如果 key 不存在,则返回空
get key1 key2 key3
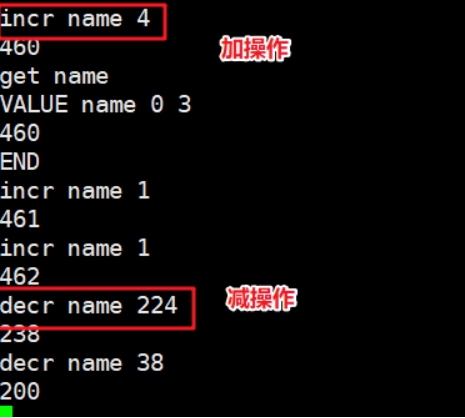
语法:incr(相加)/decr(相减)
计数器 每做一次操作 +1
incr 与 decr 命令用于对已存在的 key(键) 的数字值进行自增或自减操作
incr 与 decr 命令操作的数据必须是十进制的32位无符号整数
incr key value
decr key value
4、统计状态命令
语法:stats
stats 命令用于返回统计信息例如 PID(进程号)、版本号、连接数等
stats
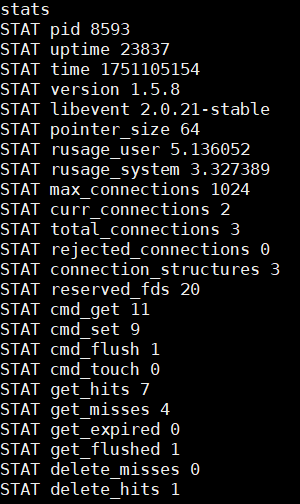
stats的参数参考
pid:memcache服务器进程ID
uptime:服务器已运行秒数
time:服务器当前Unix时间戳
启动时间: time-uptime
version:memcache版本
pointer_size:操作系统指针大小
rusage_user:进程累计用户时间
rusage_system:进程累计系统时间
curr_connections:当前连接数量
total_connections:Memcached运行以来连接总数
connection_structures:Memcached分配的连接结构数量
cmd_get:get命令请求次数
cmd_set:set命令请求次数
cmd_flush:flush命令请求次数
get_hits:get命令命中次数
get_misses:get命令未命中次数
delete_misses:delete命令未命中次数
delete_hits:delete命令命中次数
incr_misses:incr命令未命中次数
incr_hits:incr命令命中次数
decr_misses:decr命令未命中次数
decr_hits:decr命令命中次数
cas_misses:cas命令未命中次数
cas_hits:cas命令命中次数
cas_badval:使用擦拭次数
auth_cmds:认证命令处理的次数
auth_errors:认证失败数目
bytes_read:读取总字节数
bytes_written:发送总字节数
limit_maxbytes:分配的内存总大小(字节)
accepting_conns:服务器是否达到过最大连接(0/1)
listen_disabled_num:失效的监听数
threads:当前线程数
conn_yields:连接操作主动放弃数目
bytes:当前存储占用的字节数
curr_items:当前存储的数据总数
total_items:启动以来存储的数据总数
evictions:LRU释放的对象数目
reclaimed:已过期的数据条目来存储新数据的数目
**缓存命中率:**命中数(get获取到数据)/获取次数(get的次数)
get_hits/cmd_get,如果命中率低,业务代码缓存有问题,命中率为0,缓存没有起作用
缓存穿透
访问的数据,数据库不存在的数据,每次都不能够生成缓存,每次请求都直接访问数据库,穿透了缓存,缓存没有起到作用。数据库压力没有得到缓解。
解决方案,数据库查不到的,也做一个空缓存。
缓存雪崩
缓存具有失效时间,如果缓存失效时间都是一样,本来应该请求缓存的,但是因为缓存失效了,全部请求到了数据库,数据库压力剧增,可能会造成数据库宕机,进而造成系统崩溃。
解决方案,设置缓存的失效时间均匀分布。
7、企业架构队列缓存中间件分布式Redis

根据以上业务需求,准备加入Redis缓存中间件服务器,可以使用到redis更加丰富的功能
在商城业务中实现:
①session共享存储到redis
②openresty(nginx+lua)动态限制IP访问
Redis是Remote Dictionary Server(远程数据服务)的缩写,由意大利人 antirez(Salvatore Sanfilippo) 开发的一款 内存高速缓存数据库,该软件使用C语言编写,它的数据模型为 key-value,它支持丰富的数据结构,比如 String list(双向链表) hash(哈希) set(集合) sorted set(zset有序集合),可持久化(保存数据到磁盘中),保证了数据安全。Nosql 非关系数据库 key => value 键值对。
Redis业务使用场合:
①[Sort Set]排行榜应用,取top n操作,例如sina微博热门话题
②[List]获得最新N个数据 或 某个分类的最新数据
③[String]计数器应用
④[Set]sns(social network site)获得共同好友
⑤[Set]防攻击系统(ip判断)黑白名单等等
对比memcached:
①Redis不仅仅支持简单的k/v类型的数据,同时还提供list,set,zset,hash等数据结构的存储。
②Redis支持master-slave(主—从)模式应用。
③Redis支持数据的持久化,可以将内存中的数据保持在磁盘中,重启的时候可以再次加载进行使用。
④Redis单个value存储string的最大限制是512MB, memcached只能保存1MB的数据
⑤redis是单核,memcached是多核
由于redis只能使用单核,而memcached可以使用多核,所以在比较上,平均每一个核上redis在储存小数据时比memcached性能更高。而却100K以上数据中,memcached性能要高于redis,虽然redis最近也在储存大数据的性能上进行优化,但是比起memcached还是有点逊色。结论是无论你使用那个,每秒处理请求的次数都不会成为瓶颈。
你需要关注内存使用率。对于key-vlaue这样简单的数据储存,memcached的内存使用率更高,如果采用hash结构,redis的内存使用率会更高,当然这都依赖于具体的应用场景。
8、企业架构NOSQL数据库之MongoDB
9、企业架构web服务器的文件及时同步
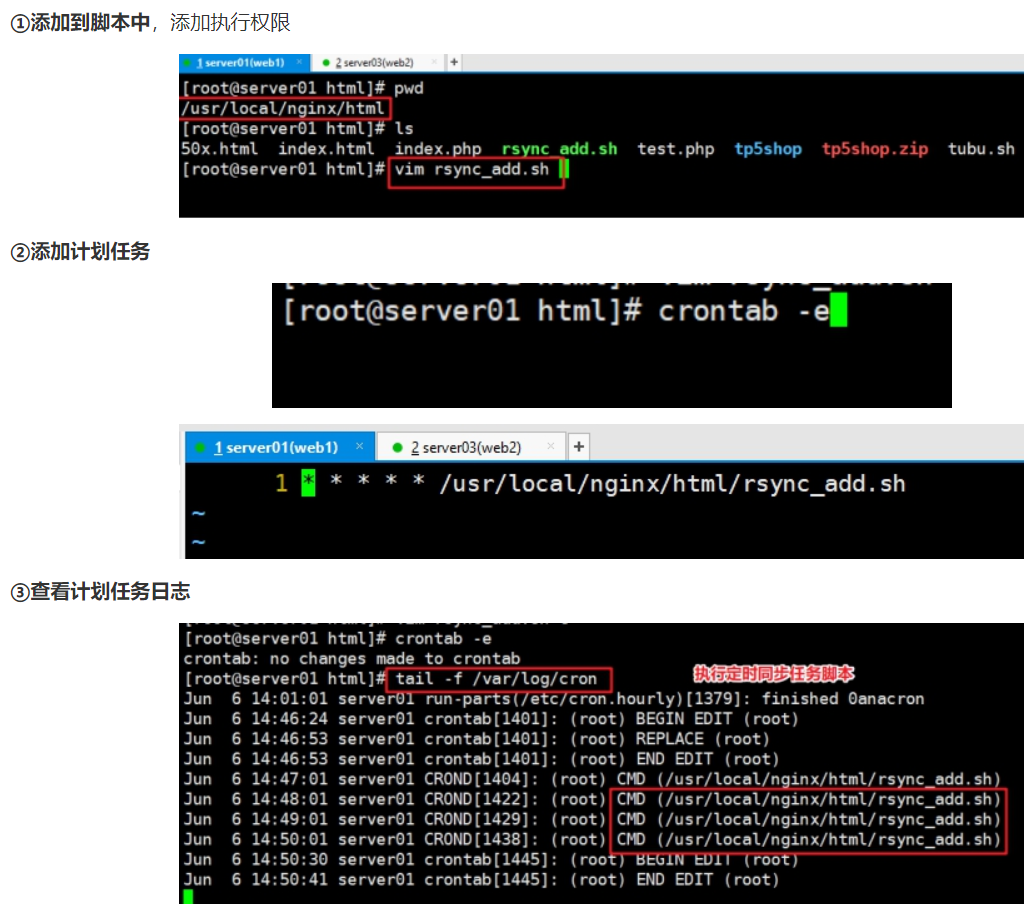
当业务代码发生改变上传到web服务器时,因为架构已经不是单台服务器提供服务器,而是由多台web服务器提供服务,业务代码需要同时上传到多台web服务器,在操作上带来了很多不便。
故需要解决以上问题, 就需要web服务器中的业务代码能够及时同步,保证业务代码的一致性。
1、同步文件的几种方式
server01  web1服务器        /usr/local/nginx/html/tp5shop
server03  web2服务器        /usr/local/nginx/html/tp5shop
①scp
scp是 secure copy的缩写, scp是linux系统下基于ssh登陆进行安全的远程文件拷贝命令 全量同步
问题:全部复制过去 比较慢 效率低一些 scp不能够远程删除
②rsync
rsync命令是一个远程数据同步工具,可通过LAN/WAN快速同步多台主机间的文件。rsync使用所谓的“rsync算法”来使本地和远程两个主机之间的文件达到同步,这个算法只传送两个文件的不同部分,而不是每次都整份传送,因此速度相当快 增量同步
问题:当文件变动,不能够实时同步
③rsync+sersync
inotify-tools和sersync属于同类
sersync是基于inotify+rsync的大量文件的多服务器自动同步程序
使用Linux 2.6 内核的 inotify 监控 Linux 文件系统事件,被监听目录下如果有文件发生修改,sersync 将通过内核自动捕获到事件,并将该文件利用 rsync 同步到多台远程服务器。sersync 仅仅同步发生增、删、改事件的单个文件或目录,不像rsync镜像同步那样需要比对双方服务器整个目录下数千万的文件,并且支持多线程同步,因此效率非常高
sersync主要用于服务器同步,web镜像等功能。基于boost1.43.0,inotify api,rsync command.开发
特点:
1、sersync是使用c++编写,而且对linux系统文件系统产生的临时文件和重复的文件操作进行过滤(详细见附录,这个过滤脚本程序没有实现),所以在结合rsync同步的时候,节省了运行时耗和网络资源。因此更快。
相比较上面两个项目,sersync配置起来很简单,其中bin目录下已经有基本上静态编译的
2、二进制文件,配合bin目录下的xml配置文件直接使用即可。
另外本项目相比较其他脚本开源项目,使用多线程进行同步,尤其在同步较大文件时,能够保证多个服务器实时保持同步状态。
3、本项目有出错处理机制,通过失败队列对出错的文件重新同步,如果仍旧失败,则按设定时长对同步失败的文件重新同步。
4、本项目自带crontab功能,只需在xml配置文件中开启,即可按您的要求,隔一段时间整体同步一次。无需再额外配置crontab功能。
5、本项目socket与http插件扩展,满足您二次开发的需要。
2、同步文件案例
源服务器    web1    server01     原文件所在服务器         10.1.1.10
目标服务器  web2    server03      需要复制到的服务器       10.1.1.30
1、scp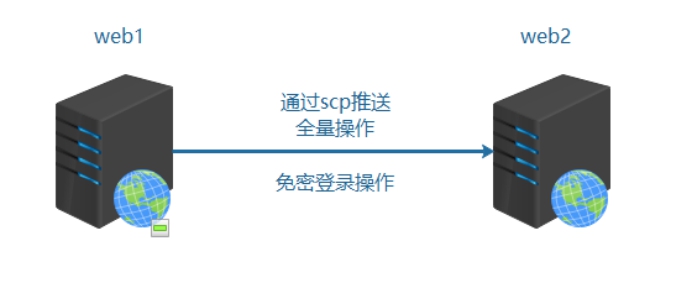
语法:scp 本地文件路径 用户名@远程IP:远程存储路径
由于需要远程登录,故需要输入密码不是很方便,添加机器的公钥到允许列表中
①生成公钥(源服务器)
/root/.ssh,ssh-keygen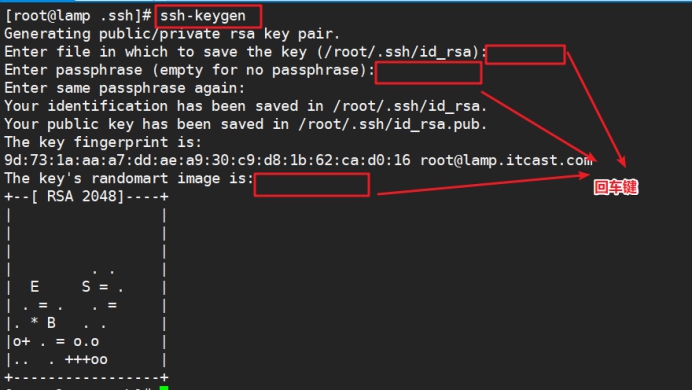
②添加公钥到允许文件(源服务器)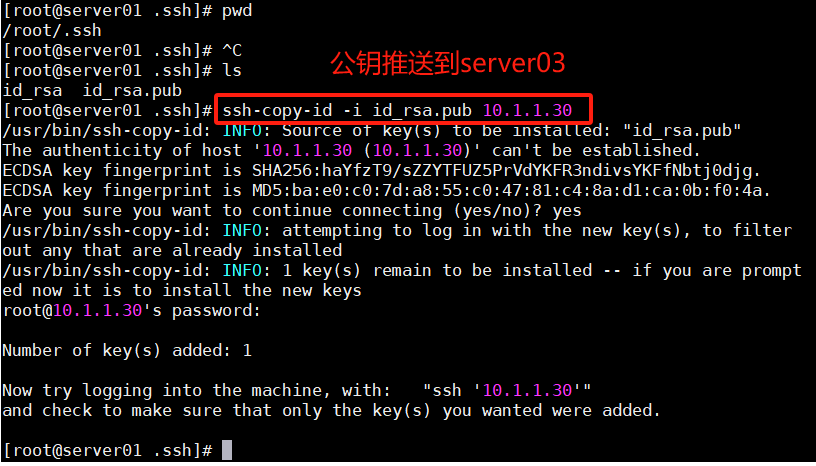
server03允许server01登录,不需要输入密码
③测试远程登录
④测试修改业务代码
源服务器server01操作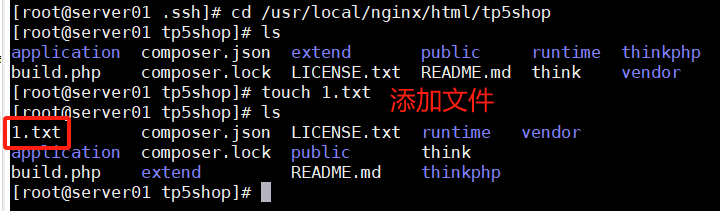
⑤通过scp推送同步
源服务器server01操作
scp -r /usr/local/nginx/html/tp5shop root@10.1.1.30:/usr/local/nginx/html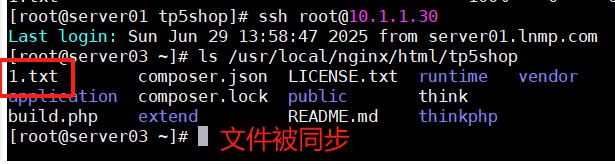
可以把以上推送命令,写入到脚本中,业务代码变化之后,直接执行脚本就可以。
2、rsync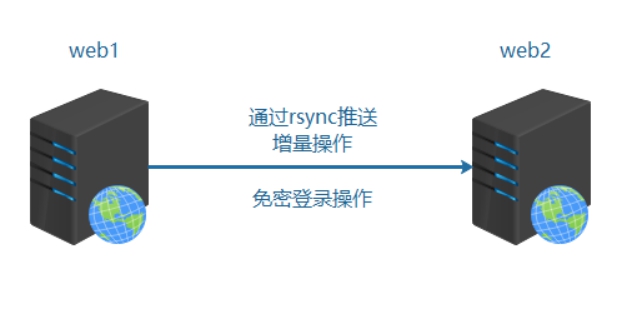
①server01文件变动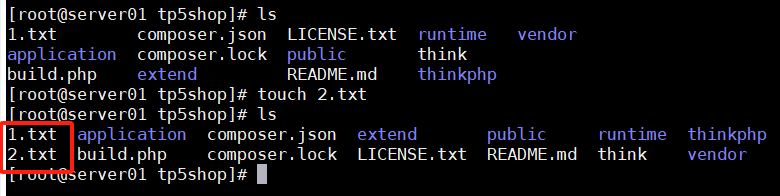
②在server01执行推送
rsync -av /usr/local/nginx/html/tp5shop root@10.1.1.30:/usr/local/nginx/html
③在server03上查看
3、rsync+sersync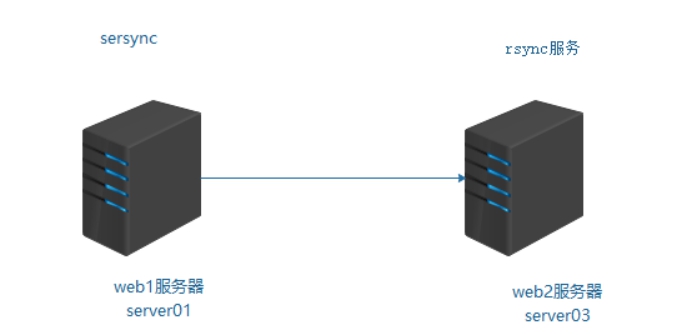
实现方式:
源服务器 安装sersync 监控文件(inotify)的变动 调用rsync传输数据给目标服务器
目标服务器 启动rsync的服务
目标服务器server03配置
配置rsync服务
1、安装rsync,yum -y install rsync
2、配置rsync,vim /etc/rsyncd.conf
配置文件内容:
uid = root
gid = root
use chroot = no
#设置允许登录的ip,这里没有限制IP
hosts allow=*
#设置最大连接数
max connections = 3
#设置启动rsync服务器的文件
pid file = /var/run/rsyncd.pid
lock file = /var/run/rsync.lock
#同步模块
[tp5shop]
#需要的文件及其文件夹路径
path = /usr/local/nginx/html/tp5shop
#备注
comment = tp5shop
#只读关闭
read only = false
3、以守护进程方式启动rsync
/usr/bin/rsync --daemon
源服务器server01配置
mv sersync2.5.4_64bit_binary_stable_final.tar.gz /usr/local/
cd /usr/local/
tar xvf sersync2.5.4_64bit_binary_stable_final.tar.gz
mv GNU-Linux-x86 sersync

confxml.xml配置serync示例文件说明:
<?xml version="1.0" encoding="ISO-8859-1"?>
<head version="2.5">
<host hostip="localhost" port="8008"></host> #保留字段,默认即可
<debug start="false"/> #是否开启调试模式,默认false即可
<fileSystem xfs="true"/> #是否开启支持xfs文件系统,Centos7默认都是xfs的了,所以建议true开启
<filter start="false"> #是否开启过滤模式,根据需求开启,例:过滤以.php结尾的文件(.*)\.php
<exclude expression="(.*)\.svn"></exclude> #过滤以.svn结尾的文件
<exclude expression="(.*)\.gz"></exclude> #过滤以.gz结尾的文件
<exclude expression="^info/*"></exclude> #过滤监控目录下的info路径
<exclude expression="^static/*"></exclude> #过滤监控目录下的static路径
<exclude expression="wwwroot/blogwhsir/*"></exclude> #过滤wwwroot/blogwhsir/目录下所有文件
</filter>
<inotify> #inotify监控事件
<delete start="true"/> #如果不开启此项,在删除监控目录下的文件时,目标服务器的文件则不会同时删除,根据需求开启
<createFolder start="true"/> #不开启不能监控子目录,建议true
<createFile start="false"/> #关闭提高通讯性能,默认就好
<closeWrite start="true"/>
<moveFrom start="true"/>
<moveTo start="true"/>
<attrib start="false"/>
<modify start="false"/>
</inotify>

<sersync>
<localpath watch="/opt/tongbu"> #指定要监控的本地目录
<remote ip="127.0.0.1" name="tongbu1"/> #指定要同步的目标服务器的IP地址,及目标服务器rsync的[模块]
<!--<remote ip="192.168.8.39" name="tongbu"/>-->
<!--<remote ip="192.168.8.40" name="tongbu"/>-->
</localpath>
<rsync> #配置rsync
<commonParams params="-artuz"/> #rsync的参数
<auth start="false" users="root" passwordfile="/etc/rsync.pas"/> #是否开启rsync的认证模式,需要配置users及passwordfile,根据情况开启(如果开启,注意密码文件权限一定要是600)
<userDefinedPort start="false" port="874"/><!-- port=874 --> #远程目标服务器的端口不是默认端口时使用
<timeout start="false" time="100"/><!-- timeout=100 --> #是否开启rsync的超时时间
<ssh start="false"/>
</rsync>
<failLog path="/tmp/rsync_fail_log.sh" timeToExecute="60"/><!--default every 60mins execute once--> #目标服务器传输失败时会重新传输,再次失败会写入rsync_fail_log中,每隔一段时间(timeToExecute)执行脚本再次传输
<crontab start="false" schedule="600"><!--600mins--> #对监控目录与目标服务器每隔一段时间进行一次整体同步,默认600分钟,根据个人情况是否开启
<crontabfilter start="false"> #如果之前开启了文件过滤,这里也要设置过滤
<exclude expression="*.php"></exclude>
<exclude expression="info/*"></exclude>
</crontabfilter>
</crontab>
<plugin start="false" name="command"/>
</sersync>

<plugin name="command"> #下面就是插件的设置(不做过多说明)
<param prefix="/bin/sh" suffix="" ignoreError="true"/> <!--prefix /opt/tongbu/mmm.sh suffix-->
<filter start="false">
<include expression="(.*)\.php"/>
<include expression="(.*)\.sh"/>
</filter>
</plugin>

<plugin name="socket">
<localpath watch="/opt/tongbu">
<deshost ip="192.168.138.20" port="8009"/>
</localpath>
</plugin>
<plugin name="refreshCDN">
<localpath watch="/data0/htdocs/cms.xoyo.com/site/">
<cdninfo domainname="ccms.chinacache.com" port="80" username="xxxx" passwd="xxxx"/>
<sendurl base="https://blog.whsir.com"/>
<regexurl regex="false" match="cms.xoyo.com/site([/a-zA-Z0-9]*).xoyo.com/images"/>
</localpath>
</plugin>
</head>
修改使用配置文件confxml.xml,修改监控本地目录和目标服务器IP
<?xml version="1.0" encoding="ISO-8859-1"?>
<head version="2.5">
    <host hostip="localhost" port="8008"></host>
    <debug start="false"/>
    <fileSystem xfs="false"/>
    <filter start="false">
	<exclude expression="(.*)\.svn"></exclude>
	<exclude expression="(.*)\.gz"></exclude>
	<exclude expression="^info/*"></exclude>
	<exclude expression="^static/*"></exclude>
    </filter>
    <inotify>
	<delete start="true"/>
	<createFolder start="true"/>
	<createFile start="false"/>
	<closeWrite start="true"/>
	<moveFrom start="true"/>
	<moveTo start="true"/>
	<attrib start="false"/>
	<modify start="false"/>
    </inotify>

    <sersync>
    <!--1、监控本地目录-->
	<localpath watch="/usr/local/nginx/html/tp5shop">
	<!--2、目标服务器IP,同步到的服务器 name为目标服务器rsyncd.conf里配置的模块名称-->
	    <remote ip="10.1.1.30" name="tp5shop"/>
	    <!--<remote ip="192.168.8.39" name="tongbu"/>-->
	    <!--<remote ip="192.168.8.40" name="tongbu"/>-->
	</localpath>
	<rsync>
	    <commonParams params="-artuz"/>
	    <auth start="false" users="root" passwordfile="/etc/rsync.pas"/>
	    <userDefinedPort start="false" port="874"/><!-- port=874 -->
	    <timeout start="false" time="100"/><!-- timeout=100 -->
	    <ssh start="false"/>
	</rsync>
	<failLog path="/tmp/rsync_fail_log.sh" timeToExecute="60"/><!--default every 60mins execute once-->
	<crontab start="false" schedule="600"><!--600mins-->
	    <crontabfilter start="false">
		<exclude expression="*.php"></exclude>
		<exclude expression="info/*"></exclude>
	    </crontabfilter>
	</crontab>
	<plugin start="false" name="command"/>
    </sersync>

    <plugin name="command">
	<param prefix="/bin/sh" suffix="" ignoreError="true"/>	<!--prefix /opt/tongbu/mmm.sh suffix-->
	<filter start="false">
	    <include expression="(.*)\.php"/>
	    <include expression="(.*)\.sh"/>
	</filter>
    </plugin>

    <plugin name="socket">
	<localpath watch="/opt/tongbu">
	    <deshost ip="192.168.138.20" port="8009"/>
	</localpath>
    </plugin>
    <plugin name="refreshCDN">
	<localpath watch="/data0/htdocs/cms.xoyo.com/site/">
	    <cdninfo domainname="ccms.chinacache.com" port="80" username="xxxx" passwd="xxxx"/>
	    <sendurl base="http://pic.xoyo.com/cms"/>
	    <regexurl regex="false" match="cms.xoyo.com/site([/a-zA-Z0-9]*).xoyo.com/images"/>
	</localpath>
    </plugin>
</head>
启动sersync服务
/usr/local/sersync/sersync2 -n 10 -d -o /usr/local/sersync/confxml.xml
-n 启用线程数量 -d daemon方式启动 -o 指定配置文件
在配置文件confxml.xml设置,过滤不需要同步的文件
第6行开始
<filter start="true">
          <exclude expression="(.*)\.cfg"></exclude>
          <!--<exclude expression="(.*)\.svn"></exclude>
          <exclude expression="(.*)\.gz"></exclude>
          <exclude expression="^info/*"></exclude>
          <exclude expression="^static/*"></exclude>-->
</filter>
10、Tomcat
Tomcat是Apache 软件基金会(Apache Software Foundation)的Jakarta 项目中的一个核心项目,由Apache、Sun 和其他一些公司及个人共同开发而成。由于有了Sun 的参与和支持,最新的Servlet 和JSP 规范总是能在Tomcat 中得到体现,Tomcat支持最新的Servlet和JSP规范。因为Tomcat 技术先进、性能稳定,而且免费,因而深受Java 爱好者的喜爱并得到了部分软件开发商的认可,成为目前比较流行的Web 应用服务器。
tomcat工作原理图示: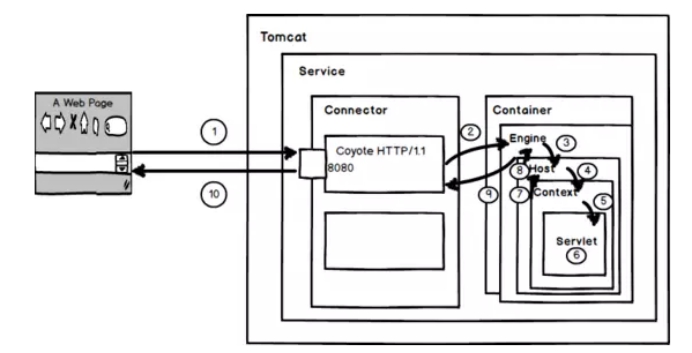
coyote是tomcat的Connector框架的名字,简单说就是coyote来处理底层的socket,并将http请求、响应等字节流层面的东西,包装成Request和Response两个类(这两个类是tomcat定义的,而非servlet中的ServletRequest和ServletResponse),供容器使用.
1、用户点击网页内容,请求被发送到本机端口8080,被在那里监听的Coyote HTTP/1.1 Connector获得。
2、Connector把该请求交给它所在的Service的Engine来处理,并等待Engine的回应。
3、Engine获得请求localhost/test/index.jsp,匹配所有的虚拟主机Host。
4、Engine匹配到名为localhost的Host(即使匹配不到也把请求交给该Host处理,因为该Host被定义为该Engine的默认主机),名为localhost的Host获得请求/test/index.jsp,匹配它所拥有的所有的Context。Host匹配到路径为/test的Context(如果匹配不到就把该请求交给路径名为“ ”的Context去处理)。
5、path=“/test”的Context获得请求/index.jsp,在它的mapping table中寻找出对应的Servlet。Context匹配到URL PATTERN为*.jsp的Servlet,对应于JspServlet类。
6、构造HttpServletRequest对象和HttpServletResponse对象,作为参数调用JspServlet的doGet()或doPost().执行业务逻辑、数据存储等程序。
7、Context把执行完之后的HttpServletResponse对象返回给Host。
8、Host把HttpServletResponse对象返回给Engine。
9、Engine把HttpServletResponse对象返回Connector。
10、Connector把HttpServletResponse对象返回给客户Browser。
1、安装和配置
1、安装方式介绍
①yum方式安装 加载epel源,版本目前为tomcat7.0
②二进制方式安装 直接下载,部署好java环境,即可运行(推荐)
③源码方式安装 需要下载Apache Ant进行编译安装
2、二进制安装
①上传获取软件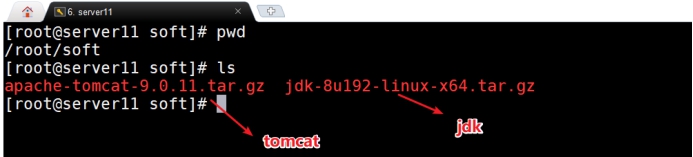
②部署java环境
shell > tar zxvf jdk-8u192-linux-x64.tar.gz
shell > mv jdk1.8.0_192 /usr/local/java
#tomcat配置环境变量,第二种可在任意路径识别java命令
#第一种tomat依赖JAVA_HOME环境变量
shell > echo "export JAVA_HOME=/usr/local/java/" >> /etc/profile
#第二种tomcat依赖java环境变量
shell > echo "PATH=/usr/local/java/bin:$PATH" >> /etc/profile
#第三中tomcat依赖JRE_HOME变量
shell > echo "export JRE_HOME=/usr/local/java/jre" >> /etc/profile
shell > . /etc/profile
shell > java -version
如果配置JAVA_HOME路径配置到jdk下就可以,不需要配置到bin下。
如果配置java的环境环境变量PATH,就指定到bin下。
如果启动tomcat,遇到如下问题
①没有安装jre jdk
②环境变量没有配置
③启动的软件找不到需要的java相关软件
③部署tomcat
shell > tar xvf apache-tomcat-9.0.11.tar.gz
shelll > mv apache-tomcat-9.0.11 /usr/local/tomcat
软件部署之后的目录结构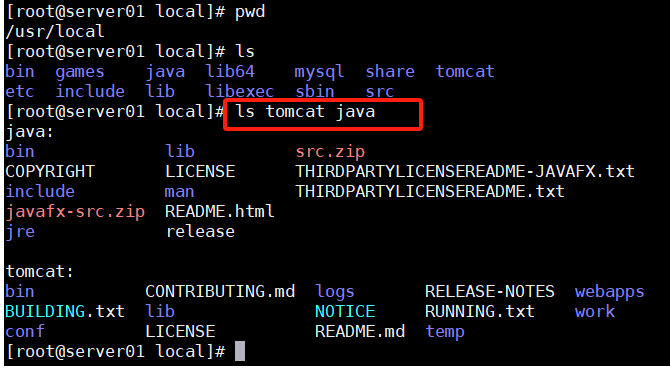
3、目录介绍,/usr/local/tomcat
bin 存放启动和关闭Tomcat的脚本文件
conf 存放Tomcat服务器的各种全局配置⽂文件,其中最重要的是server.xml和web.xml
lib 存放Tomcat服务器所需的各种JAR文件
logs 存放Tomcat执行时的日志文件
temp 此目录是tomcat存放的临时文件
webapps tomcat默认存放应用程序的目录,好比apache的默认网页存放路径是/var/www/html一样
work 用于存放JSP应用程序在部署时编译后产生的class文件
项目代码目录,/usr/local/tomcat/webapps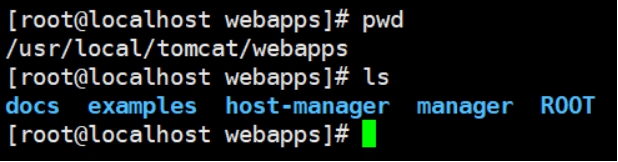
docs tomcat文档
examples tomcat自带的一个独立的web应用程序例子
host-manager tomcat的主机管理应用程序
manager tomcat的管理应用程序
ROOT 指tomcat的应用程序的根,如果应用程序部署在ROOT中,则可直接通过http://ip:port 访问到
配置文件目录,/usr/local/tomcat/conf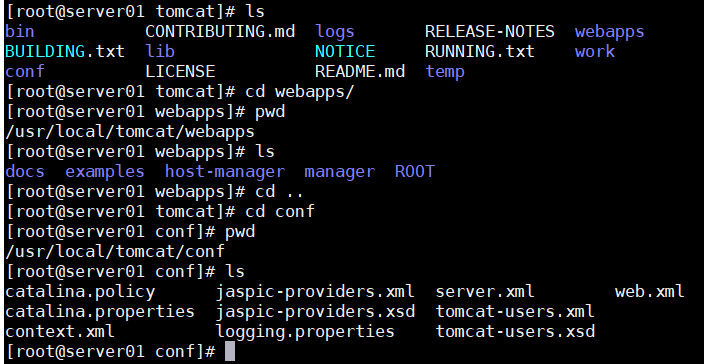
catalina.policy 配置tomcat对文件系统中目录或文件的读、写执行等权限,及对一些内存,session等的管理权限
catalina.properties 配置tomcat的classpath等
context.xml tomcat的默认context容器
logging.properties 配置tomcat的日志输出方式
server.xml tomcat的主配置文件  host配置
tomcat-users.xml tomcat的角色(授权用户)配置文件
web.xml tomcat的应用程序的部署描述符文件
4、启动相关说明
tomcat的相关管理命令在/usr/local/tomcat/bin目录下
经常使用的命令:
catalina.sh 主命令脚本
configtest.sh 检测配置文件
shutdown.sh 关闭
startup.sh 启动
version.sh 查看版本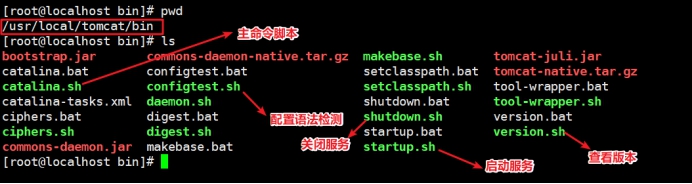
①测试启动tomcat
shell > /usr/local/tomcat/bin/startup.sh
shell > ps aux |grep tomcat
shell > netstat -lntp |grep 8080
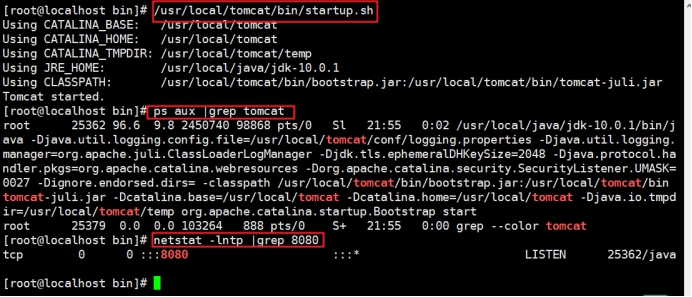
②查看页面效果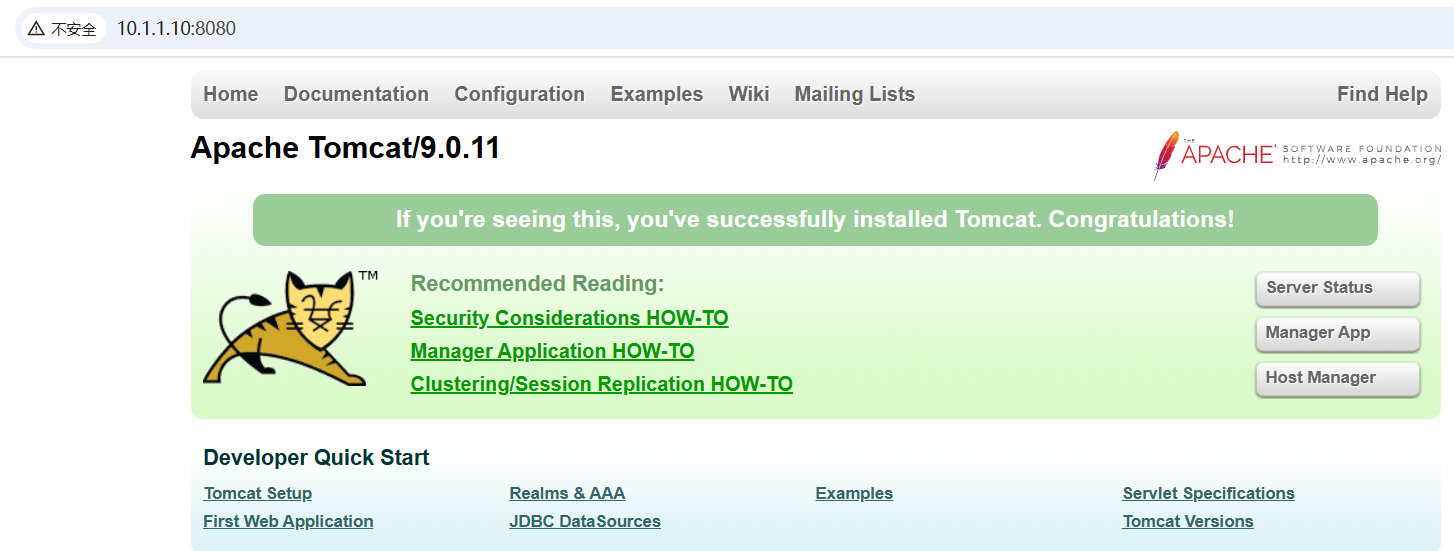
③测试关闭tomcat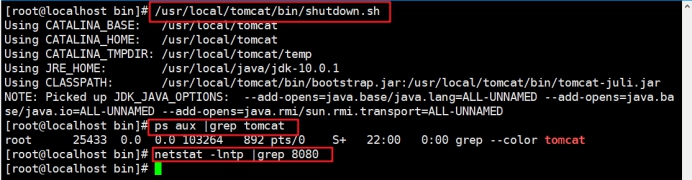
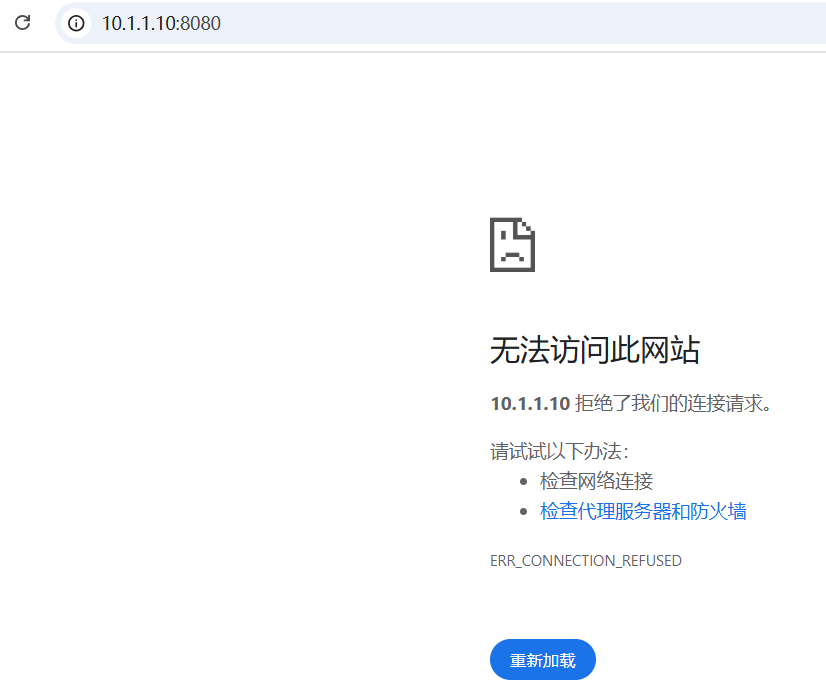
5、配置服务
tomcat提供了方便的启动命令脚本,但是却没有提供服务器中经常管理使用的service脚本。可以自行编写服务管理脚本。
①编辑启动脚本,生成tomcat.pid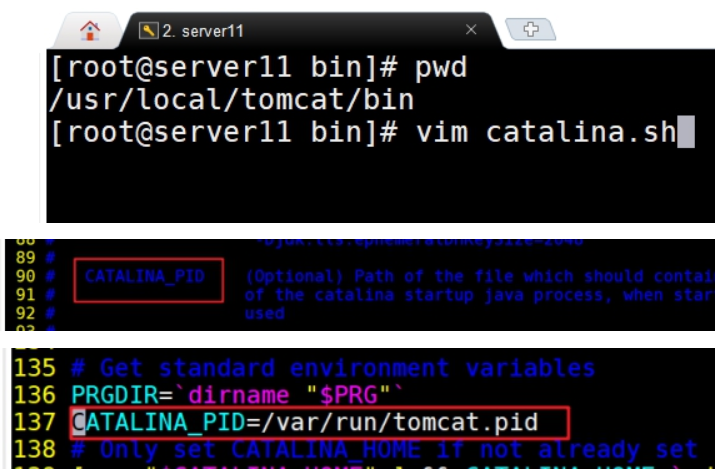
②脚本实现
将tomcat脚本上传到/etc/init.d目录并添加x可执行权限,chmod +x tomcat
根据编写的service脚本,通过chkconfig管理即可
chkconfig --add tomcat 添加服务
chkconfig tomcat on 服务自启动
service tomcat start
ps -ef |grep tomcat
2、企业中常见使用方式
1、简单代码测试

2、基于域名访问的Host配置
tomcat单实例运行多个tomcat应用的案列
①建立项目目录并写入测试文件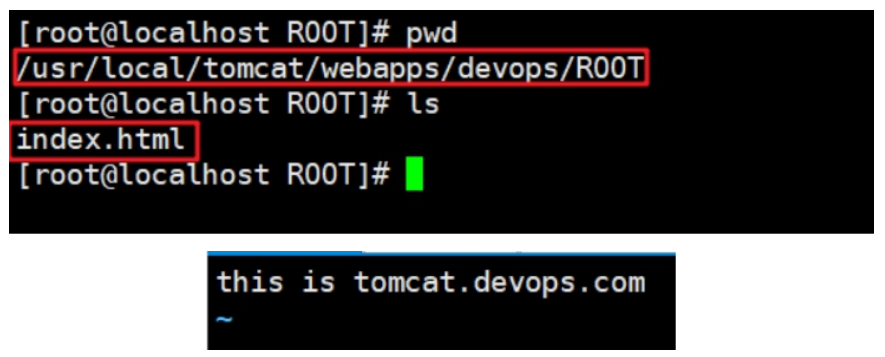
②编辑配置文件
shell > /usr/local/tomcat/conf/server.xml
name可以填写域名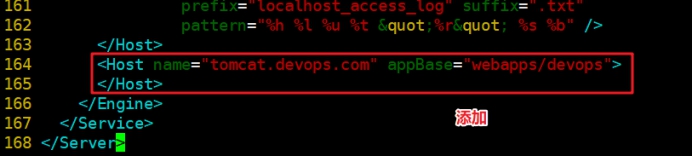
③检测配置并重启
shell > service tomcat configtest
shell > service tomcat restart
④访问主机解析域名并测试访问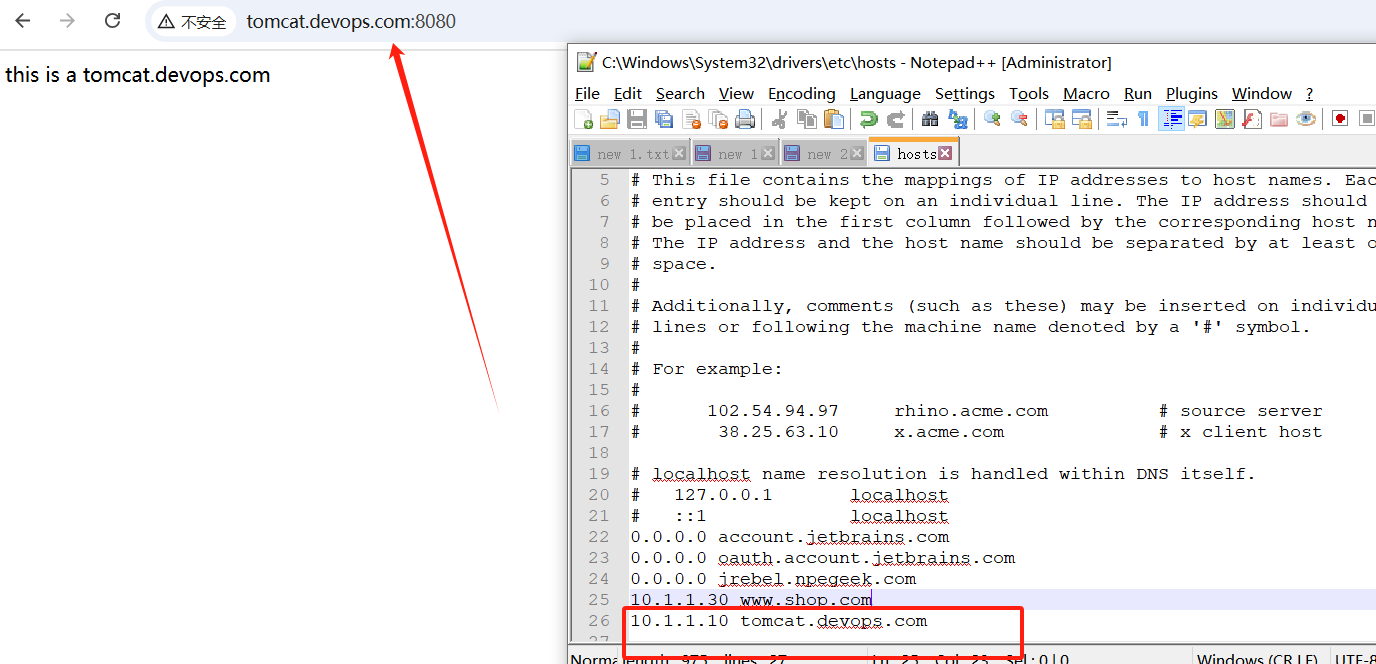
tomcat支持serverlet和jsp规范
项目源码:
①jsp jsp=>java代码=>class字节码=>加载jvm运行=>解析字符串=>container容器=>connector连接=>浏览器
②java代码
3、服务器状态查看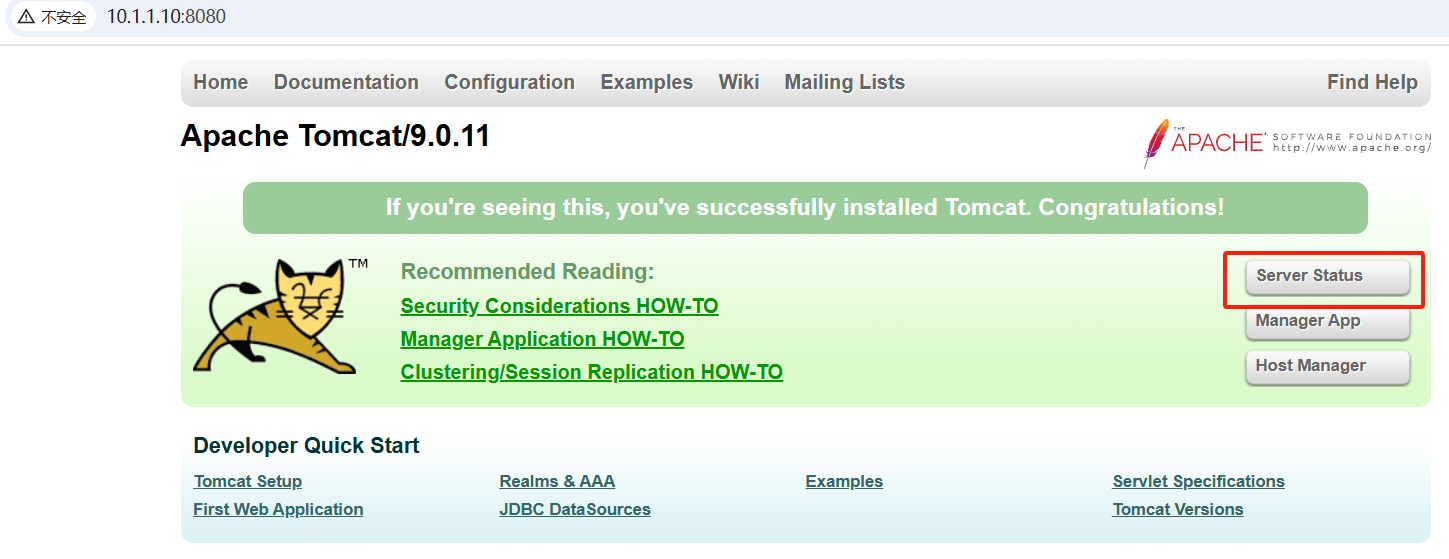
默认访问报错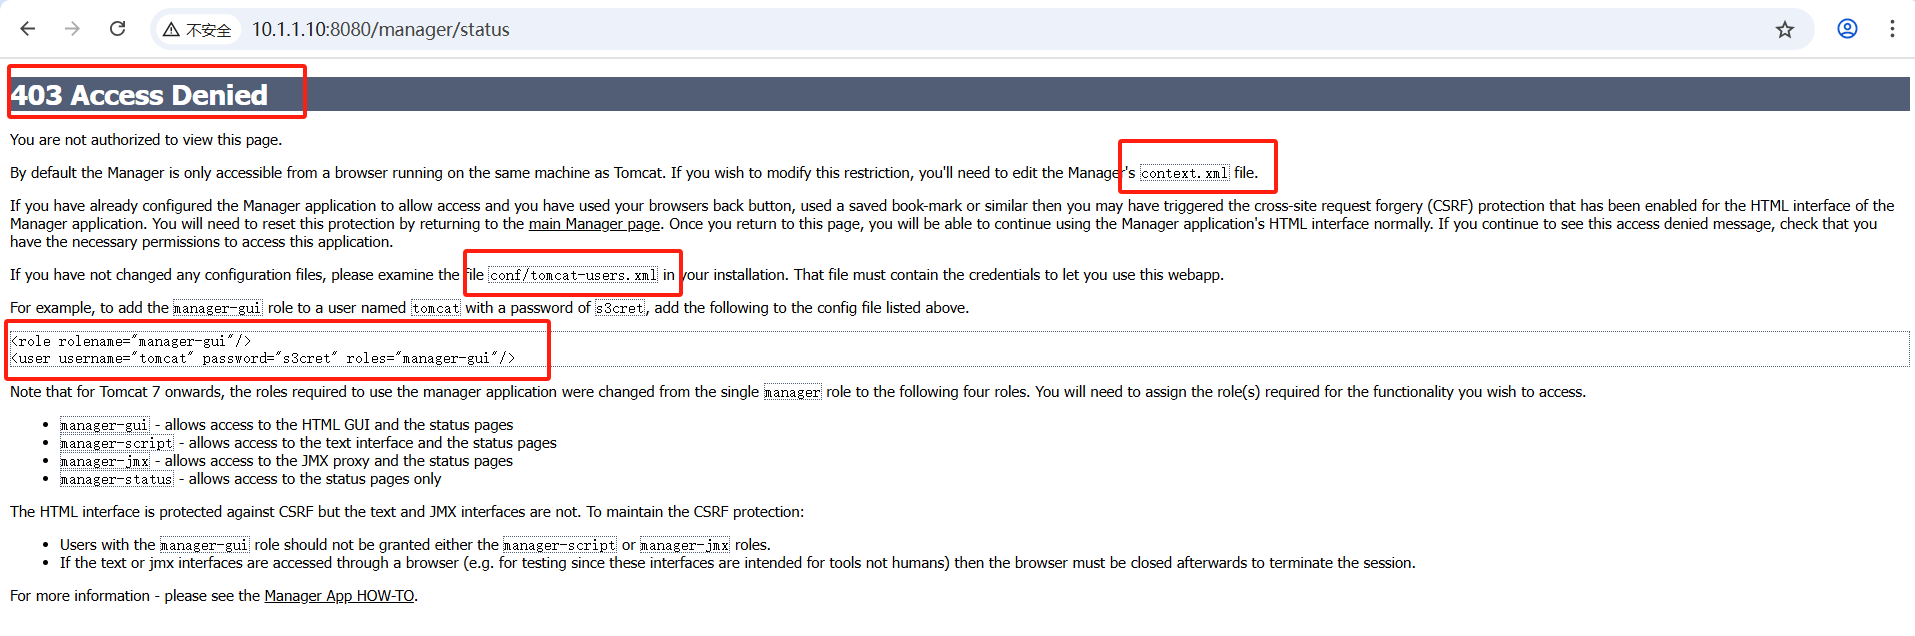
①去掉访问IP限制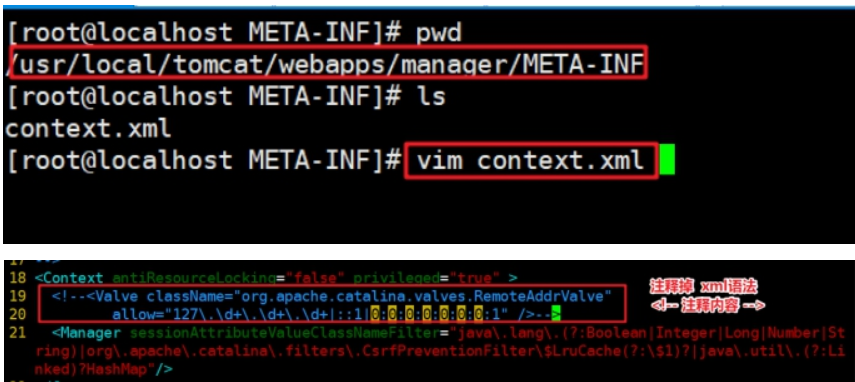
②创建用户和密码开启访问权限
  <role rolename="manager-gui"/>
  <user username="tomcat" password="tomcat" roles="manager-gui"/>
</tomcat-users>
改完配置文件重启tomcat,service tomcat restart
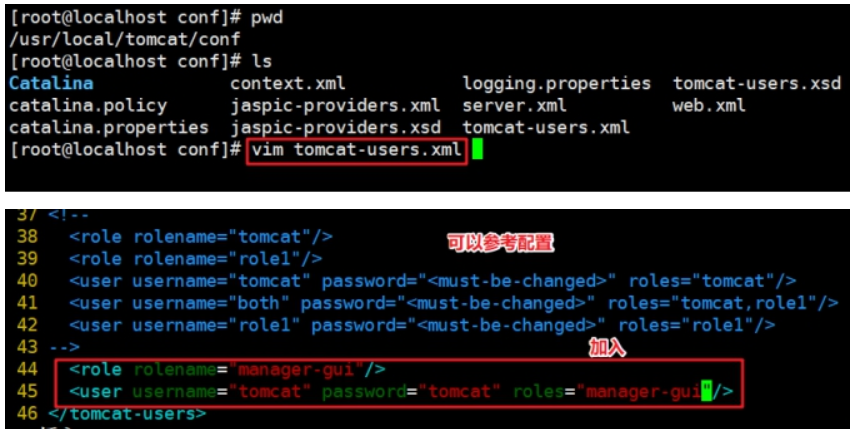
③查看页面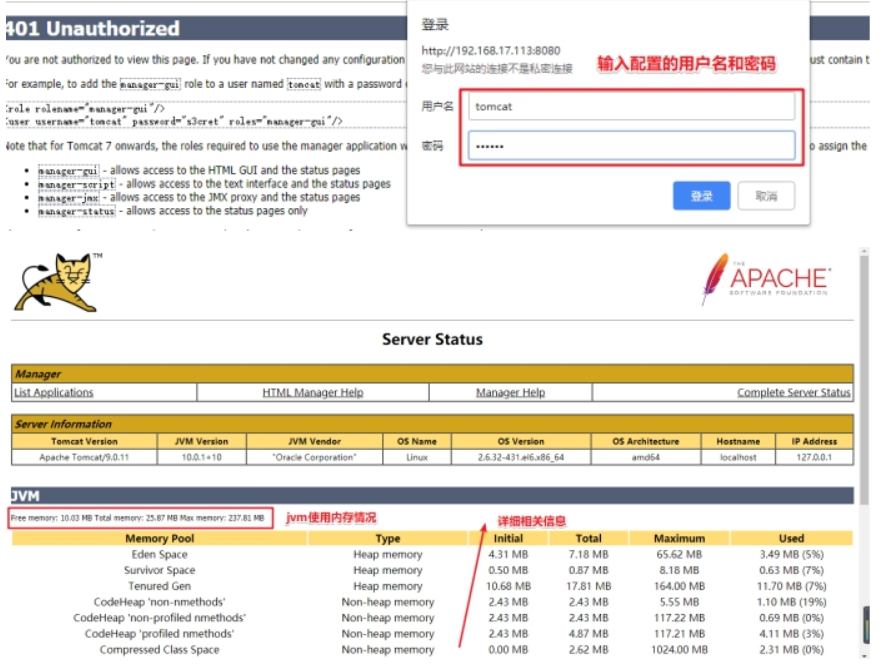
4、应用管理查看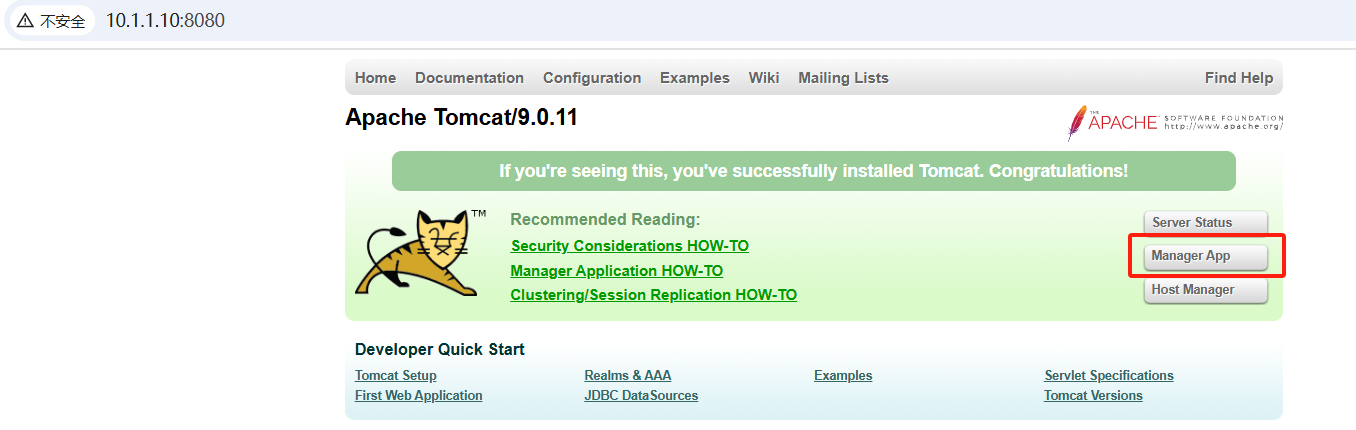
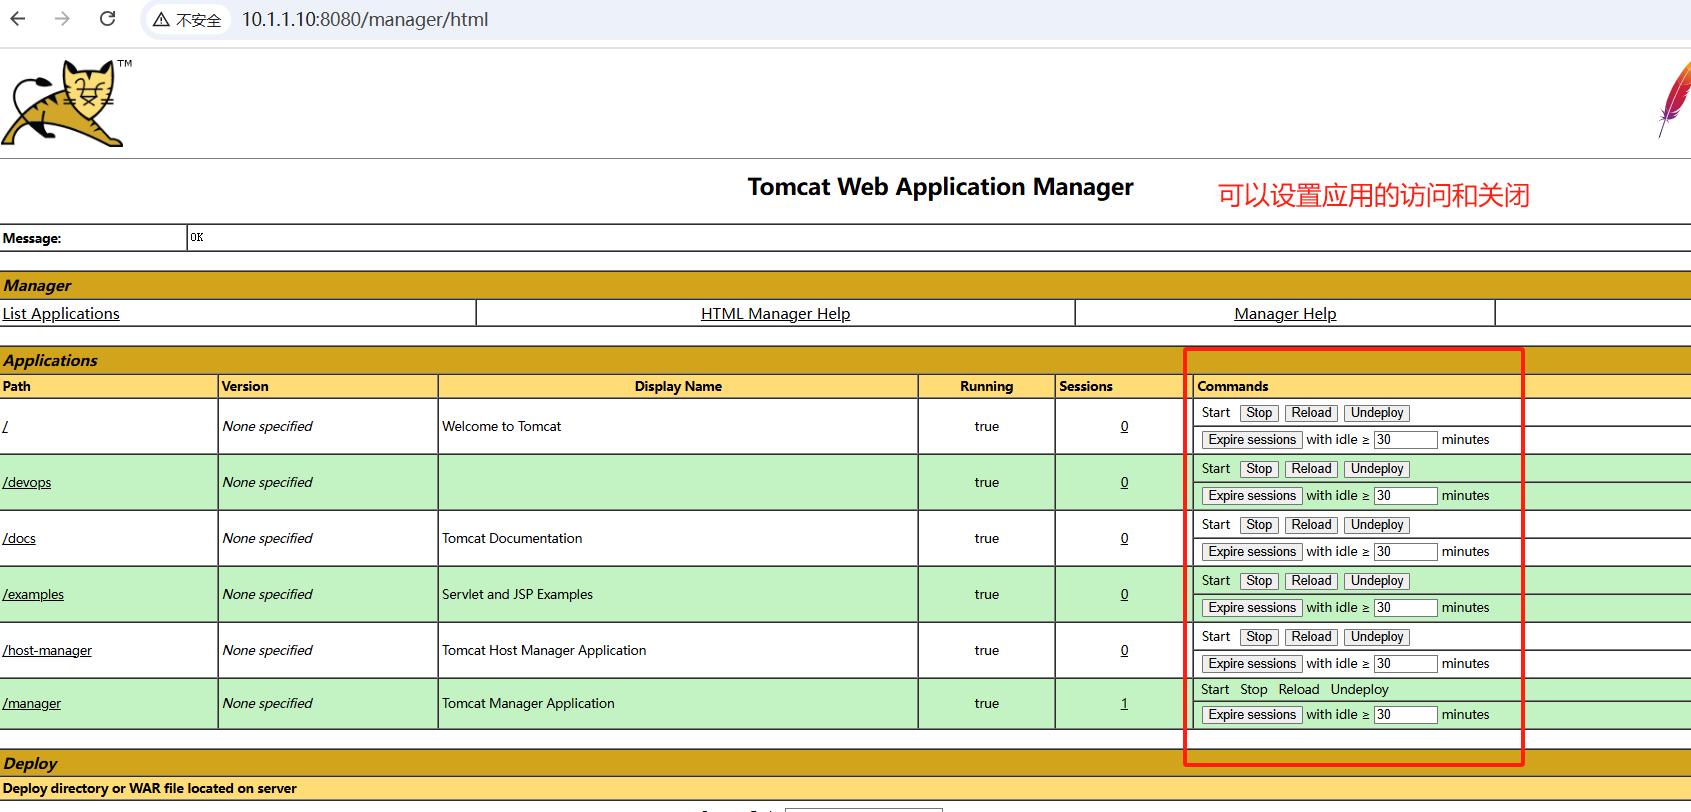
测试关闭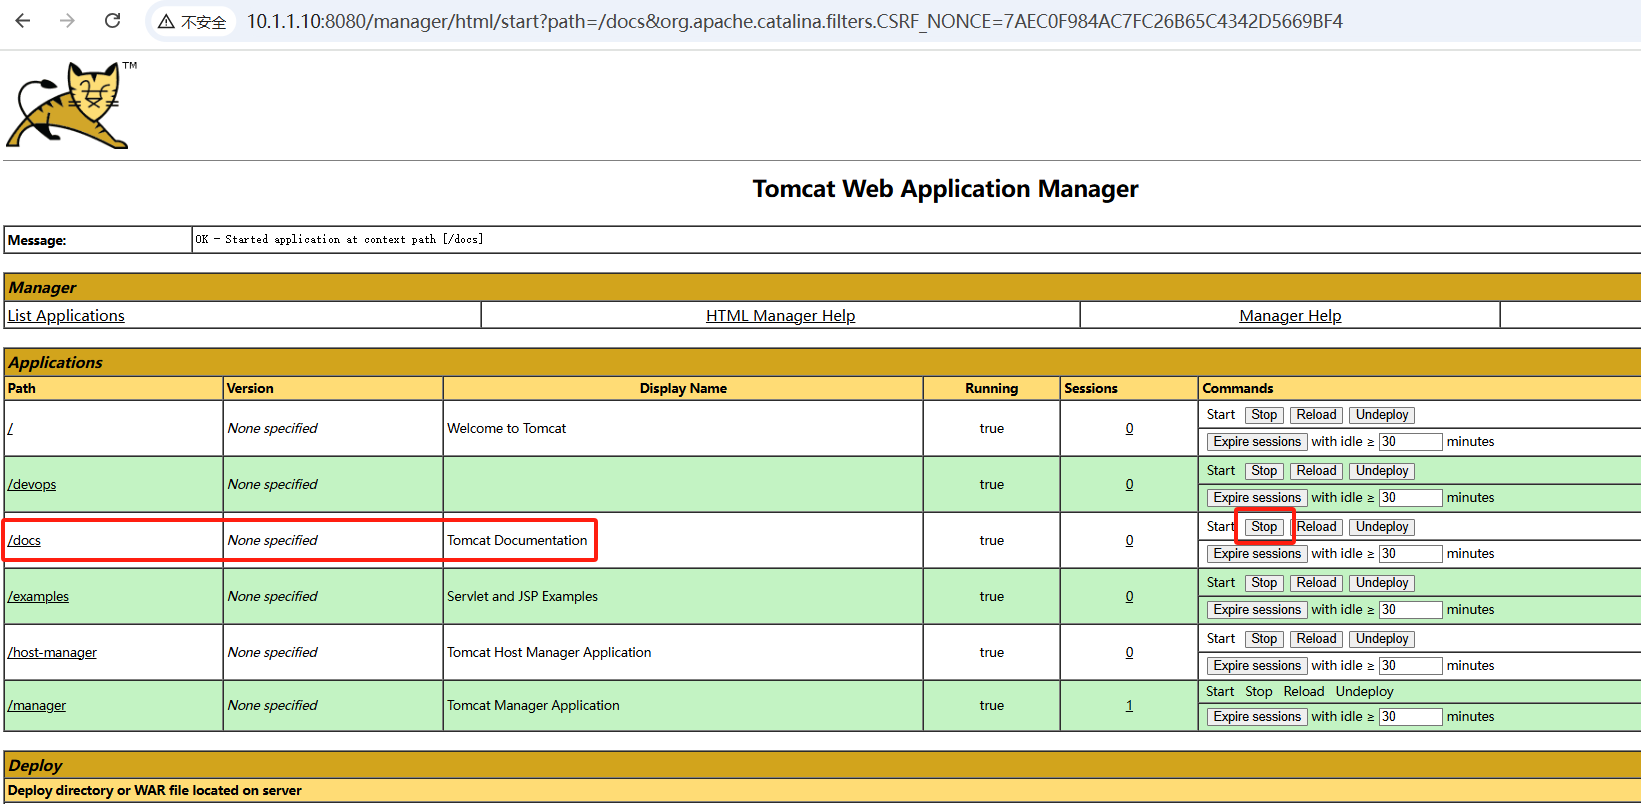
访问测试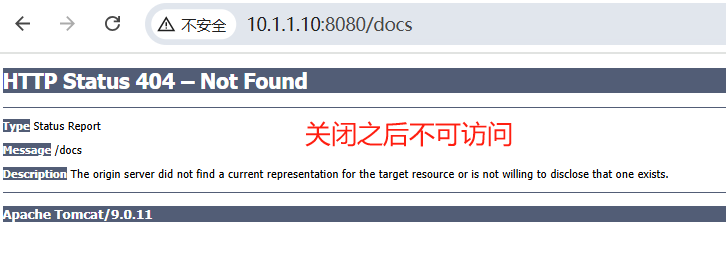
start之后即可重新访问正常显示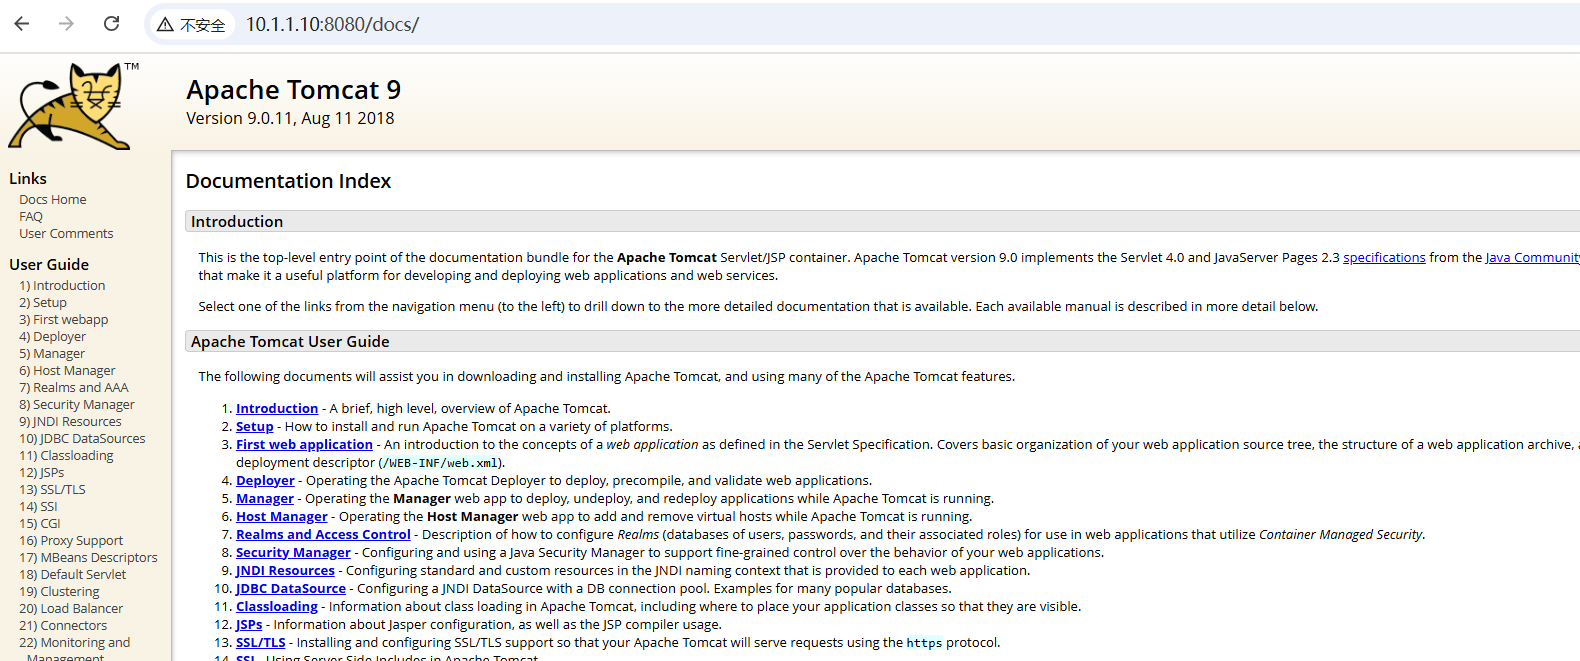
5、虚拟机Host管理查看
遇到上面类似的错误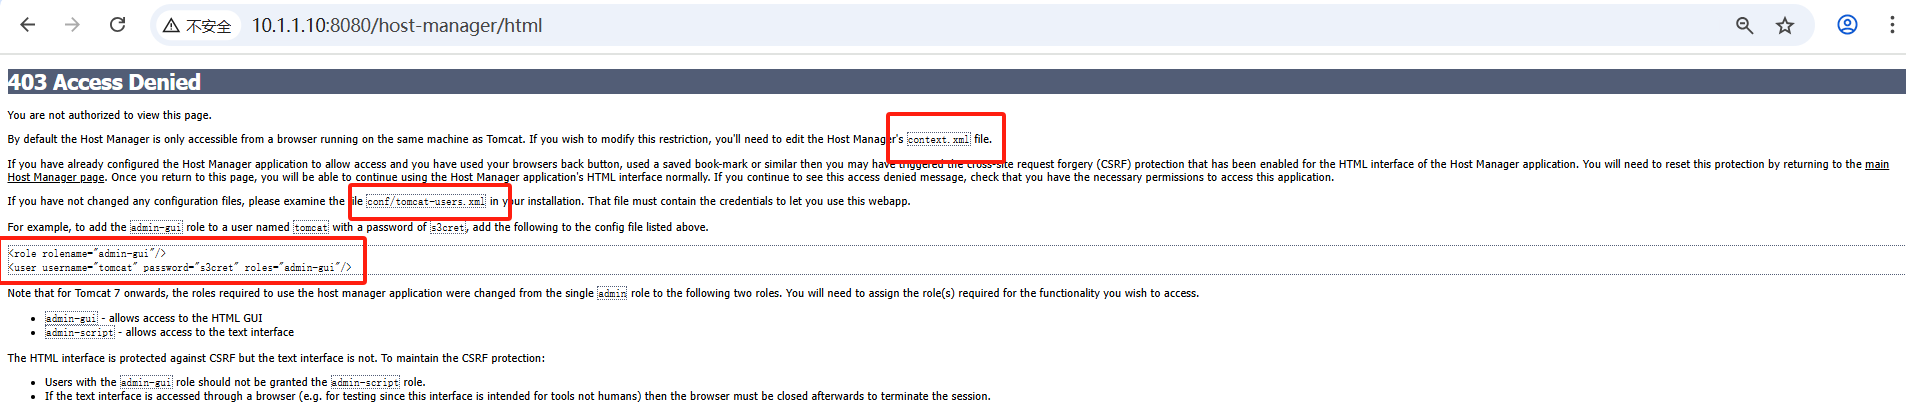
修改host-manager目录下的context.xml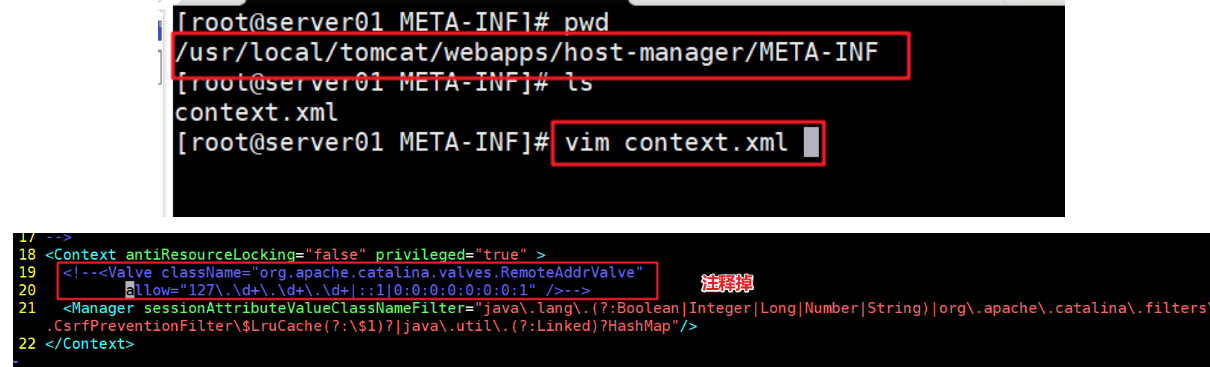
创建用户和密码开启访问权限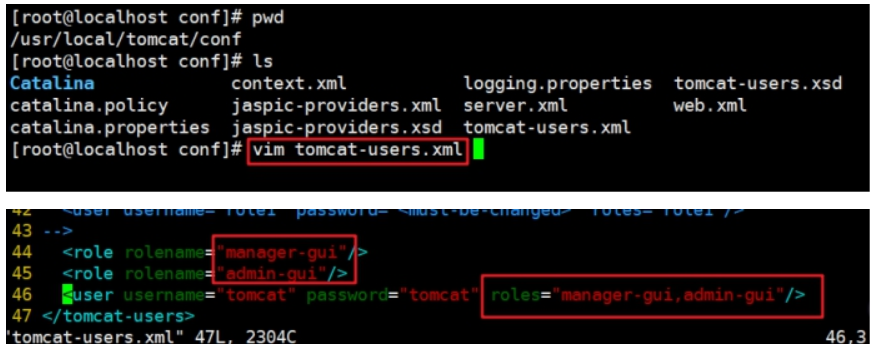
  <role rolename="manager-gui"/>
  <role rolename="admin-gui"/>
  <user username="tomcat" password="tomcat" roles="manager-gui,admin-gui"/>
改完配置文件重启tomcat,service tomcat restart
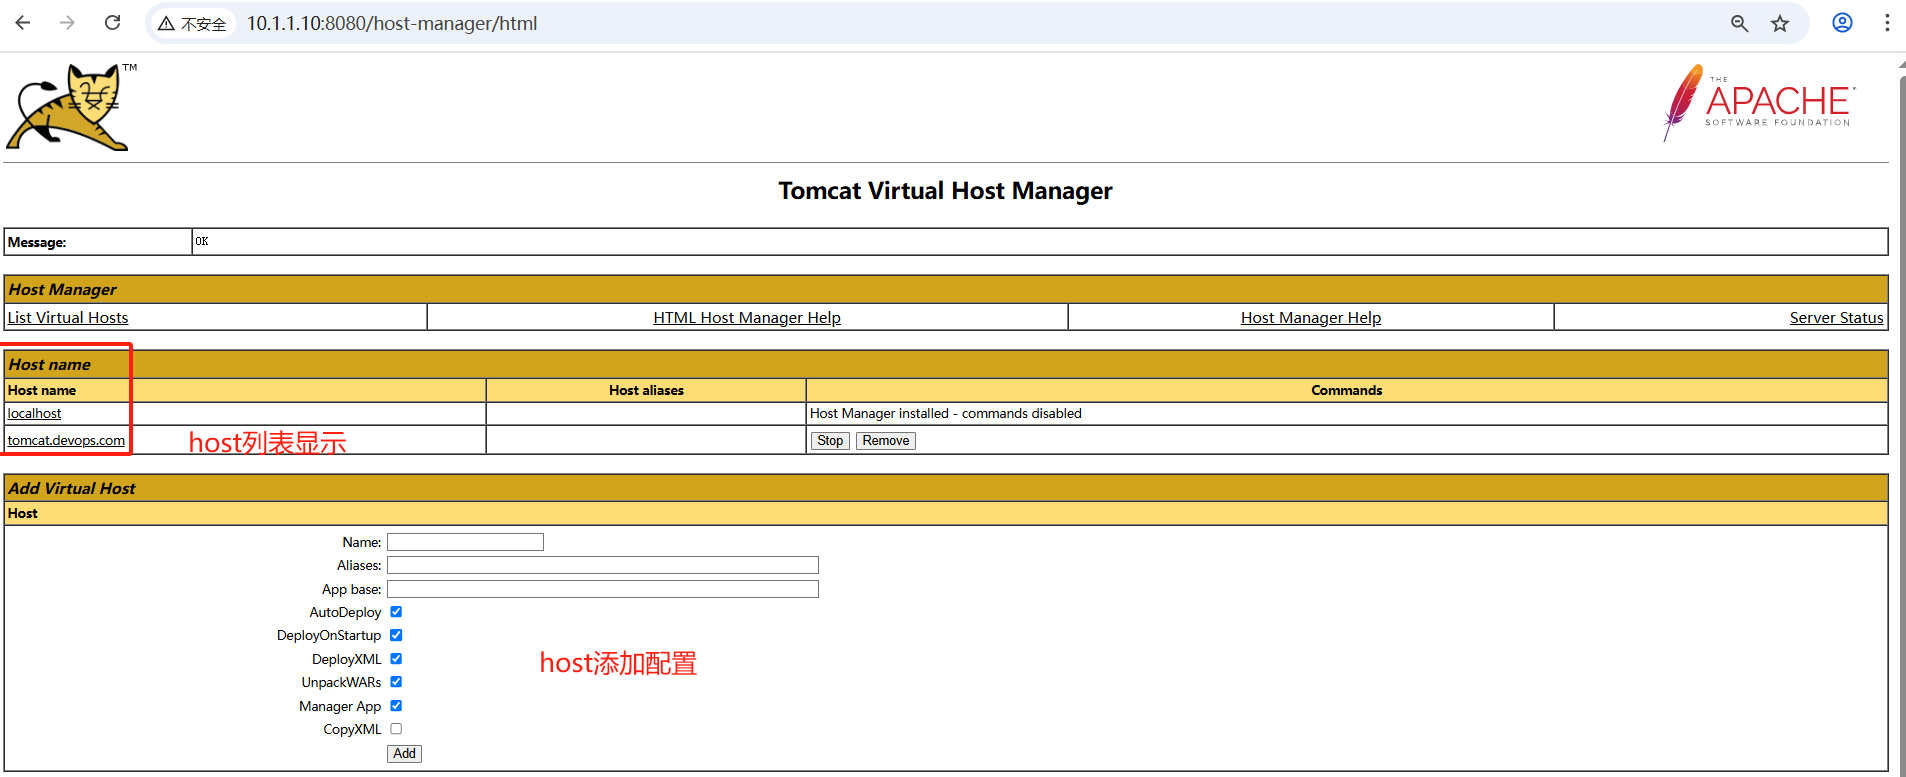
6、Nginx前端反向代理
实际业务环境中,用户是直接通过域名访问。基于协议一般是http、https等。默认tomcat运行在8080端口。一般会通过前端服务器反向代理到后端tomcat的方式,来实现用户可以直接通过域名访问到tomcat的webapp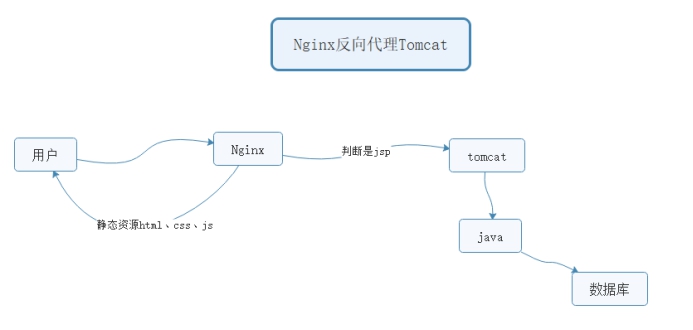
动静分离:动态页面的请求交由后端处理(tomcat+java),静态资源直接返回
实现配置
配置文件参考:
 server{
          listen       80;
          server_name  tomcat.devops.com;
          #和tomcat的host配置一致
          root /usr/local/tomcat/webapps/devops/ROOT;
          #静态不需要进行转发
          location ~ \.(html|css|js|png|jpg|jpeg)$ {
              #default_type text/plain;
              #echo 'html';
              #alias /;
              #root /usr/local/tomcat/webapps/devops/ROOT;
          }
          #其他识别不是静态资源的,统统发送到后端tomcat
          location / {
               proxy_pass http://127.0.0.1:8080;
               proxy_set_header Host      $host;
               proxy_set_header X-Real-IP $remote_addr;
               #default_type text/plain;
               #echo $host;
               #echo $remote_addr;
               #echo $proxy_add_x_forwarded_for;
          }
    }
nginx单独访问静态页面,出现403的问题:
分析:没有读权限
解决方案:
当nginx和tomcat网站根目录一致的情况,注意nginx是否有权限读到tomcat网站目录的权限。
一般性解决方案,网站目录文件夹,赋予一个公共用户www
shell > cd /usr/local/tomcat
shell > chown -R www:www webapps
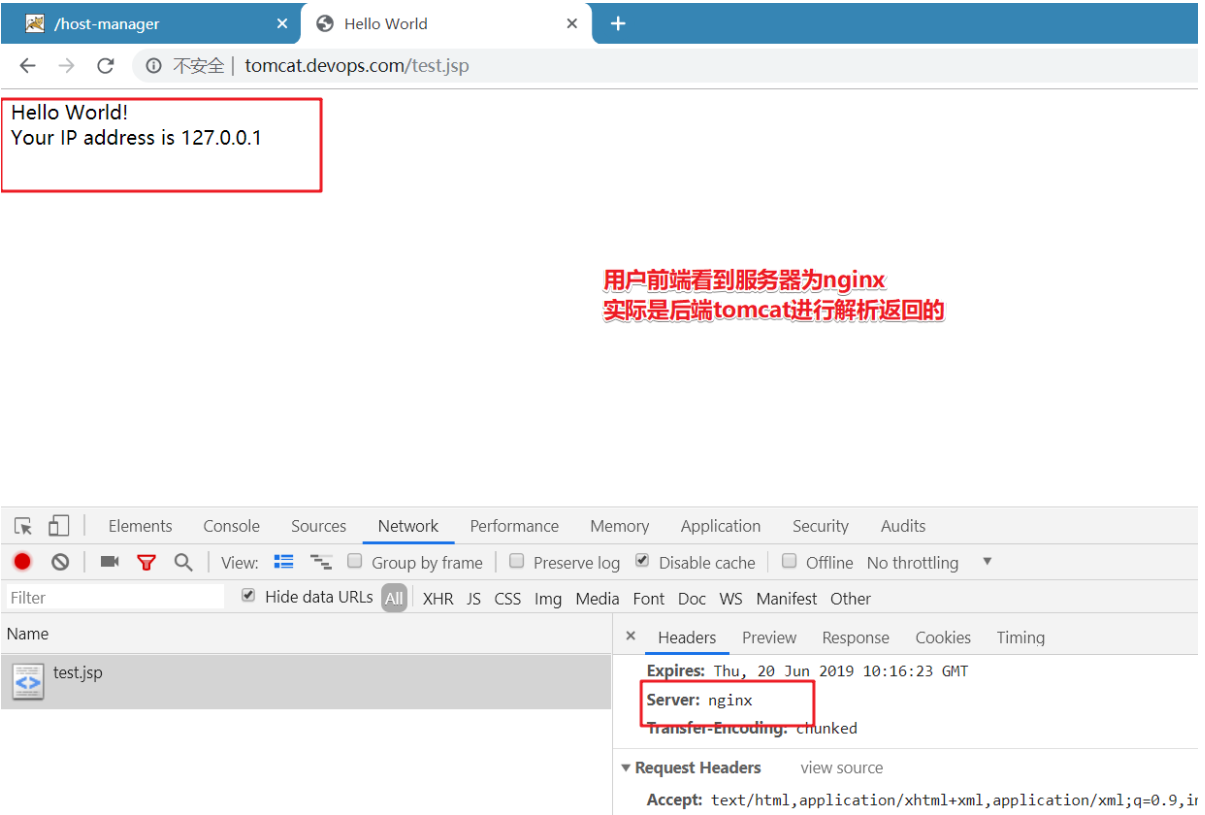
7、Nginx负载均衡
随着业务的发展,单实例服务已经不能够满足业务使用需要,单实例无法满足,扩容为多实例。
常见的业务运行方式:
单实例单应用 一个tomcat一个webapps
单实例多应用 一个tomcat多个webapps host
多实例单应用 多个tomcat同一个webapps
多实例实现方式:
①多台服务器一个运行一个实例(性能好)
②单台服务器运行多个实例(监听不同的端口,性价比高)伪集群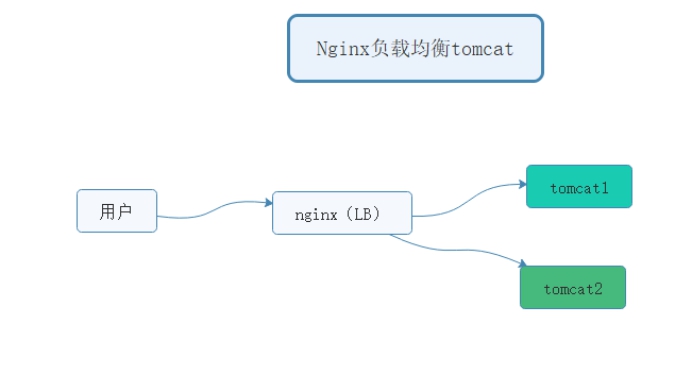
server01   nginx负载均衡
server02   tomcat1
server03   tomcat2
实施步骤:
①复制虚拟机,多实例
两台tomcat里项目里的内容要一致
在server02上配置和server03一样的实现:
1、建立项目文件夹目录,绑定host主机域名
2、nginx做反向代理
②配置nginx负载均衡
在server01上进行配置
upstream tomcat {
        #ip_hash;
        server 10.1.1.20:8080;
        server 10.1.1.30:8080;
    }
    server {
        listen 80;
        server_name tomcat.devops.com;
        location / {
           proxy_pass http://tomcat;
           proxy_set_header Host      $host;
           proxy_set_header X-Real-IP $remote_addr;
        }
    }

电商企业物流数字化转型必备!快递鸟 API 接口,72 小时快速完成物流系统集成。全流程实战1V1指导,营造开放的API技术生态圈。
更多推荐
 8
8 0
0- 0


 已为社区贡献1条内容

所有评论(0)